 There is something terribly awkward about waiting for the tow rope to lift you up onto your feet behind a boat. Tipping and floating back and forth like an ungainly fishing bob with nowhere to go. Often shivering - sometimes from the cold, sometimes in anticipation of the thrill thats yet to come. But it's always worth it... because once you get past the worst moment - the slack rope, the self doubt, the intense, balance defying pull - suddenly you are flying a cross the water, adrenalin coursing through your veins, eyes wide to the horizon, wind blowing through your hair and a huge smile pasted on both your face, and the faces of those watching... "you did it" ... and now you are living your best life, and enjoying the view as never before! For me this is a perfect metaphor for life, and the journey through anticipation, self doubt, the pull and intensity of a project, and finally- success in pursuit of that stunning view, wonderful moment and in my case perfectly executed renovation. It's the whole reason I dove into a multiple years long rescue of a historic lake house, which against all odds, I seem to be achieving in spite of more than one moment where I wondered if I could make the climb and keep my balance through it all! I am especially proud of my kitchen project because I did it completely myself from start to finish with the exception of Murray holding the upper cabinets in place for me to attach them to the wall, my friend Brenda joining me for one long evening to lay the floor and my electrician doing his usual thing which keeps me from taking myself to an early grave with misaligned wires.
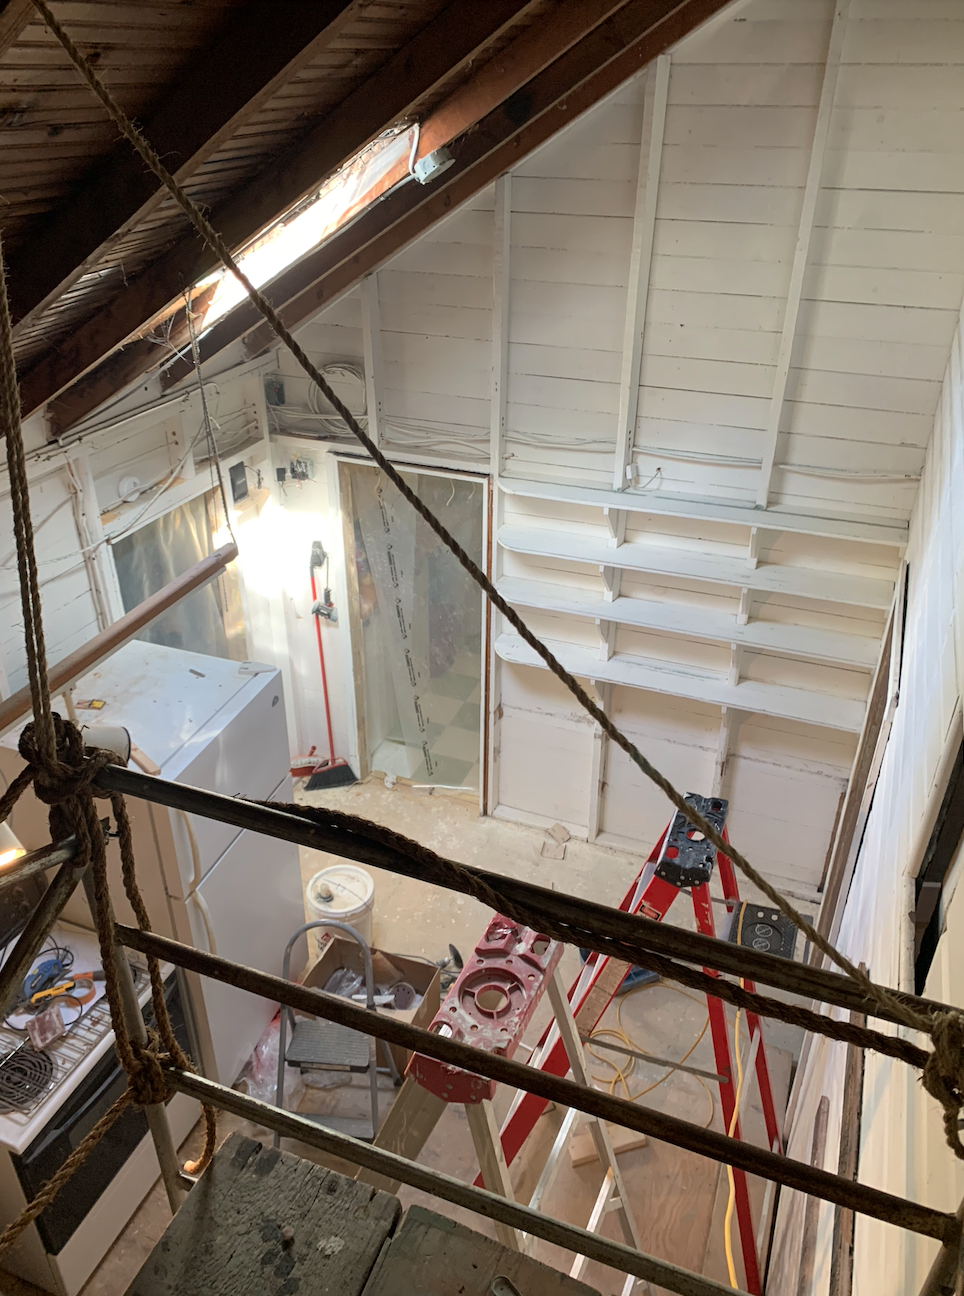
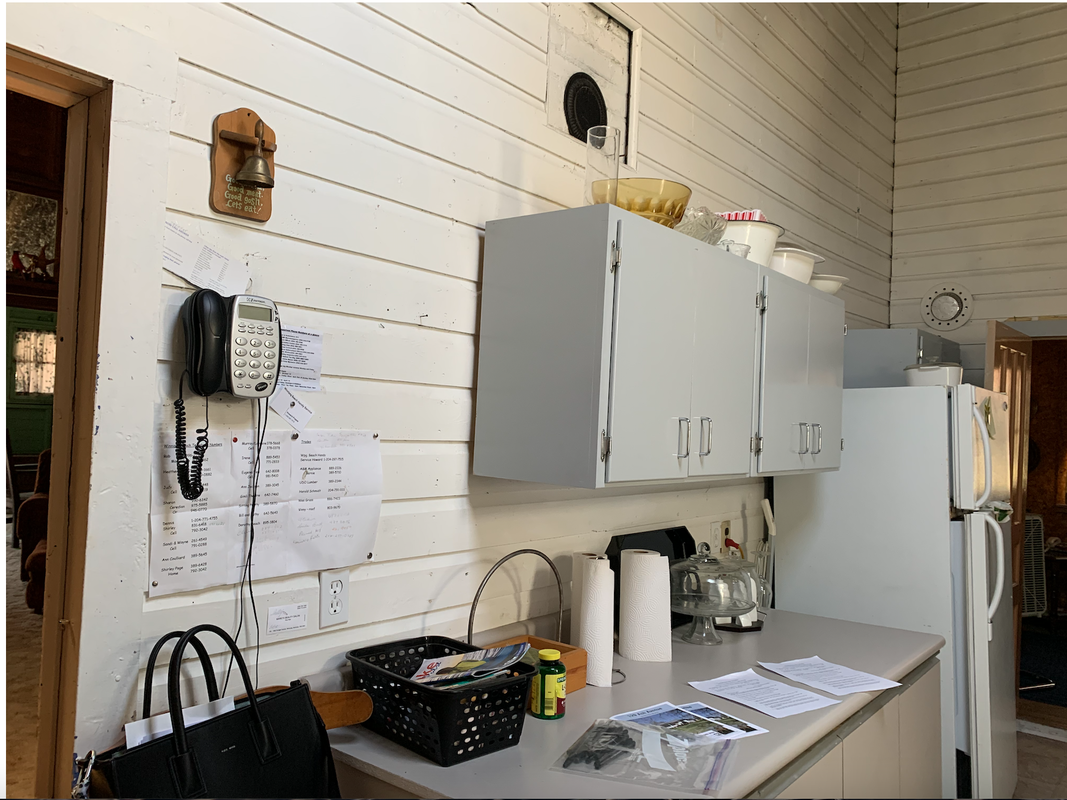
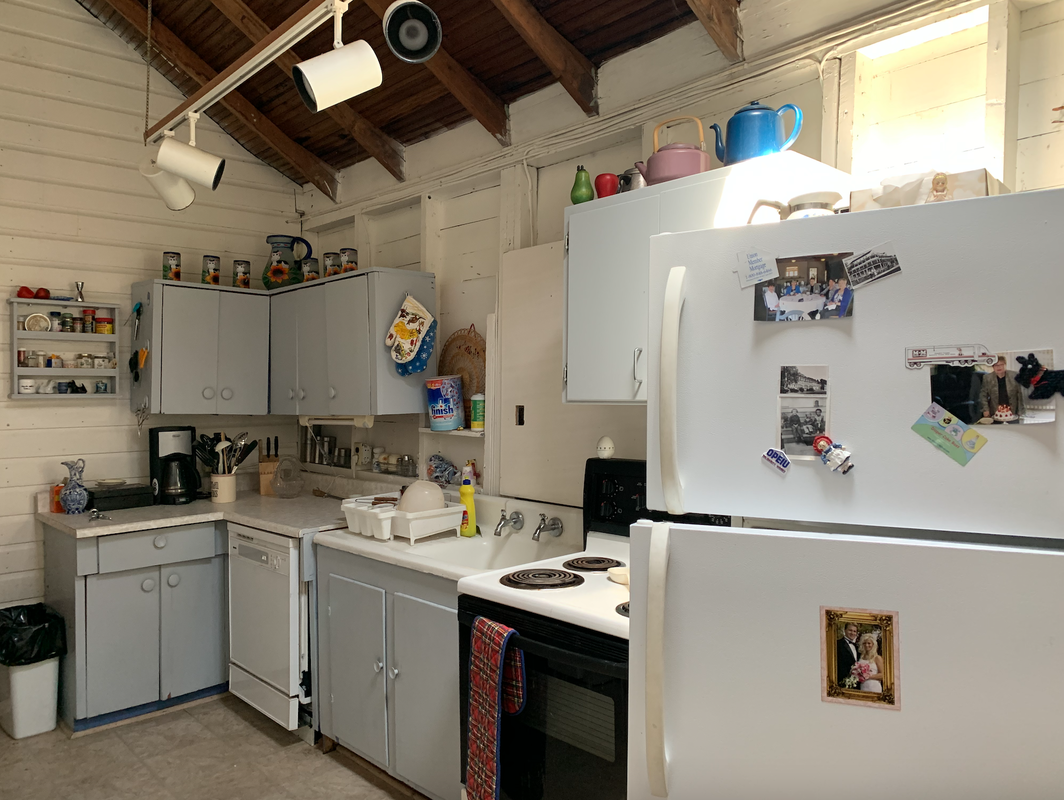
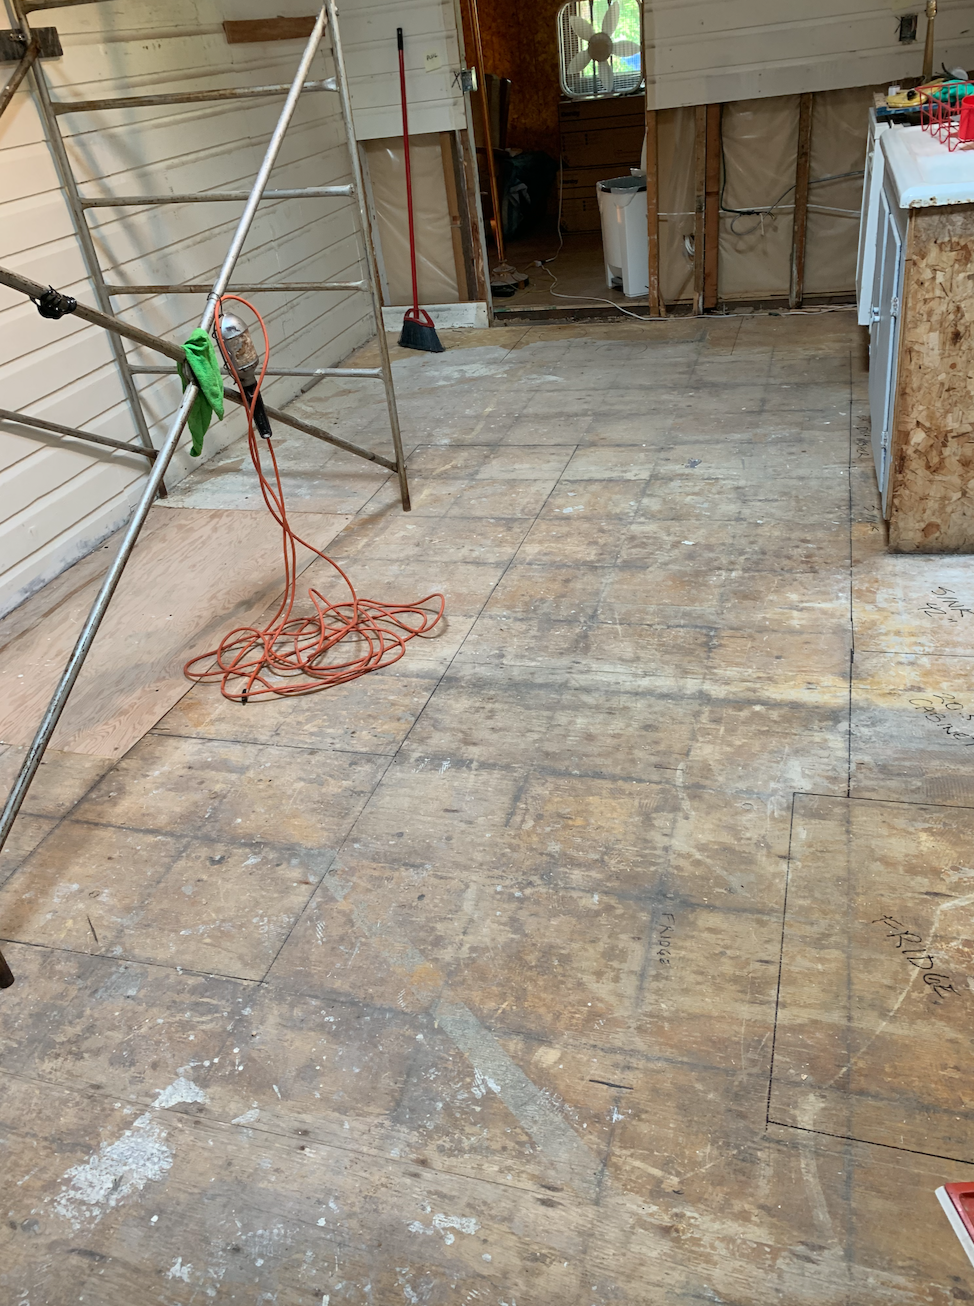
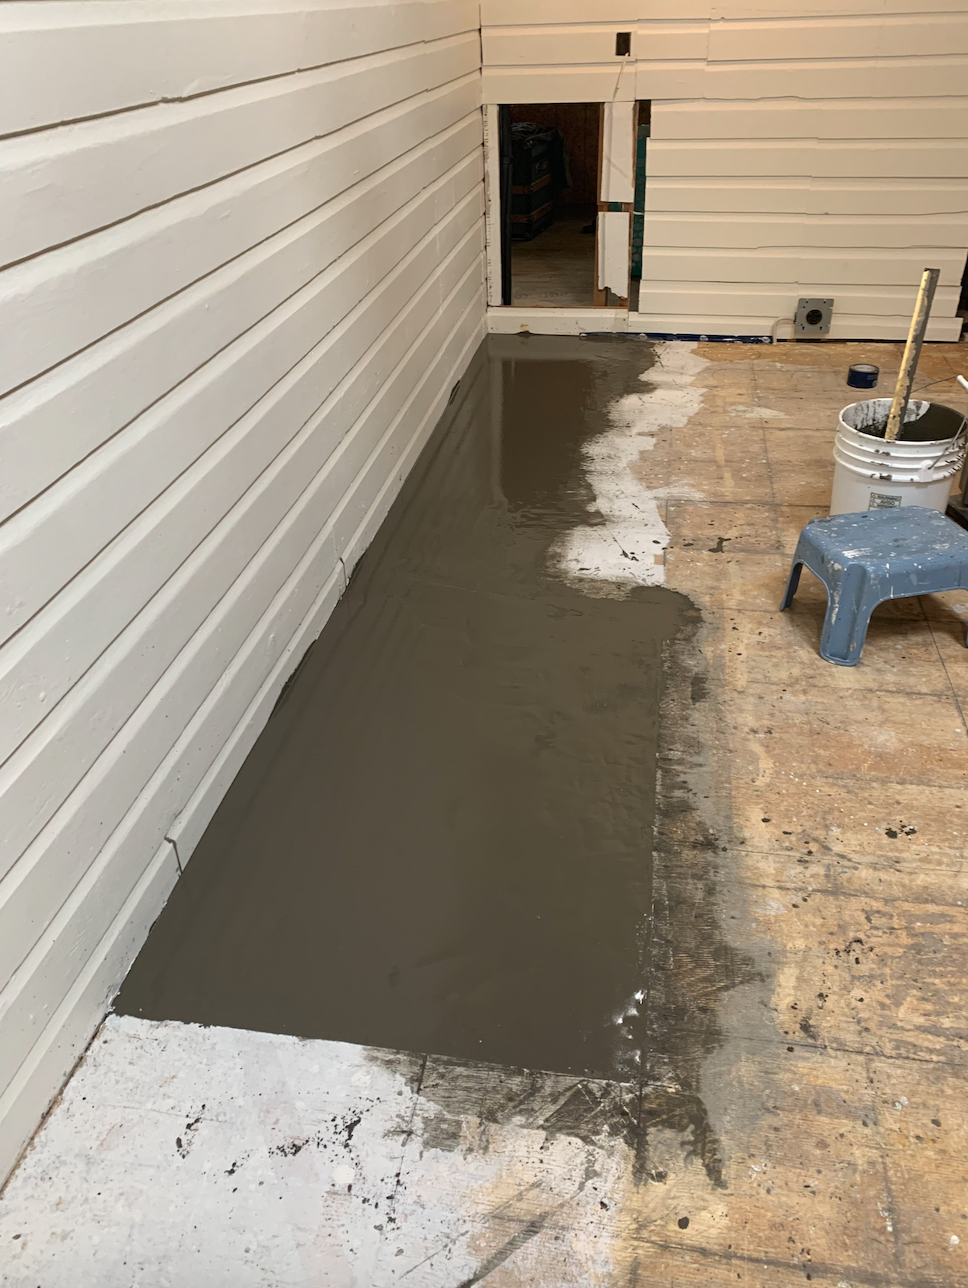
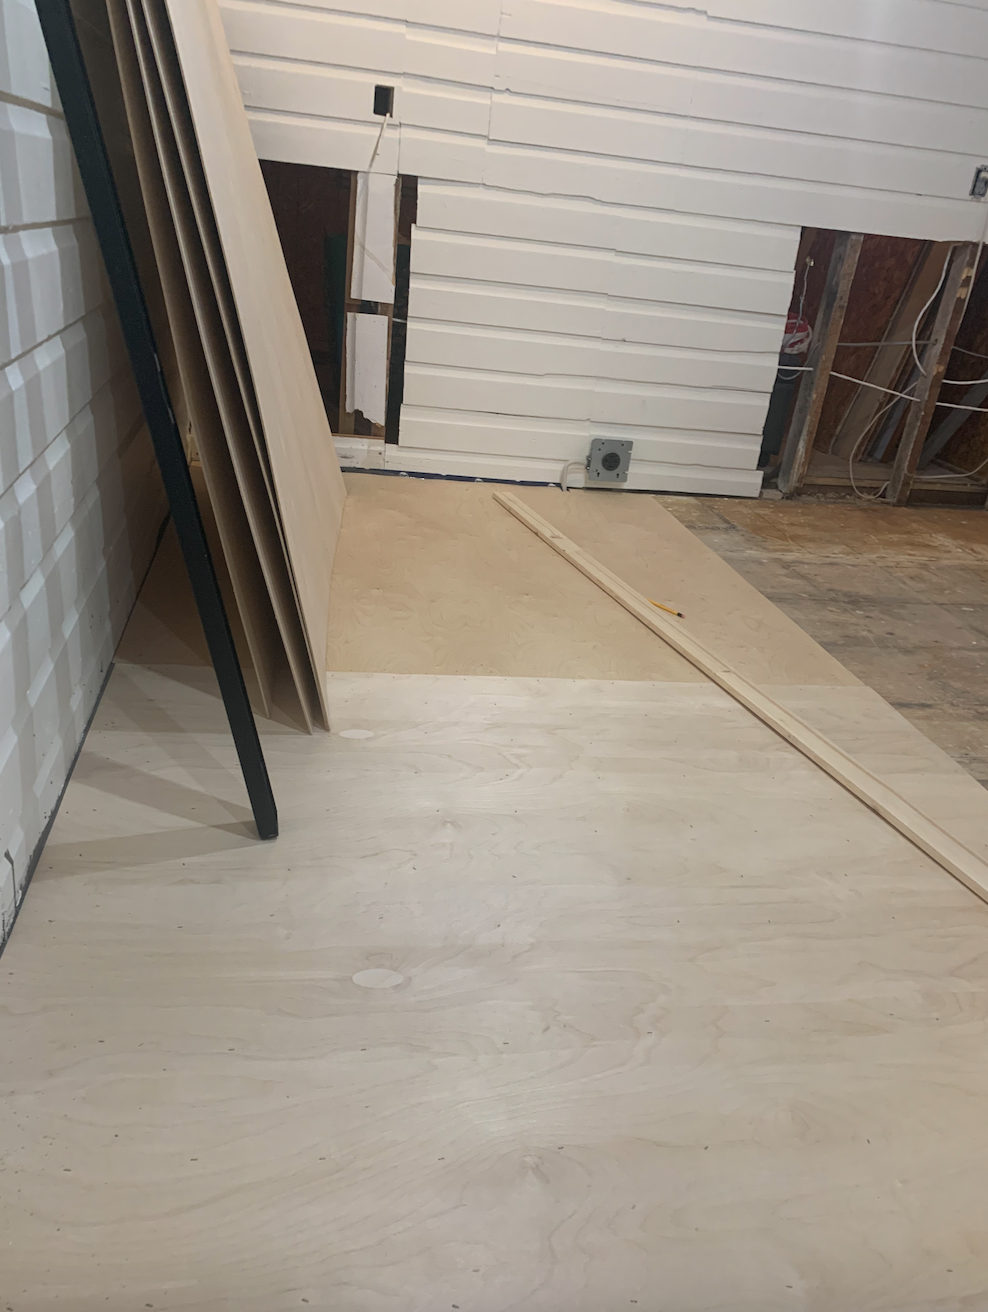
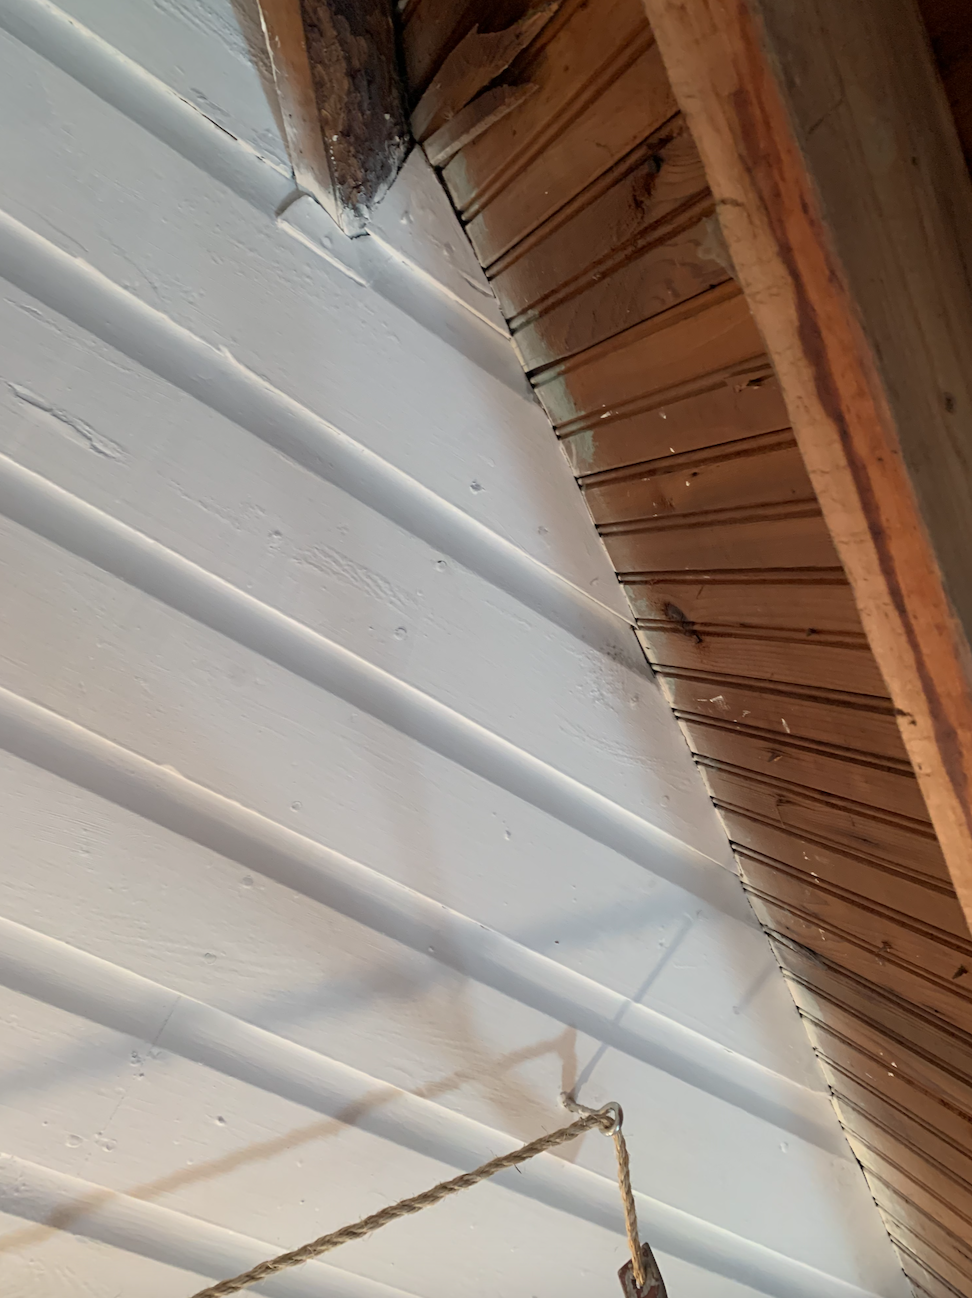
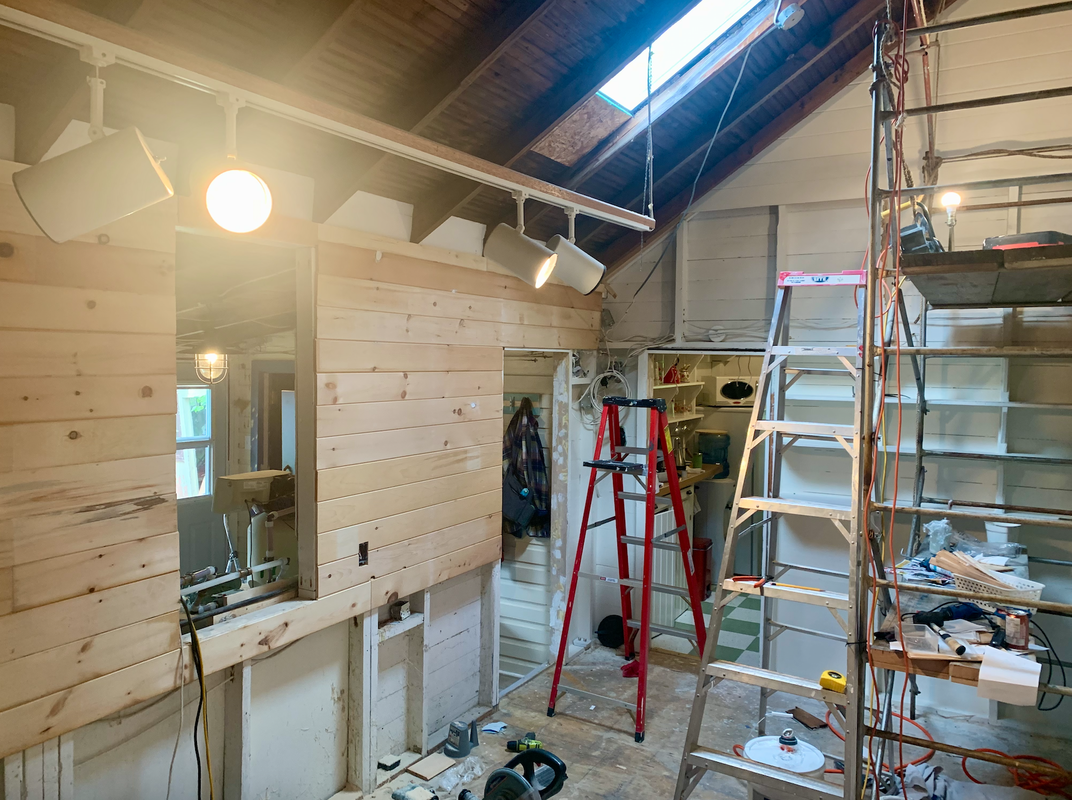
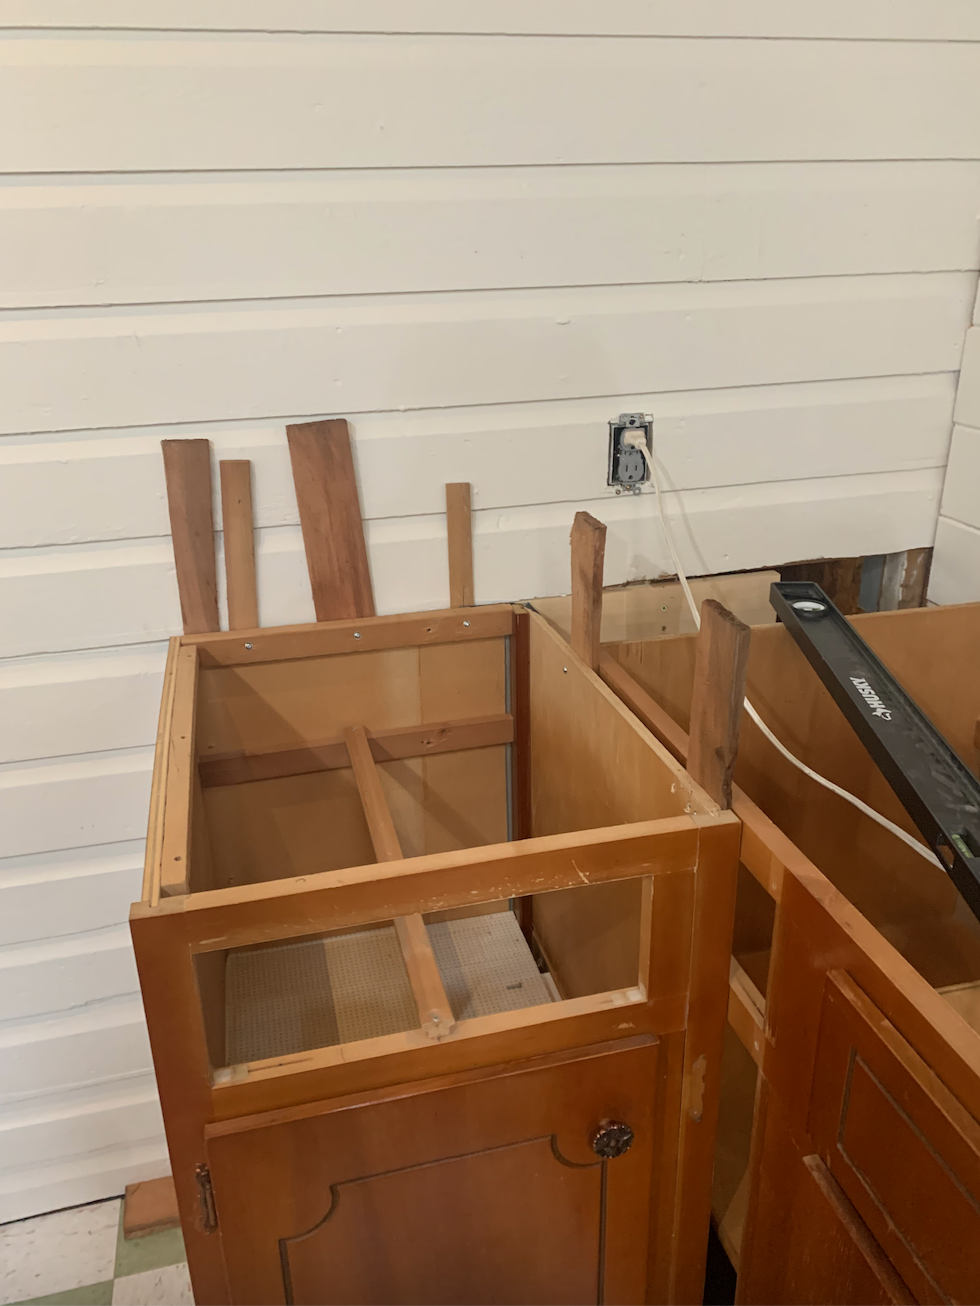
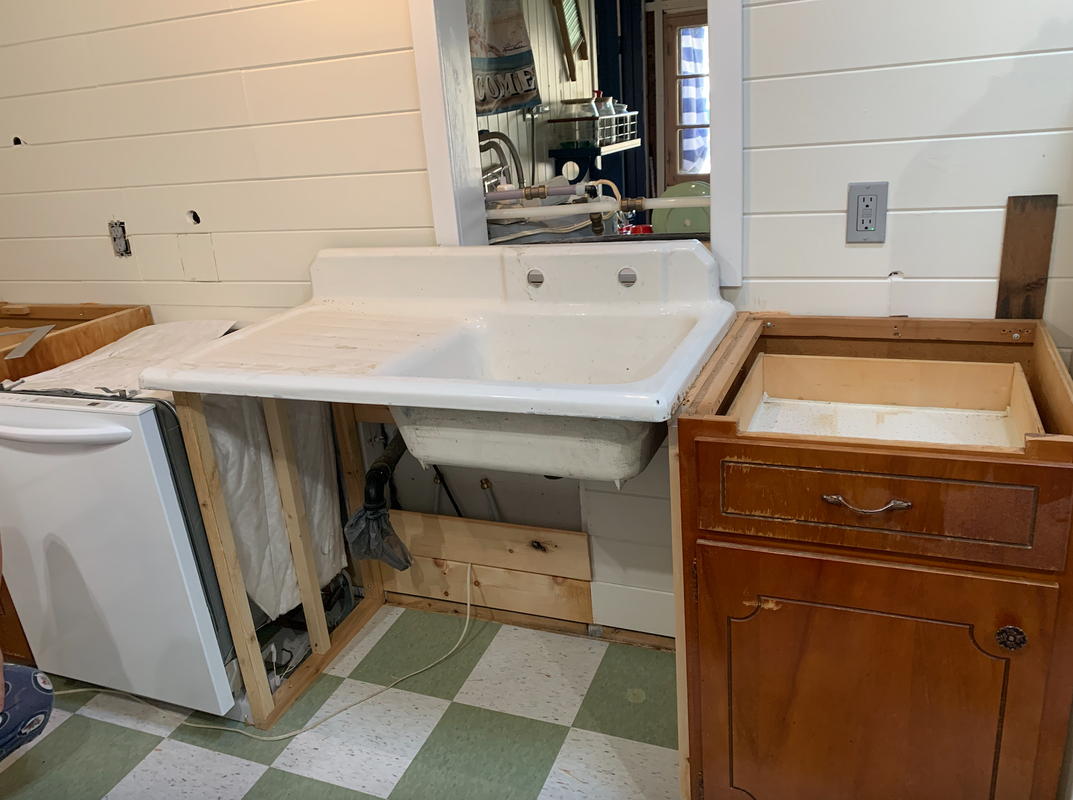
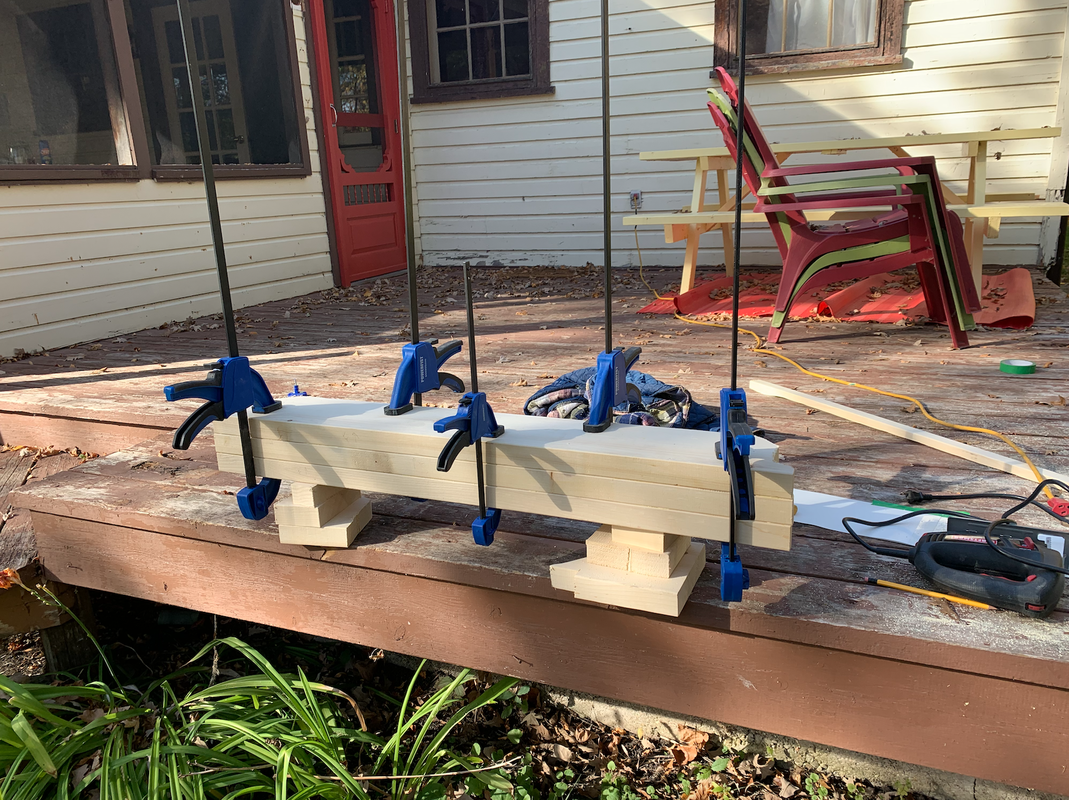
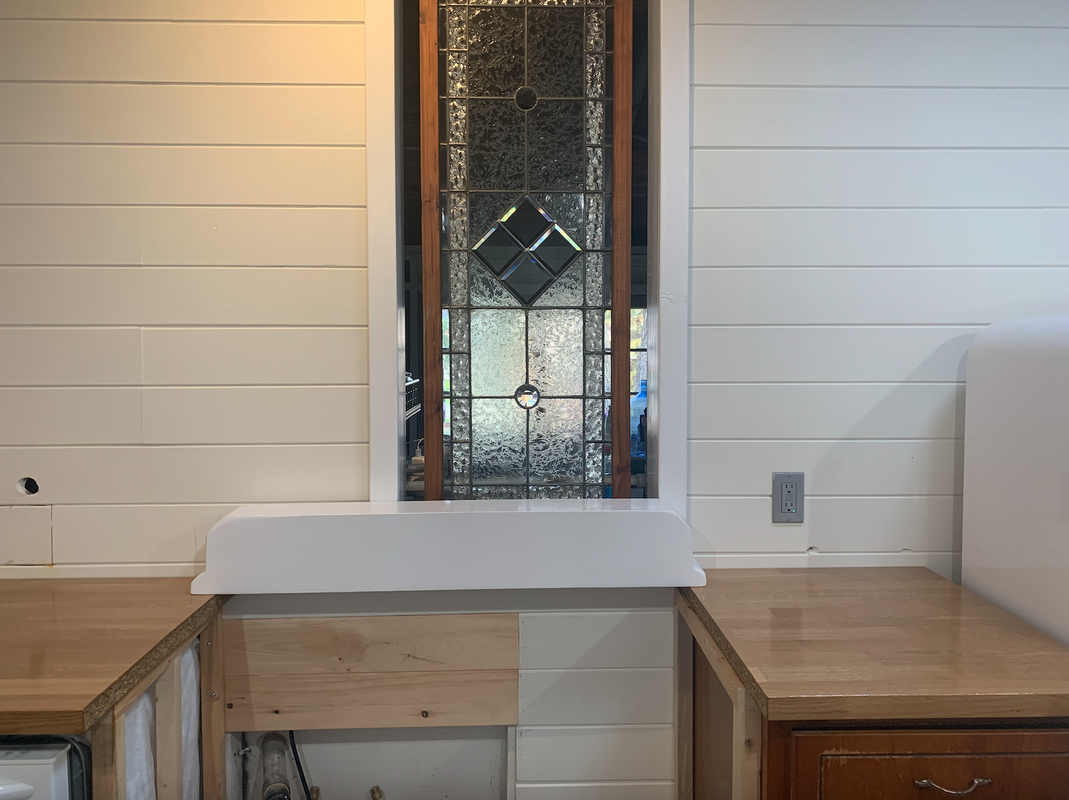
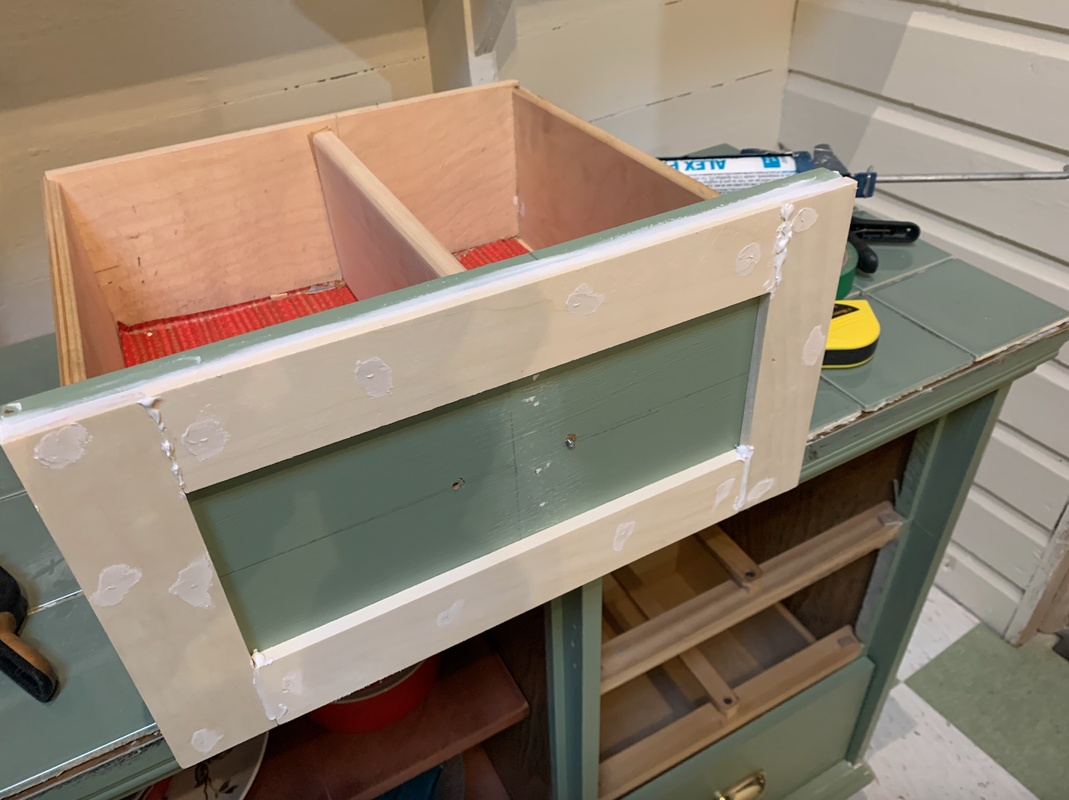
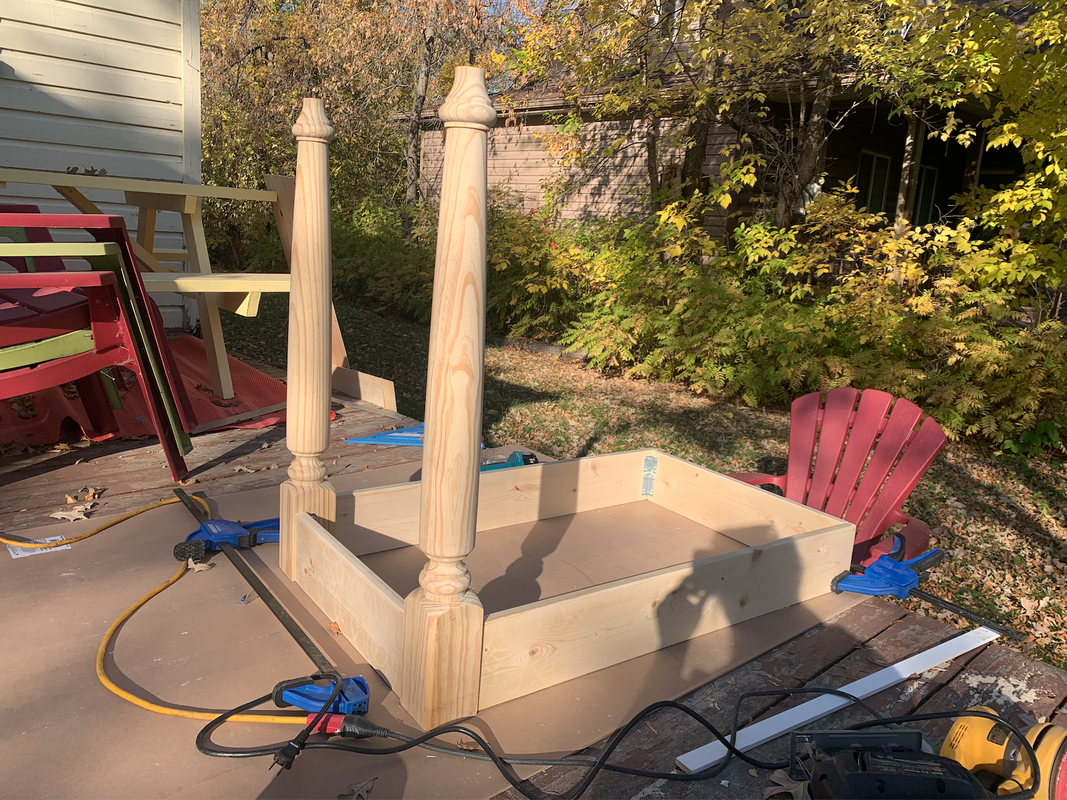
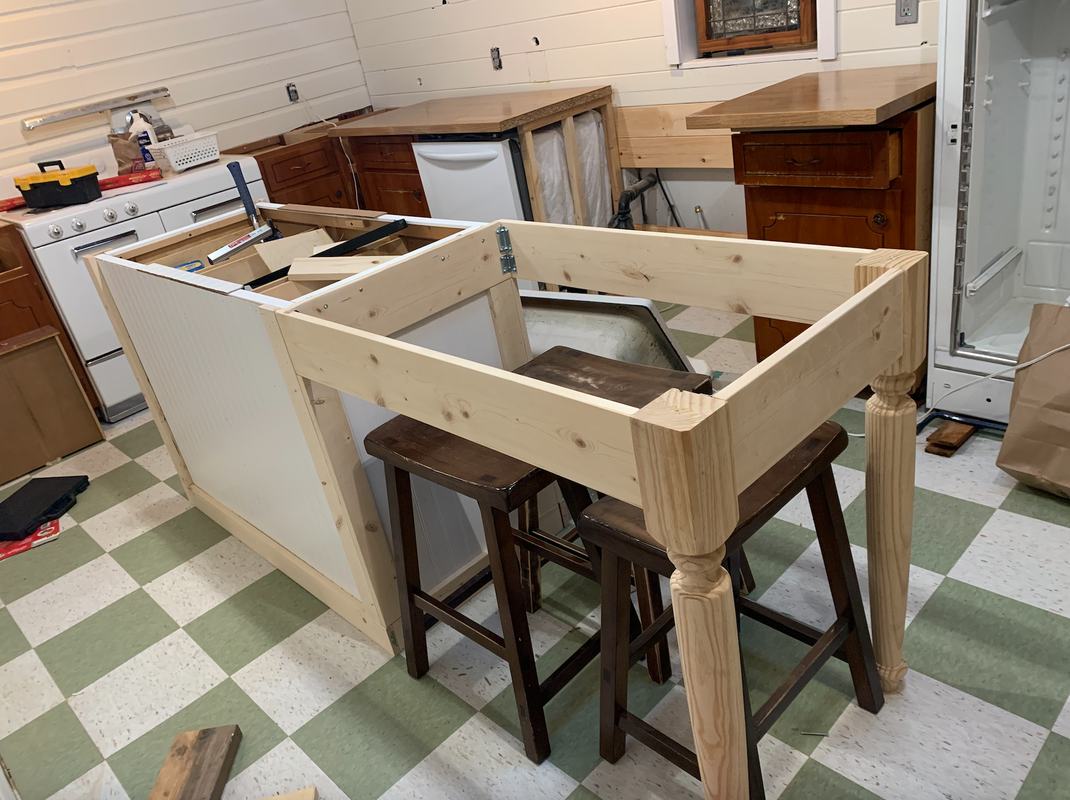
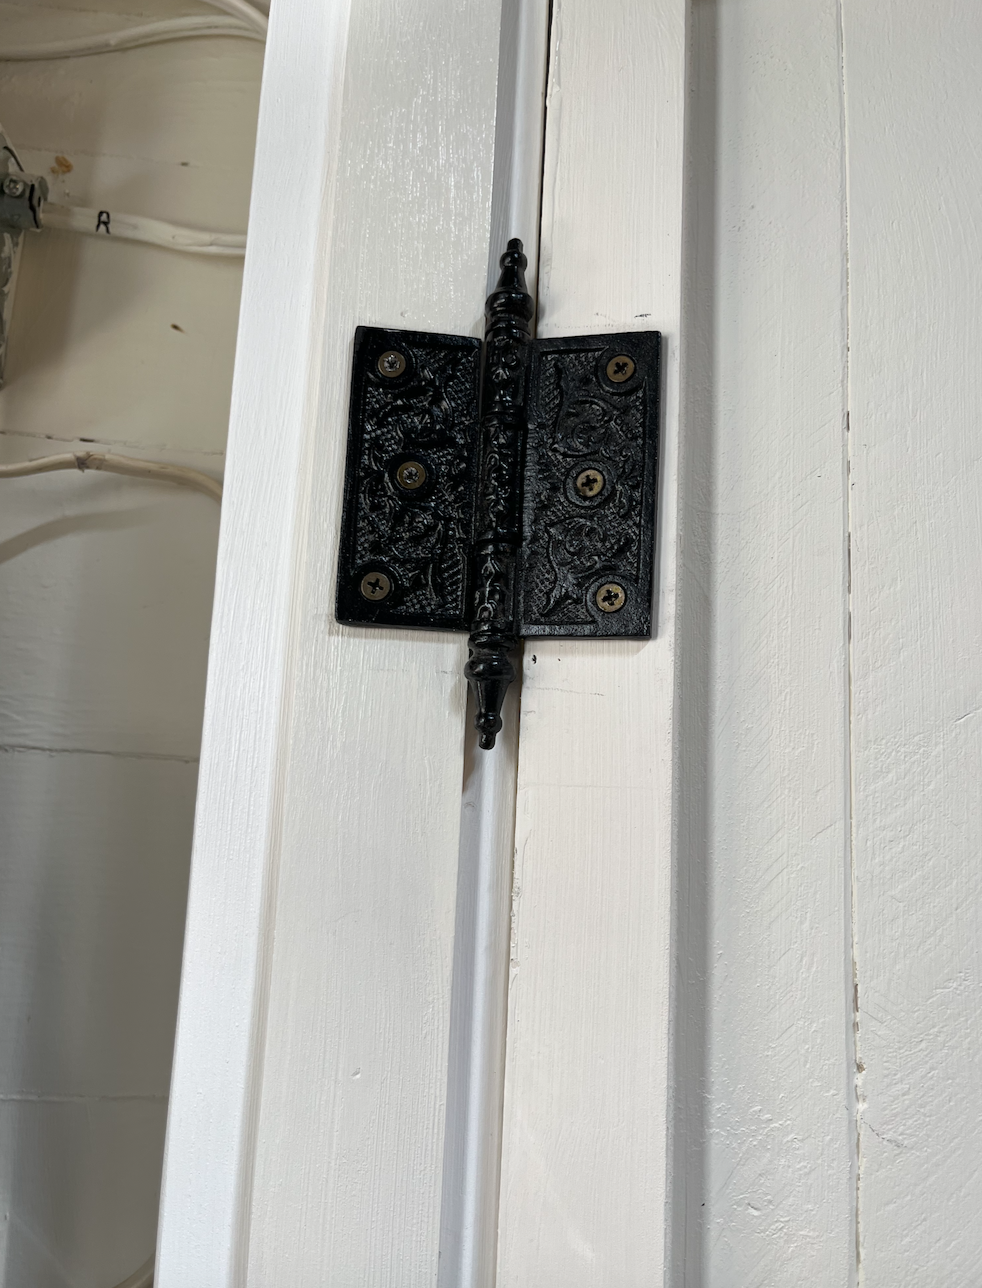
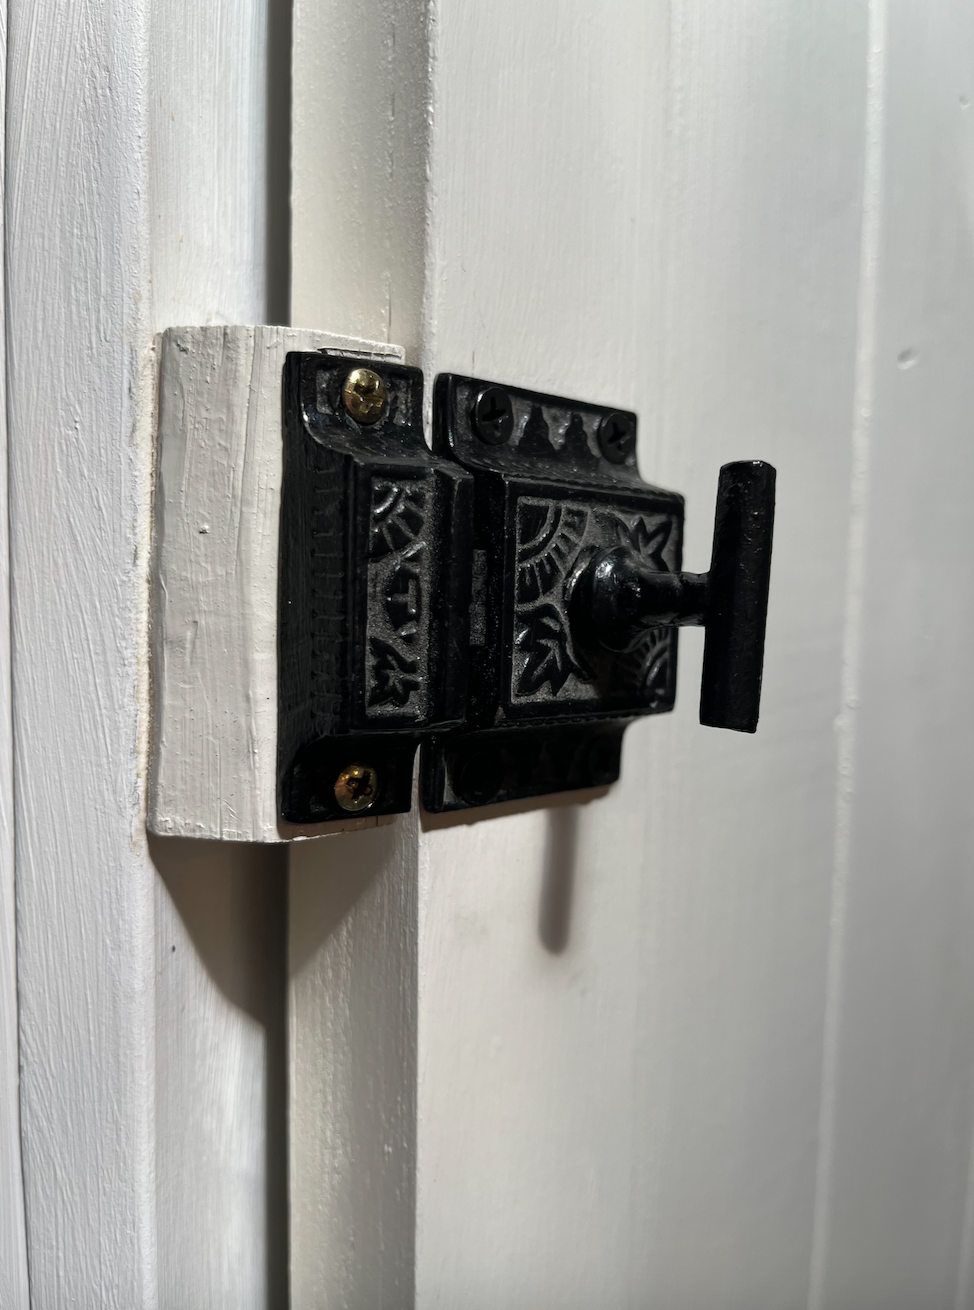
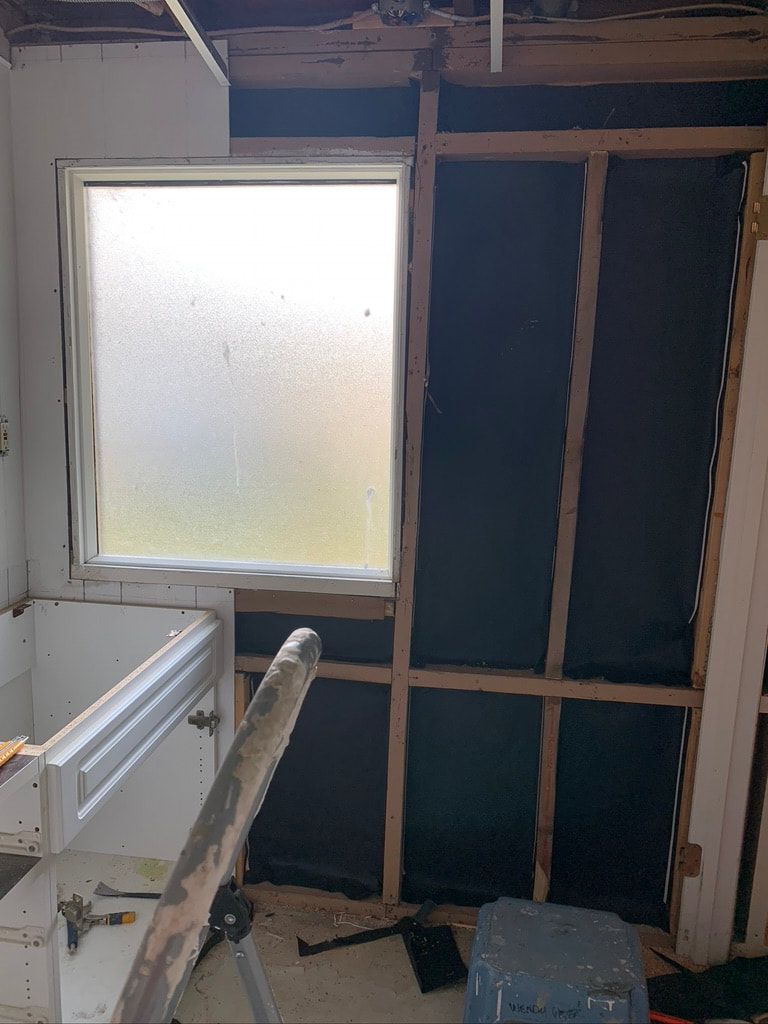
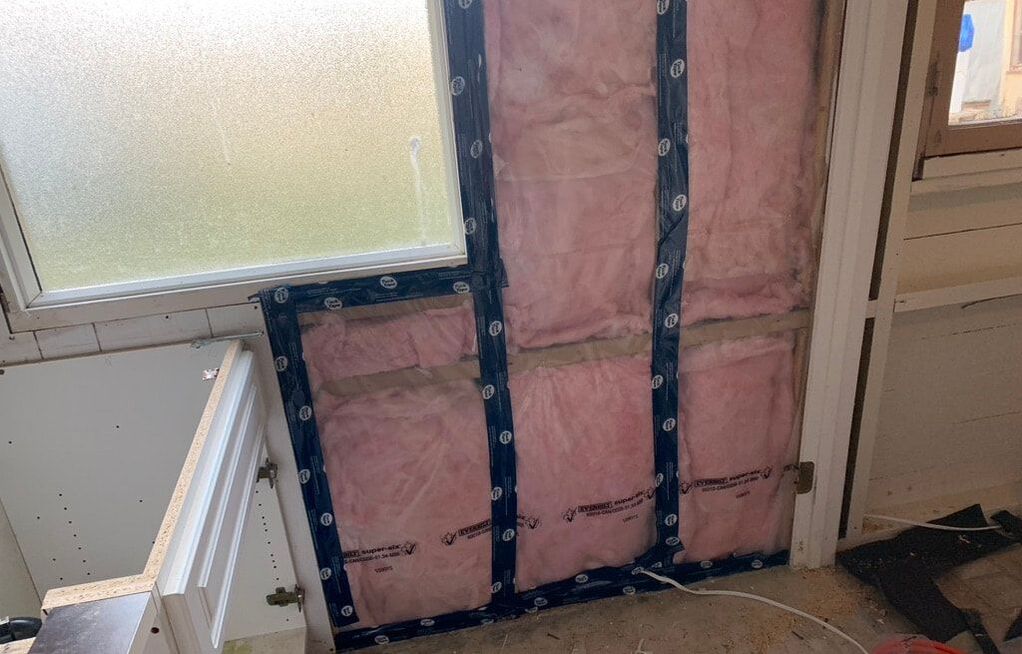
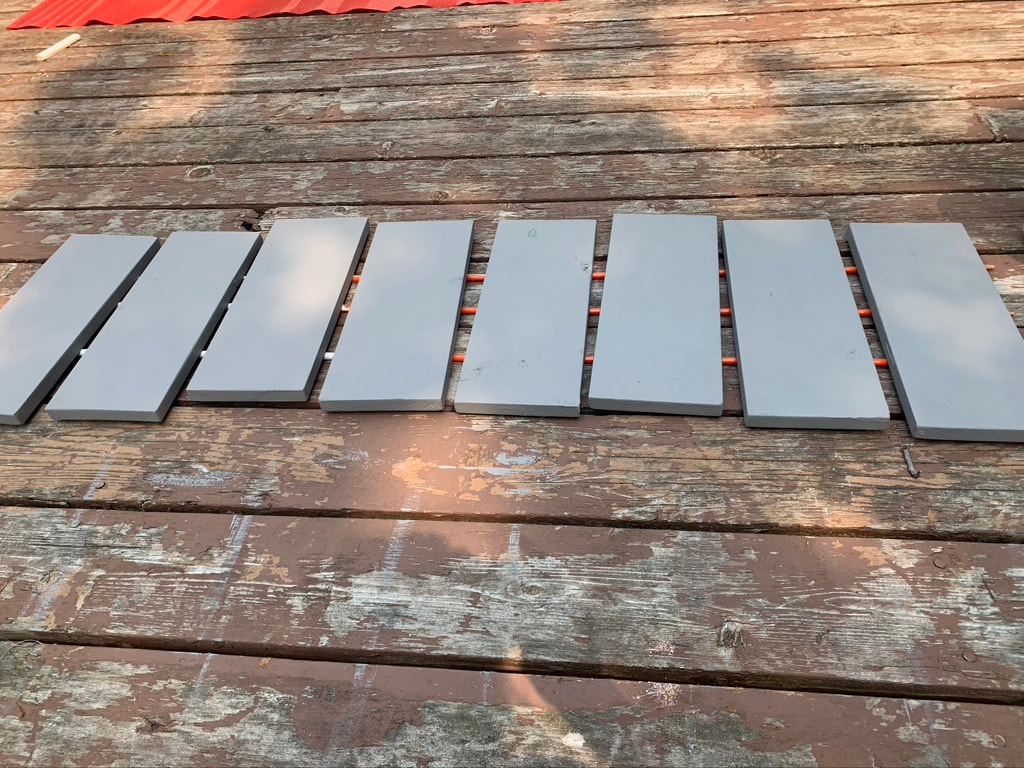
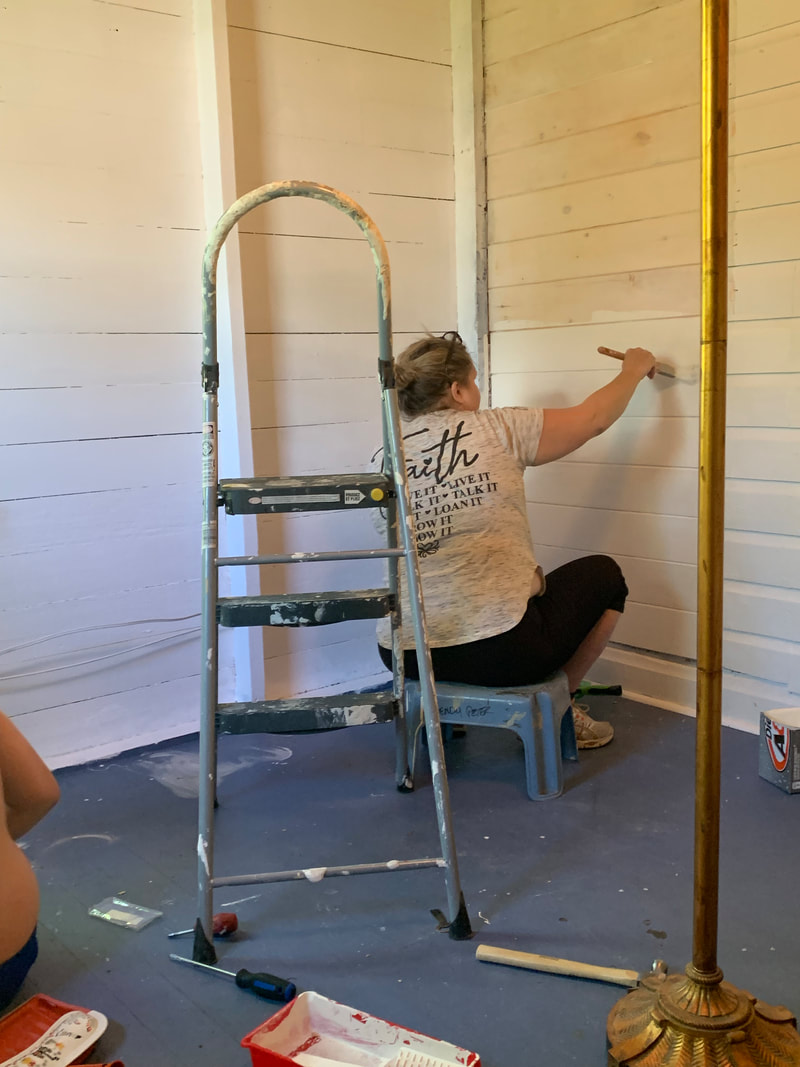
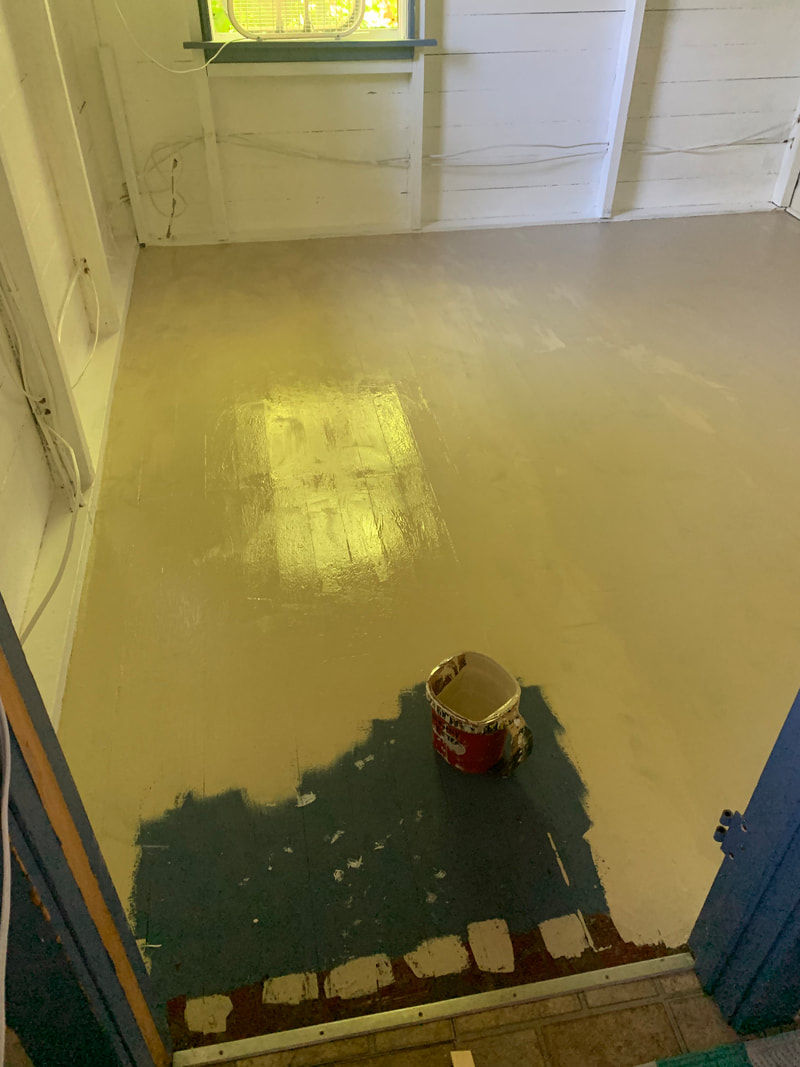
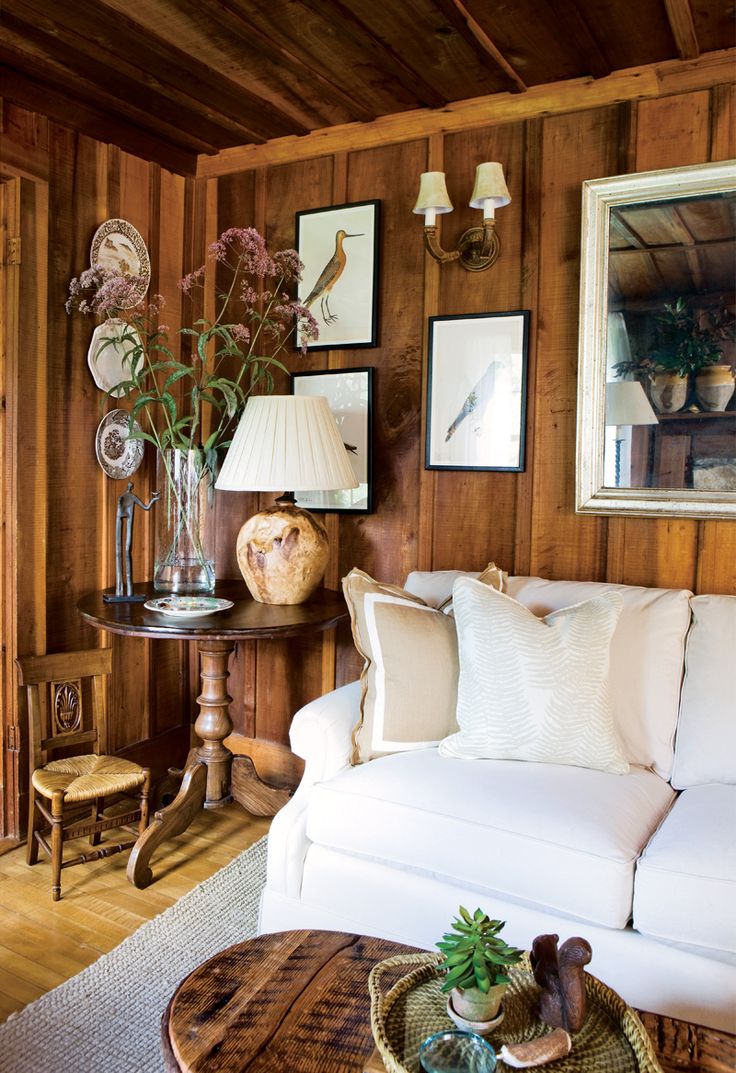
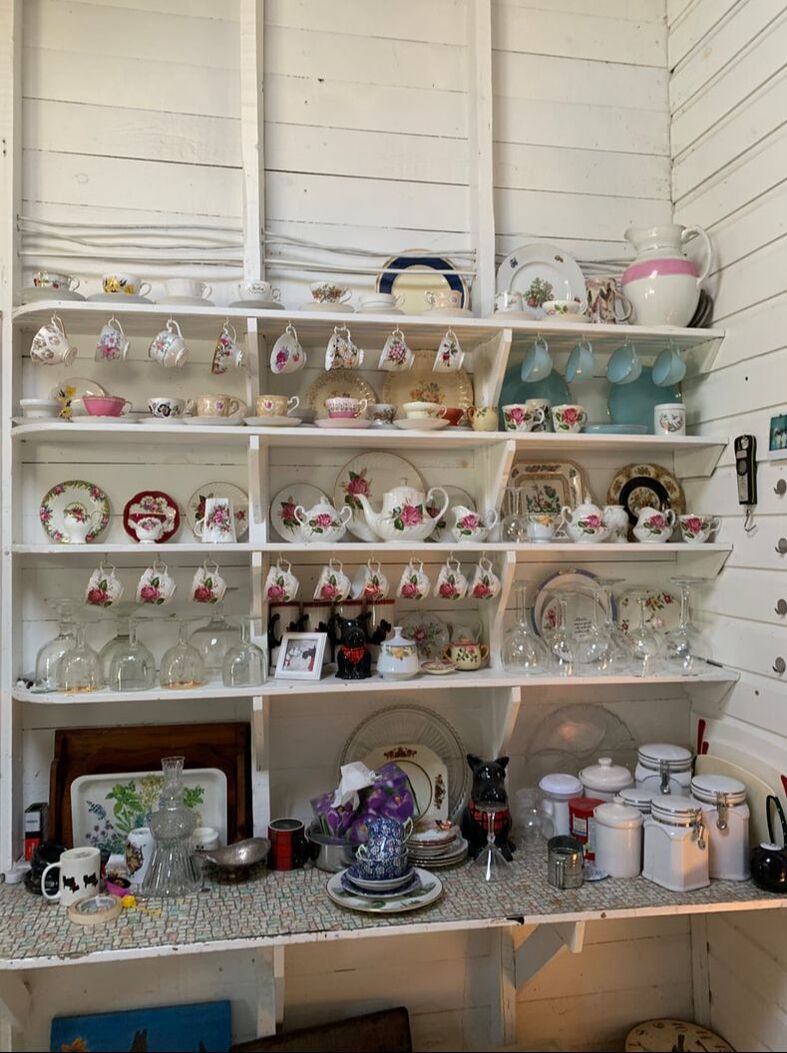
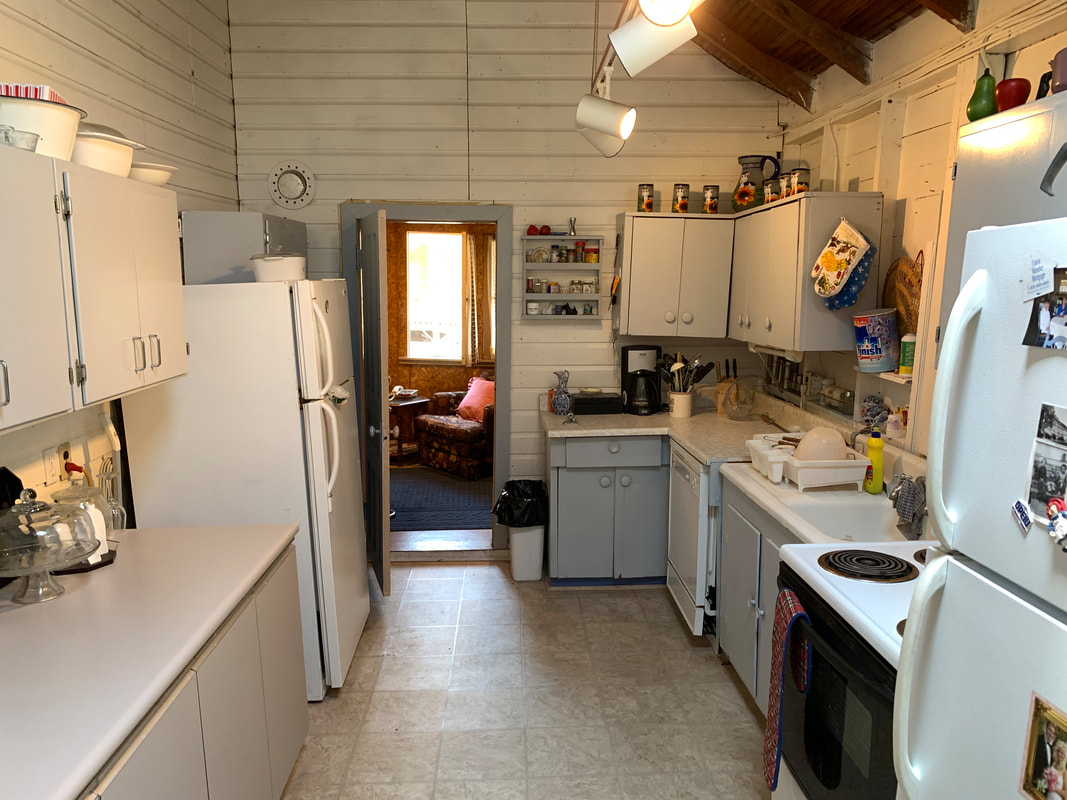
Although we had the cottage leveled there was still a dip in one corner of the floor. This was leveled and a new layer of subfloor added. Here is a before and after photo of the same wall once I restored the wood with a faux finish of the original wood color and graining. My friend Paul at Western paint helped me with this. He had his paint specialist scan a scrap of the original ceiling wood that I had, and they chose the darkest color and the lightest color. I painted over the messy spots of old paint with the lightest color and then feathered some graining in with the darkest tone. Once complete, even I can't see the touch up. The next job was to install new wood siding on all the walls that were still open studs. I decided to frame in a window opening above the kitchen sink since there were no windows in the kitchen at all. The windows had been closed in when the rear addition was added. My plan was to install a beautiful leaded glass window on chains above the original 1923 farm house sink, which was the only item I saved from the old kitchen. I had to build a back piece for the sink to bring it out forward of the counters, which was the look I wanted. I accomplished this by tracing the back of the sink and laminating three layers of 2x4 together to form the backing. This not only solved the issue with the sink depth, it created a nice shelf behind the sink for plants and soap. For the cabinets, you will notice that I recycled some old 60's cabinets. My plan was to flip the doors around and add a wooden two inch wide lip edge to look like old shaker style cabinets. I wanted the kitchen to look like it had always been there, so brand new cabinets would not look right. Besides that I get a lot of joy out of the creativity required to bring old things back to life. I have already owned a very large, custom home and while that too was beautiful, the journey with this cottage is more hands on and the goal is that the kitchen and other rooms look timeless when complete. Here is a photo of the wood edge I added to the cabinets and drawers, and some photos of the island I built out of two legs from LOWES, an old bottom cupboard, some bead-board and trim. The rest of the photos show the "after" shots of my kitchen makeover which include a restored 1948 Frigidaire stove, 1952 Philco fridge, wood countertops from IKEA and real tin back-splashes. I even built my own broom closet to look like it had been there since 1910 with reproduction cast iron hinges and latch in the Eastlake style. Nautical pendant lights were found at a thrift store for $8.00 each, and stools I already owned were painted vintage red for an accent color. My paint color is Benjamin Moore Estate Sale on the cabinets, and you can now see how my recycled, tacky 1960s cabinets have been remade as beautiful vintage styled units. I also like to mix old and new dishes together, and I love the contrast of the vintage reds and greens on the old plate wall which brings it back to life! I added a working vintage toaster, a restored bread box, and red 1950s cooking utensils just like your grandma had. And for just the record ... nothing is purely decorative. We use everything in the kitchen every day from the vintage copper pots to the old cottage style china. 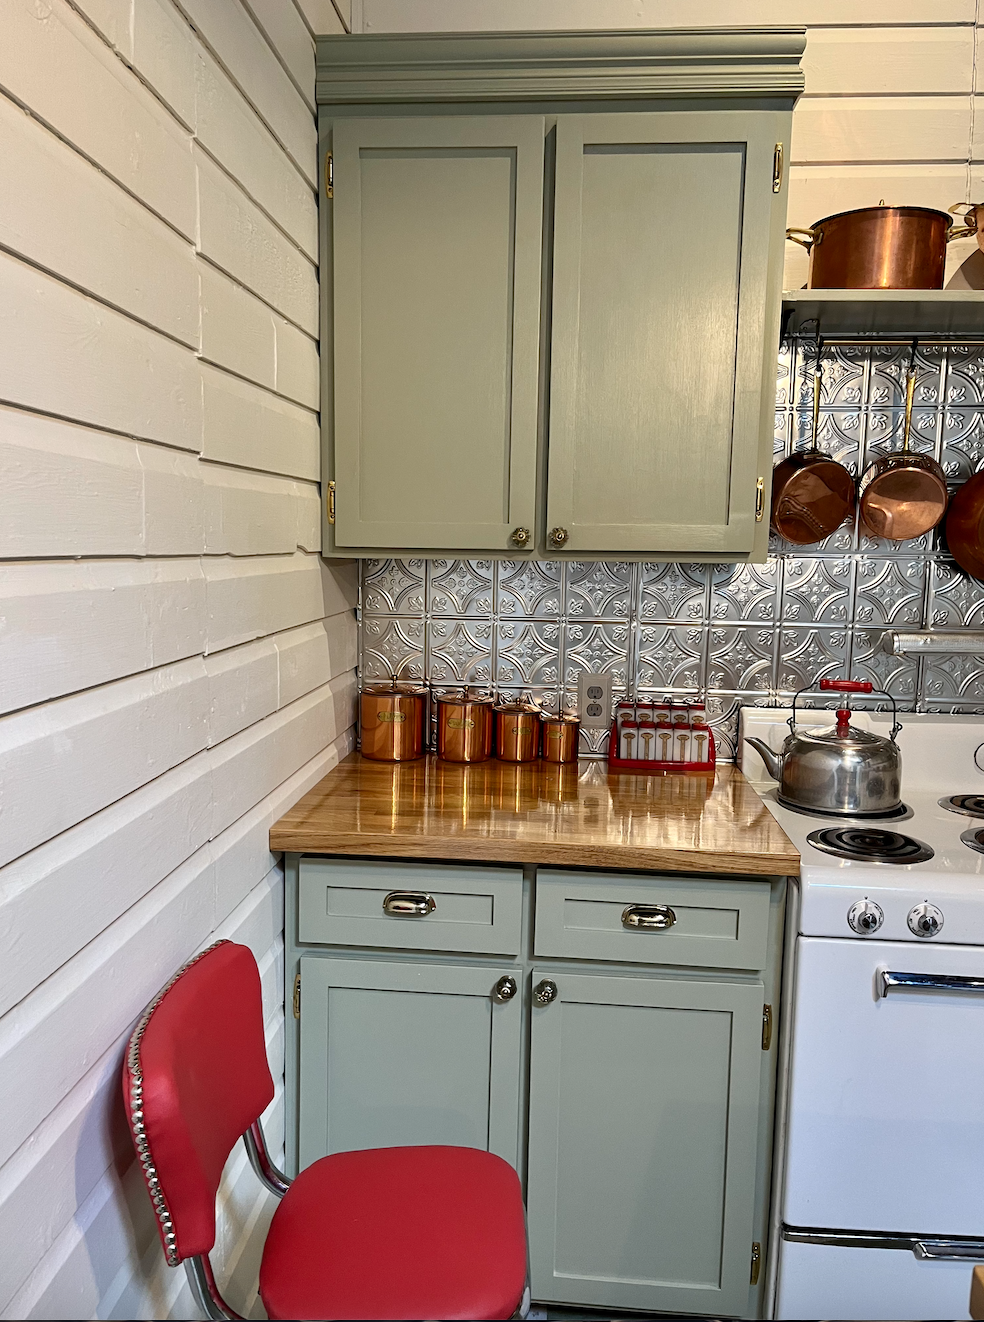 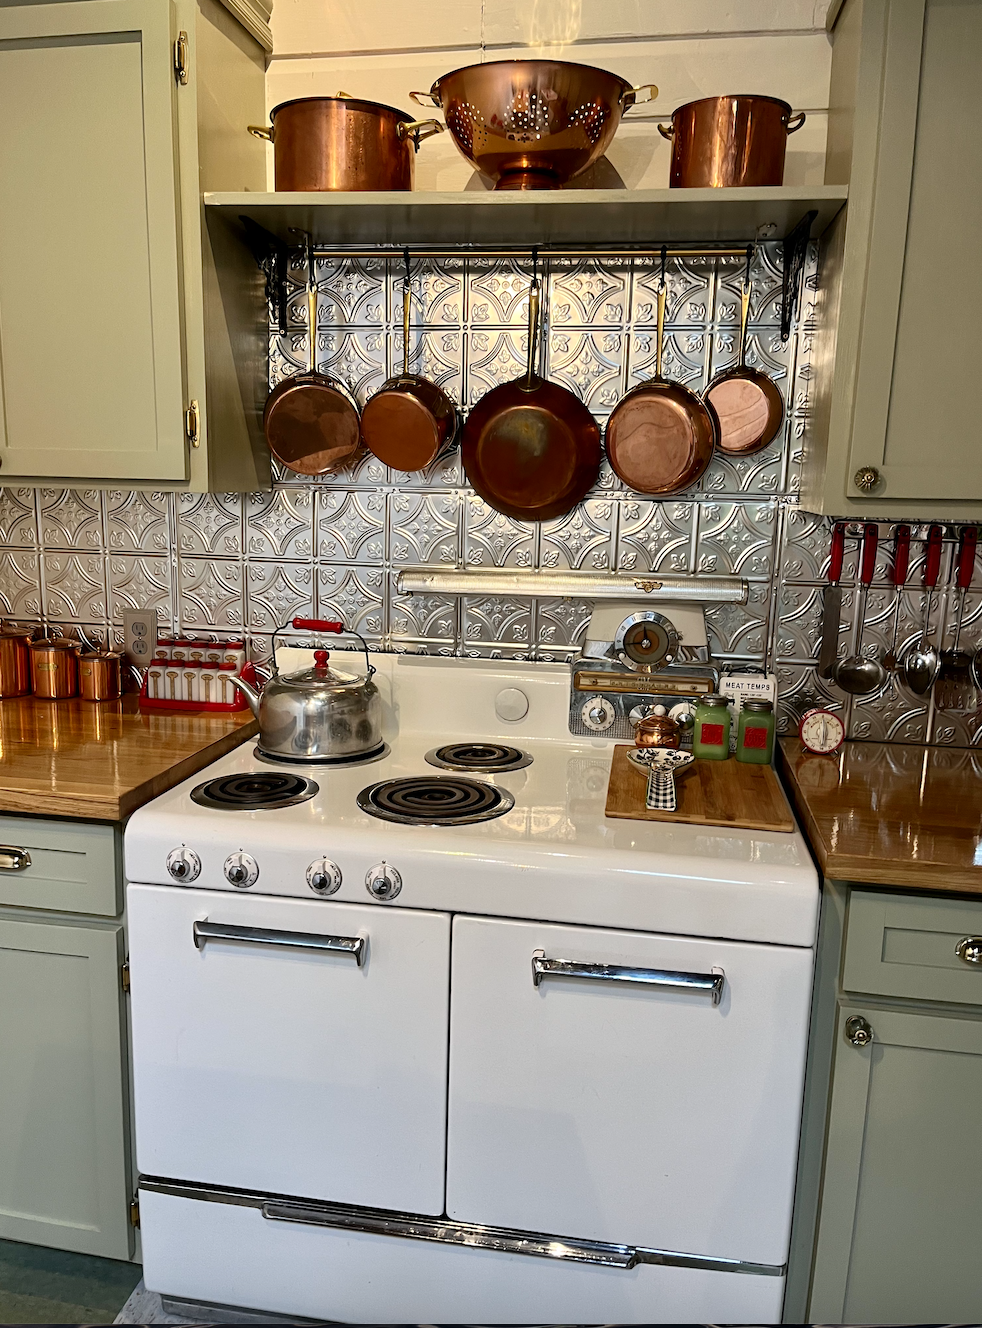 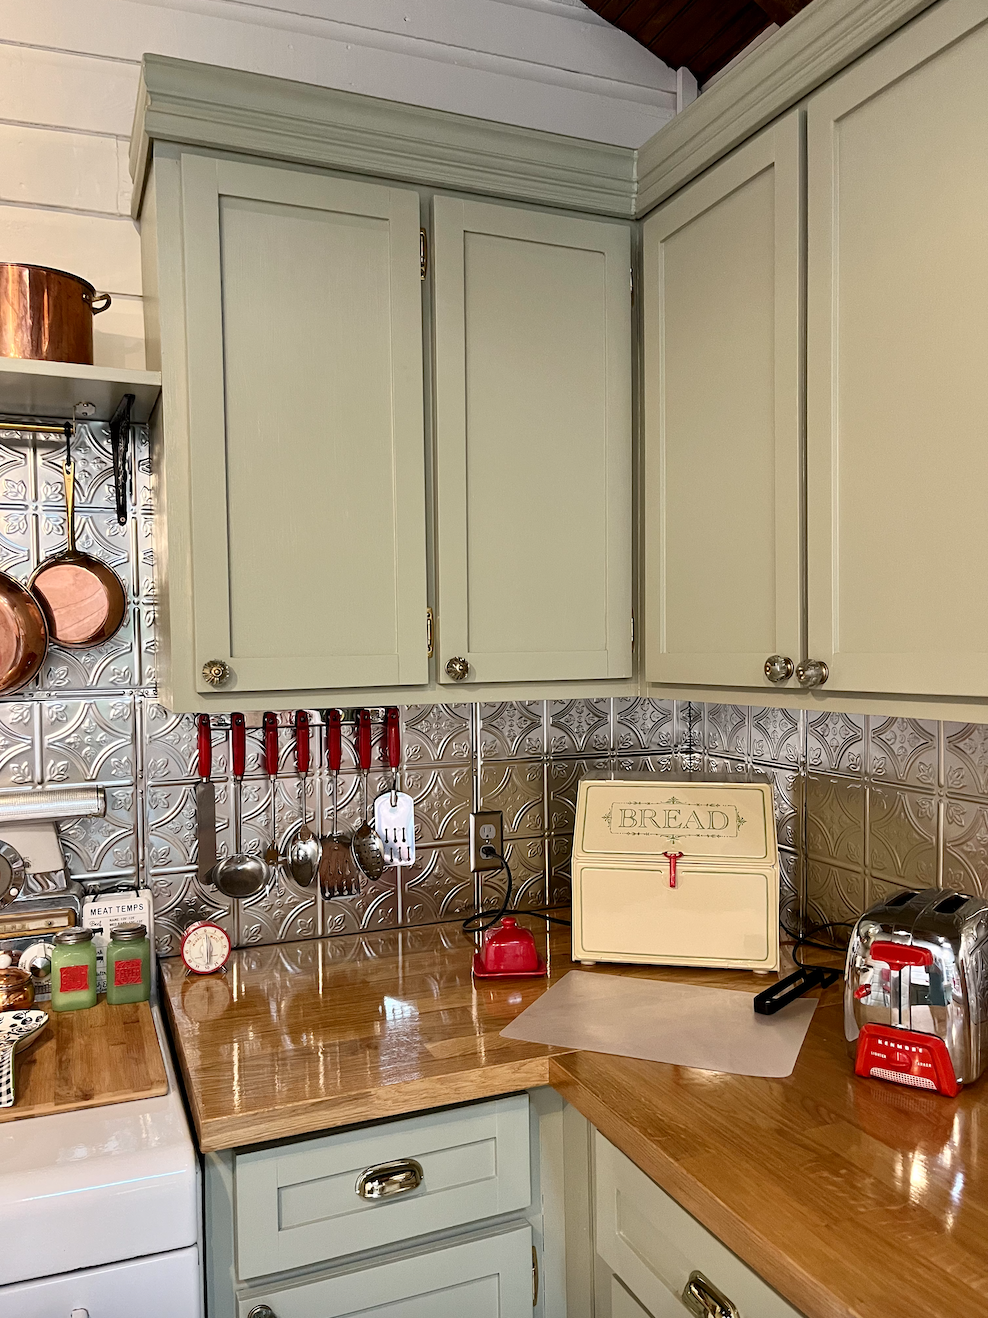 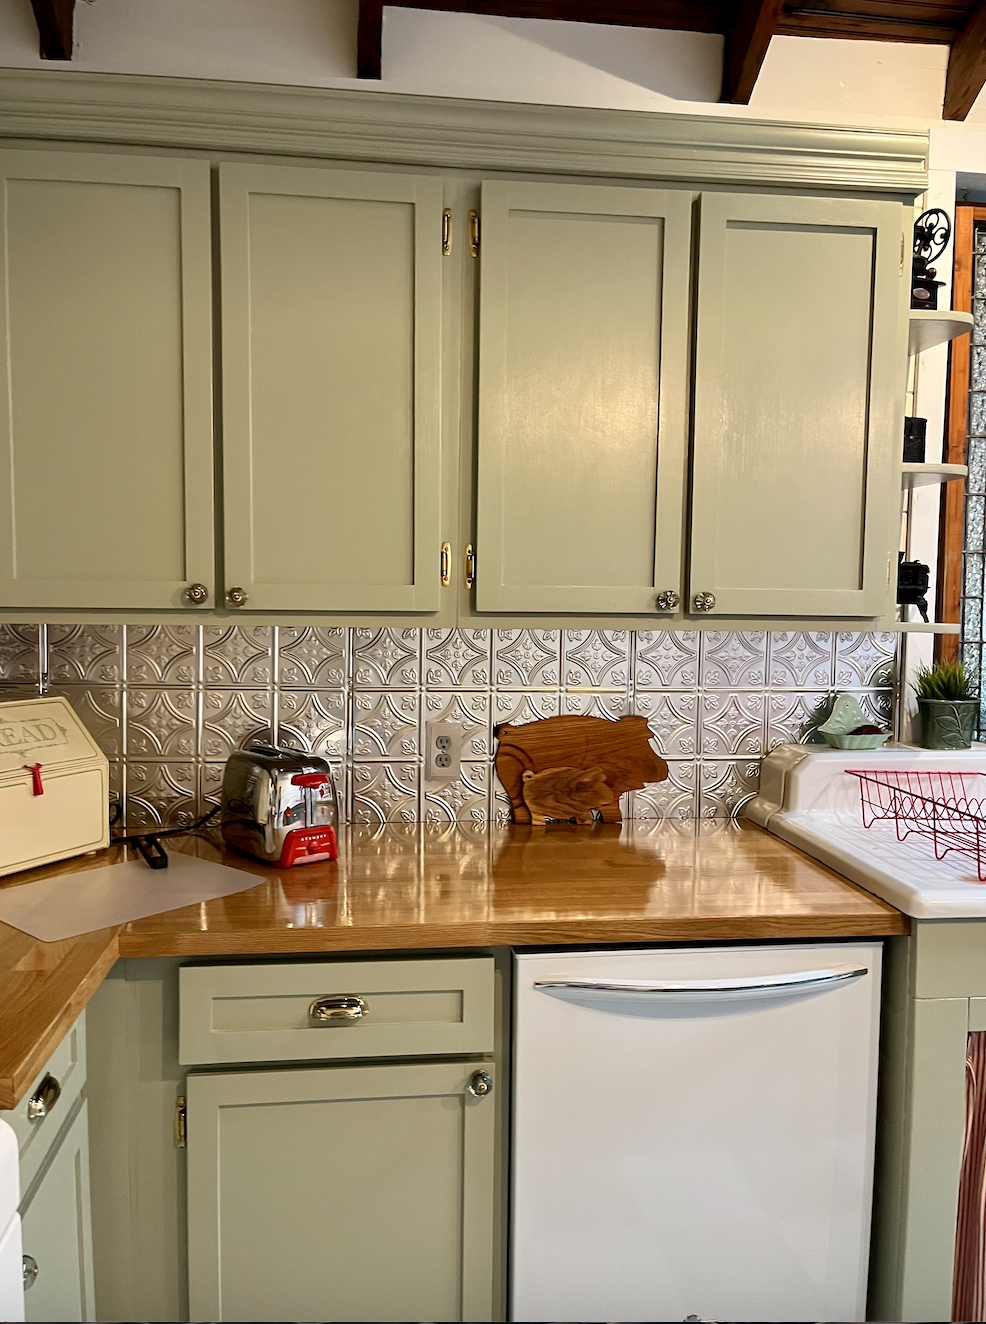 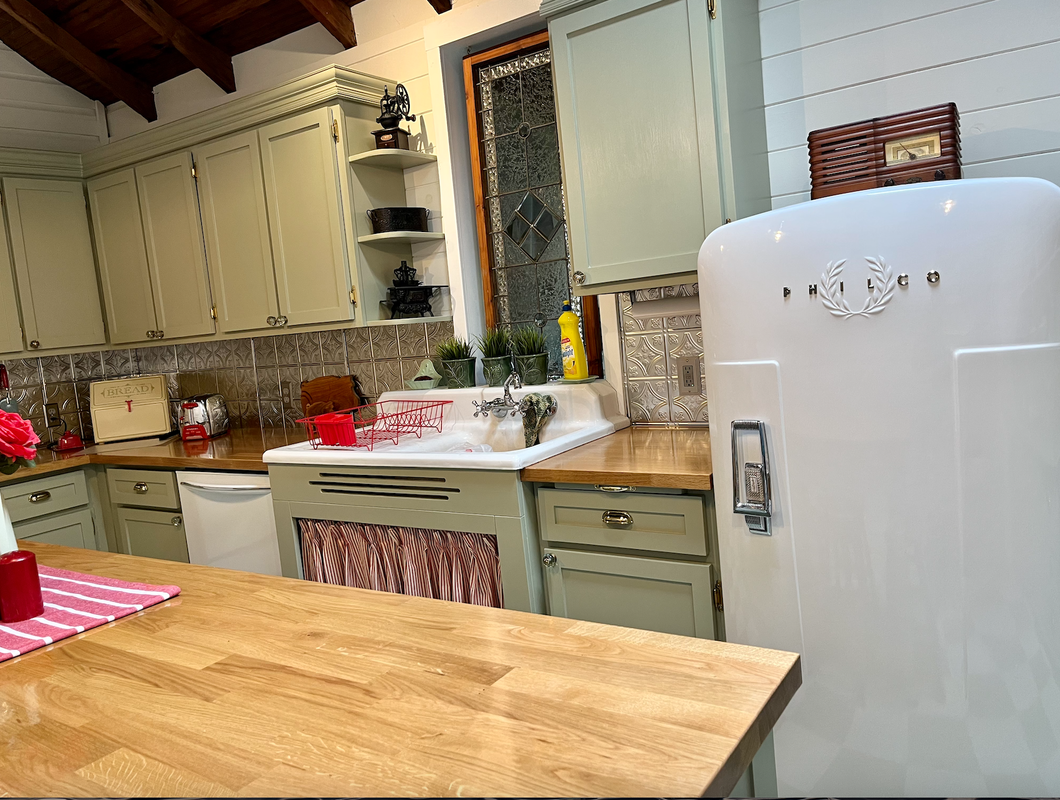 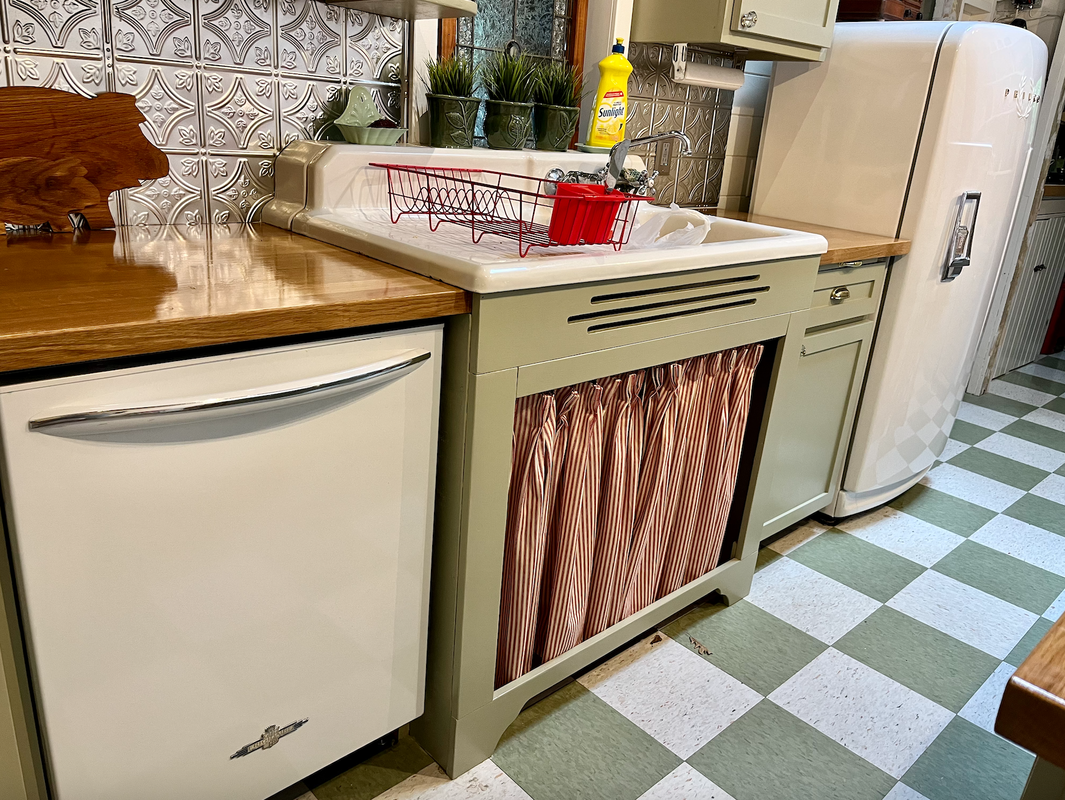 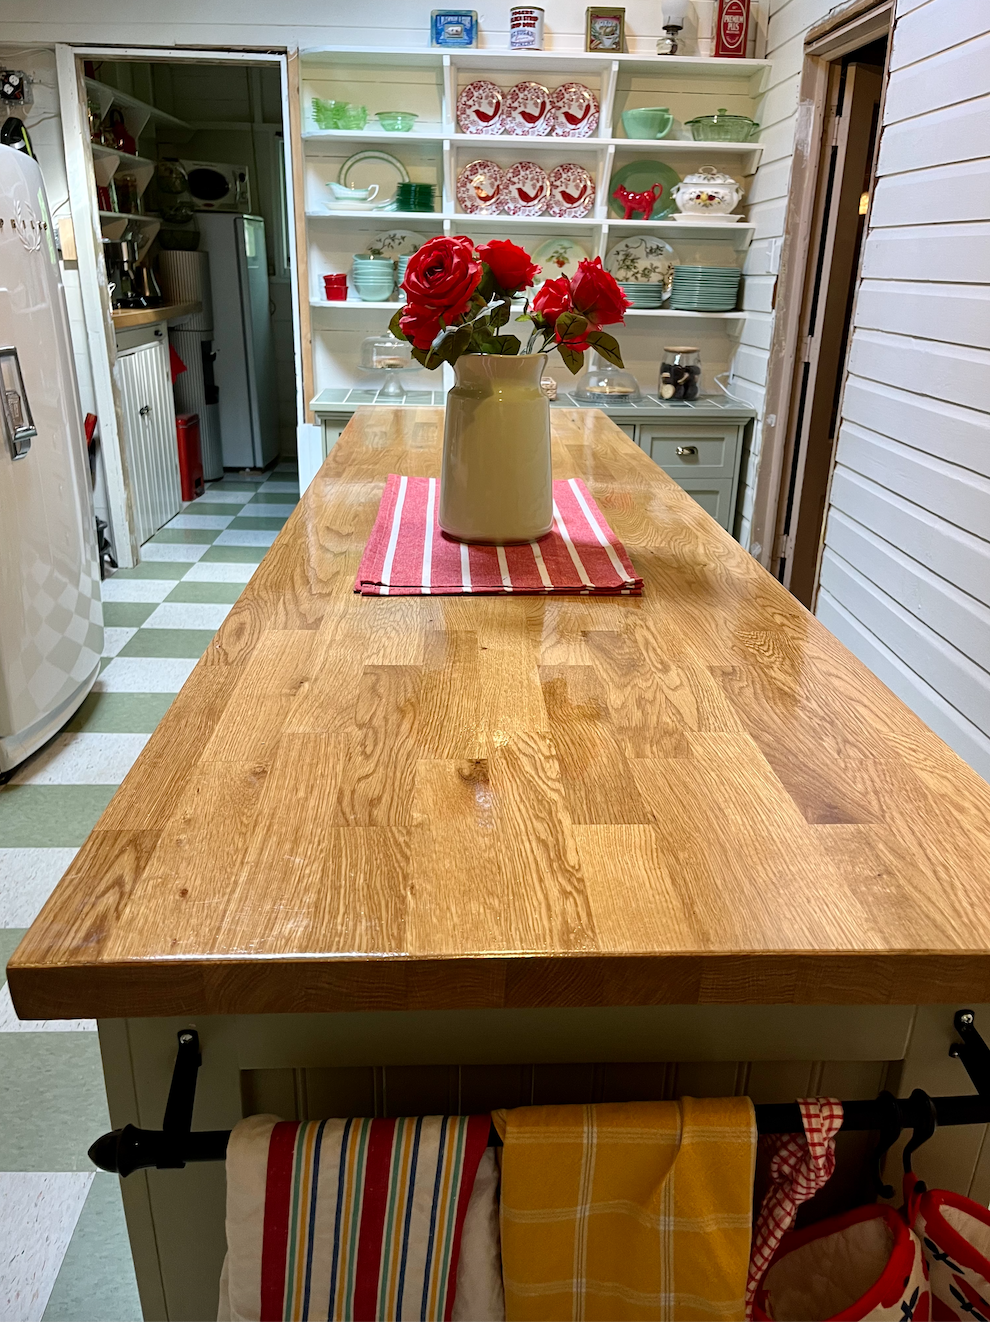 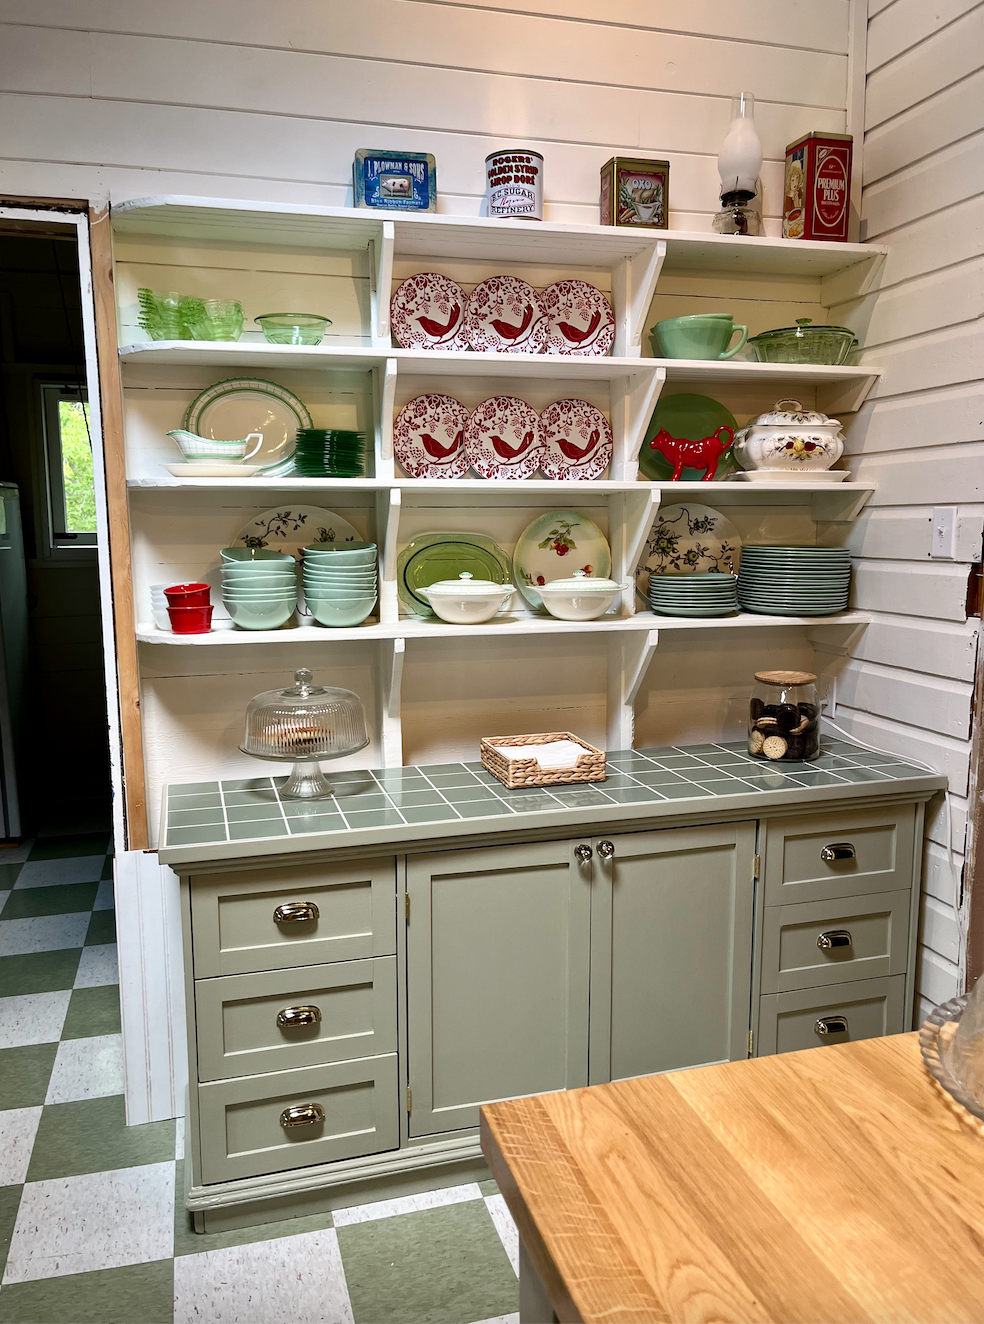 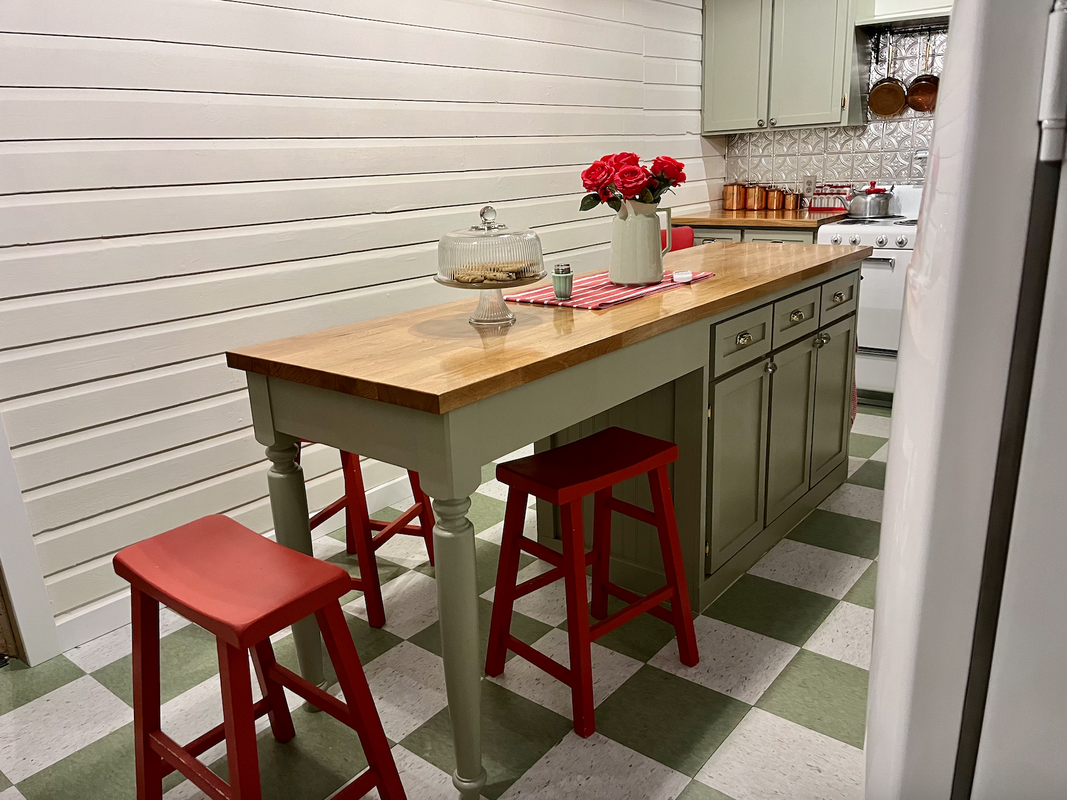 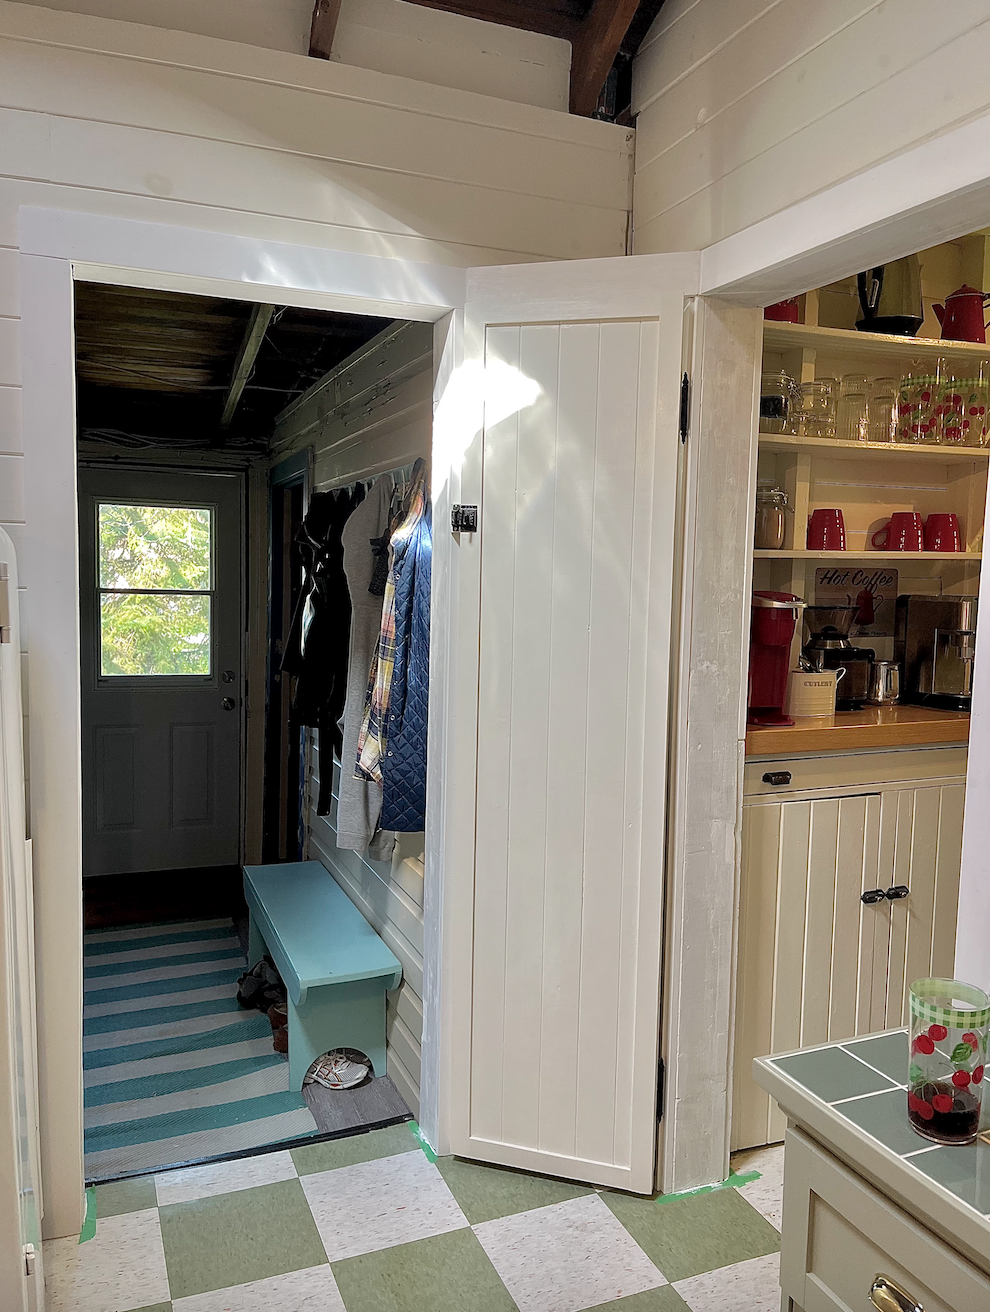 And here is the full view.... 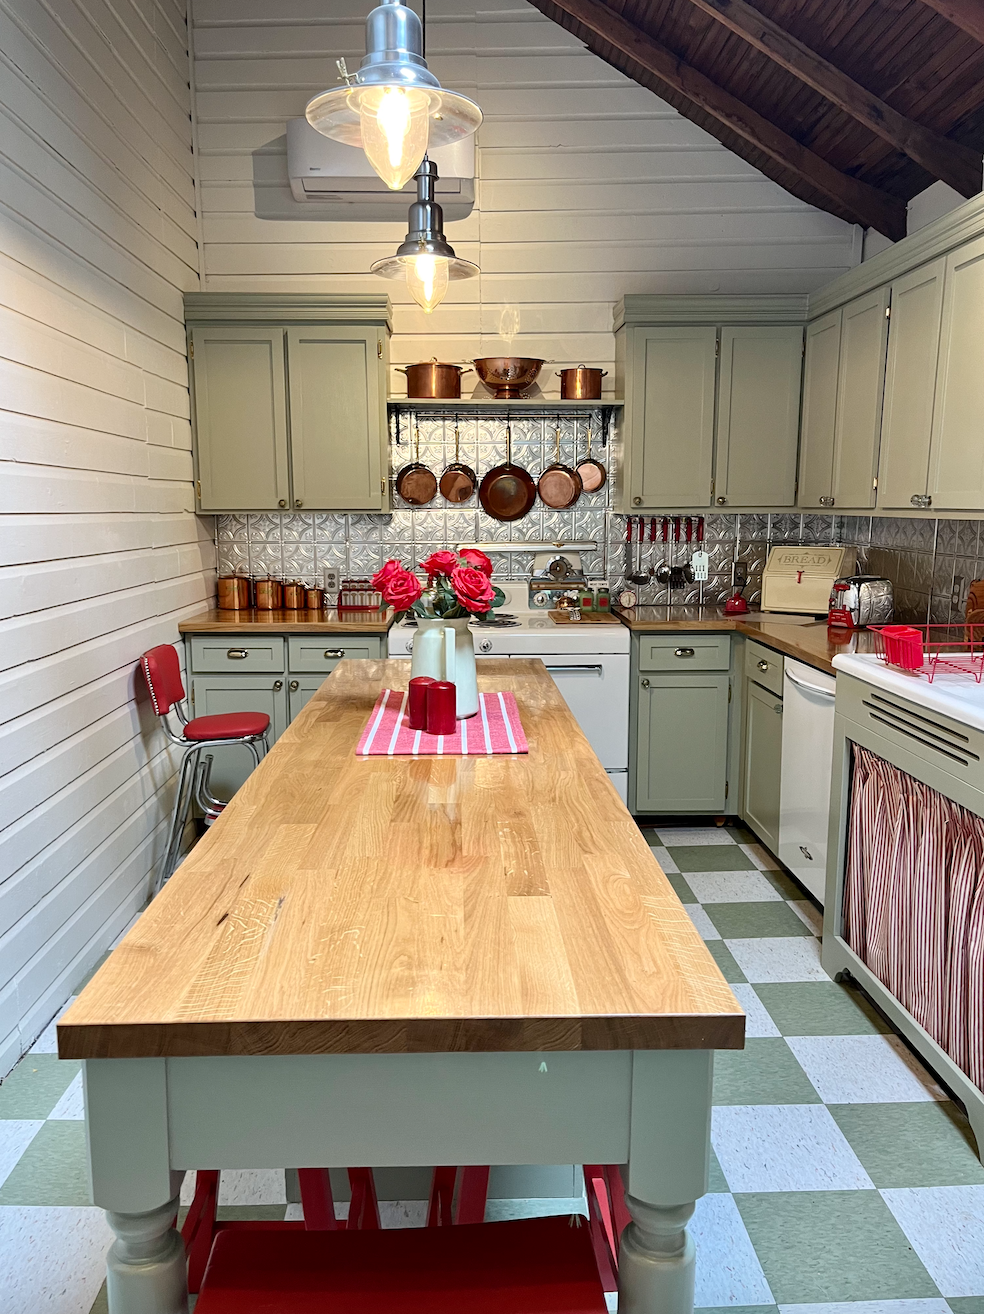 I hope you enjoyed the makeover of my vintage lake house kitchen. I thought of my Nana often while working on this. Her kitchen at the original Banchory Lodge was her pride and joy and I believe she was smiling down at me as I completed mine. Her original "piggy" cutting boards are back in use at Banchory Lodge 2.0 and I enjoy seeing them on my counter every time I walk into the kitchen.
So whether you are restoring a lake house or climbing a mountain, or wakeboarding behind a boat... just remember as I do, to always take time to enjoy the view!
4 Comments
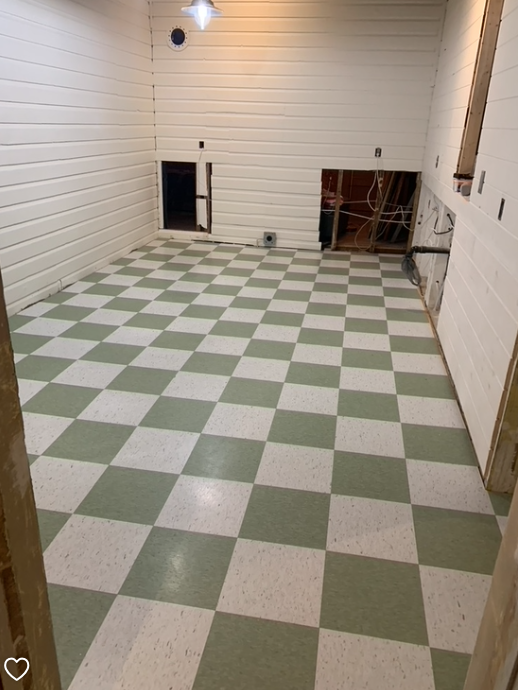
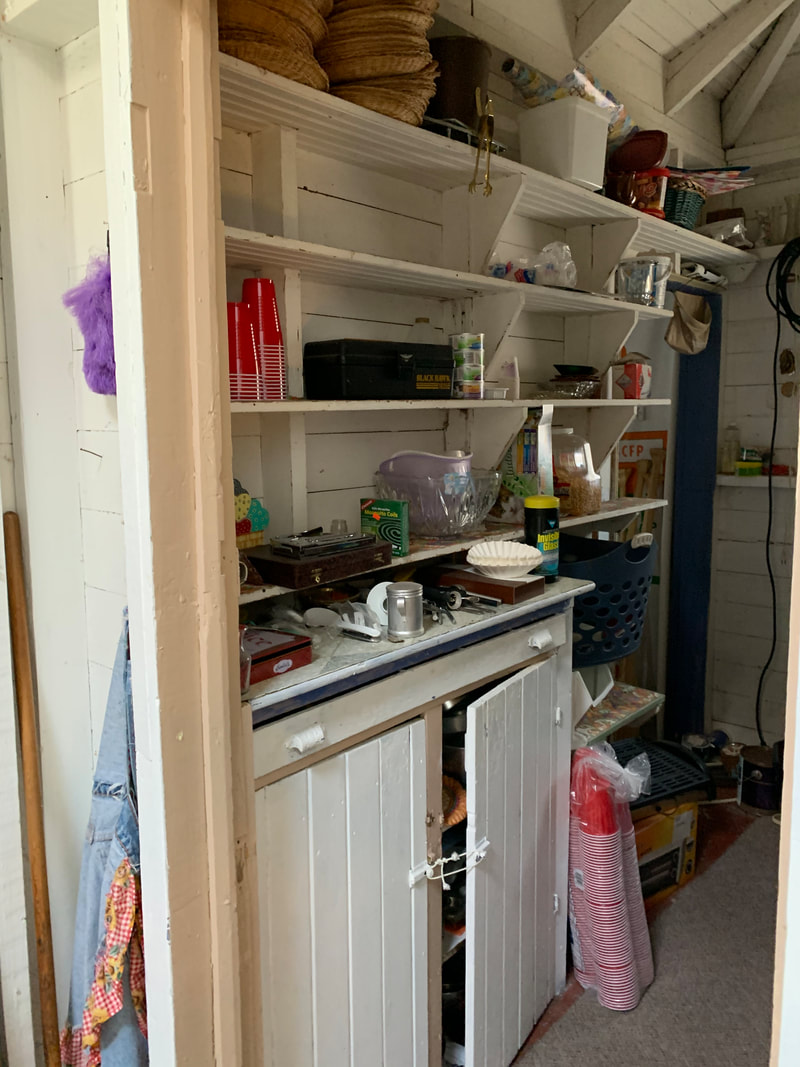
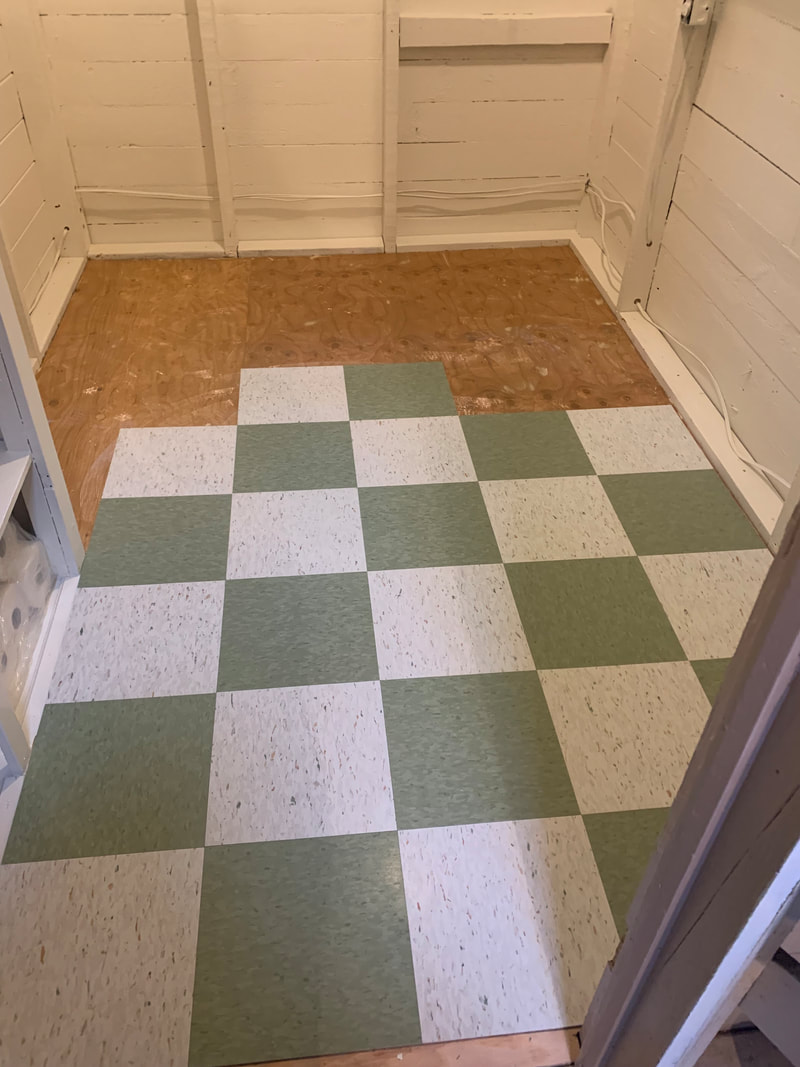
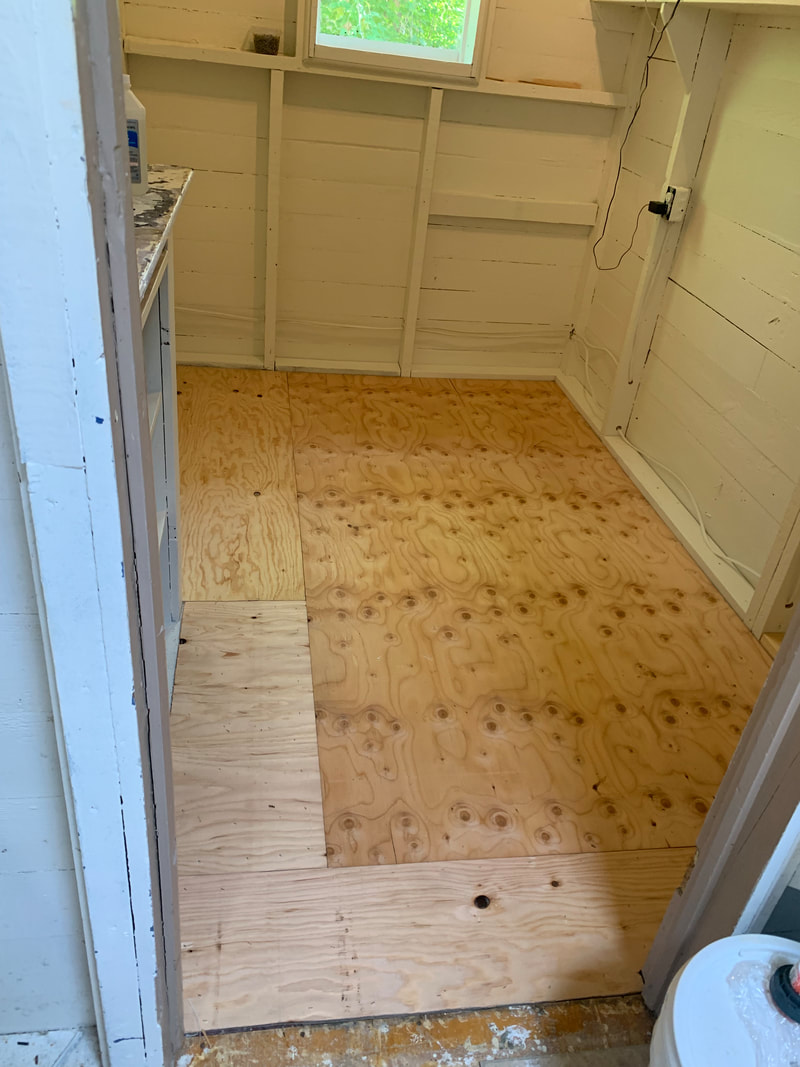 Once the room was empty, I could truly see its potential. However, it was a month of hard work on a ladder, re-painting the old ceiling and shelves entirely by hand (oh, and one disastrous day with a spray paint gun, but that doesn't count because I got more paint on me than the ceiling). Once it was painted, I covered the old floor with a layer of thin plywood so that I would have a clean surface to tile onto. In the meantime, I was also working on stripping the hundred-year-old cabinet and hardware, to try and clean it up and re-use it. That's the thing about an old place like this. If you replace everything, you lose the charm. It's only by keeping the old shelves and cabinet that the pantry recalls the days gone by. Once the painting was finished, it was time to add the tile and I decided on a vintage green checkerboard for a 1940s kitchen feel. My grandson Liam was out for the summer with me, and once again he helped me with a Reno project. You can see his happiness as we finished up... Well done Liam!
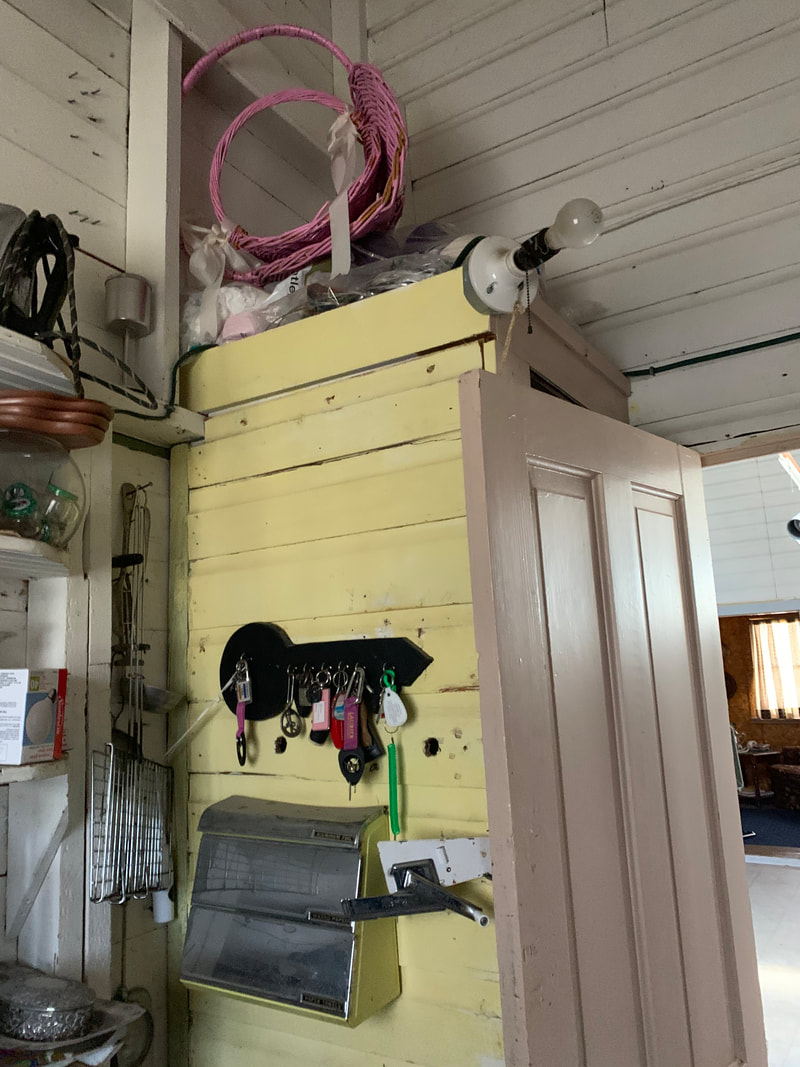
Once the floor was in, it was time to reassemble the room. The plan is for the exterior wall to receive insulation and wallpaper, but we decided that could wait till next spring. So I moved on to finishing the vintage cabinet and installing a new oak top on it. The counter I designed and built myself and the old hardware was soaked in a crockpot overnight and then cleaned with a wire brush. Look at the beautiful vintage detail on the hardware! Stripping and repainting the old doors was also a lot of work, but they are hugely improved, although not perfect, and really I don't want them perfect because they are 110 years old. 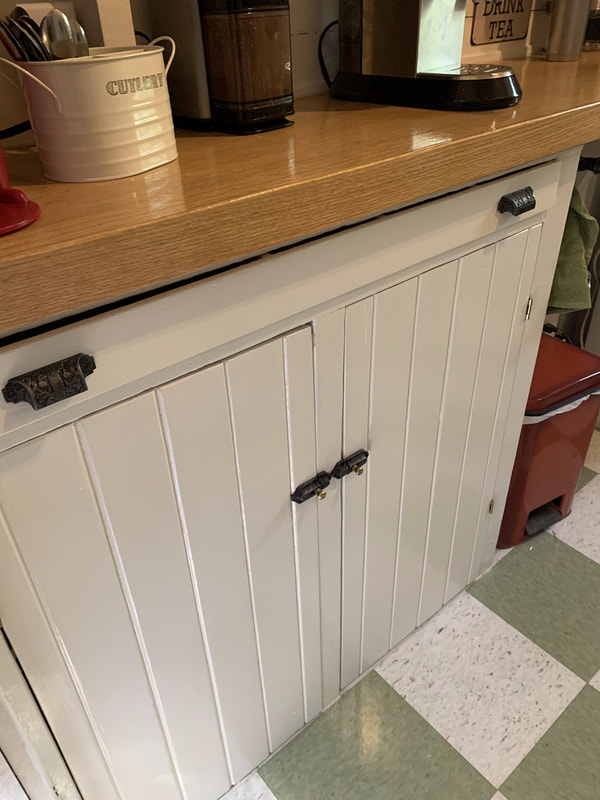 On top of the counter we now have a whole coffee and tea center and at the side of that a water station and fridge. 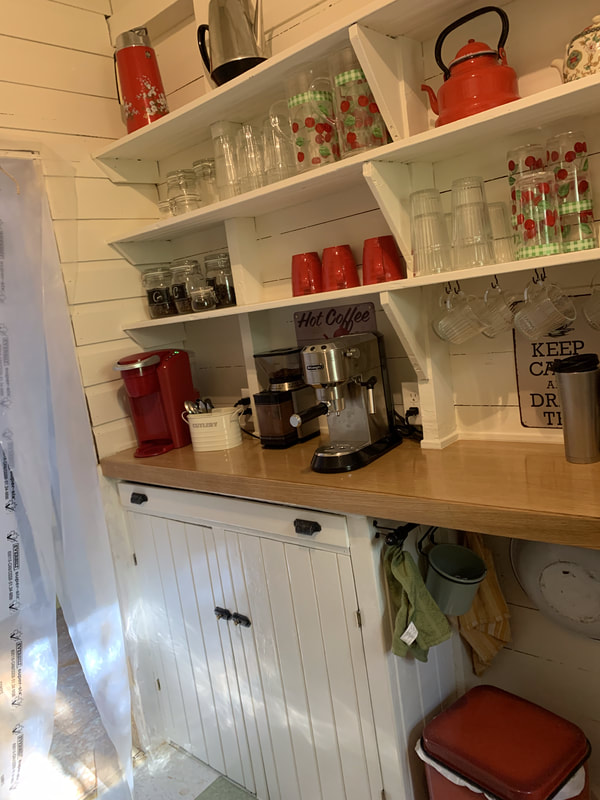 On the back corner of the room, I added a wicker storage tower which was originally dark brown and modern but was quickly given a vintage feel with a coat of cream and green paint. This will store potatoes, carrots, and other items for our cooking. This rear wall will receive insulation and vintage wallpaper next year. 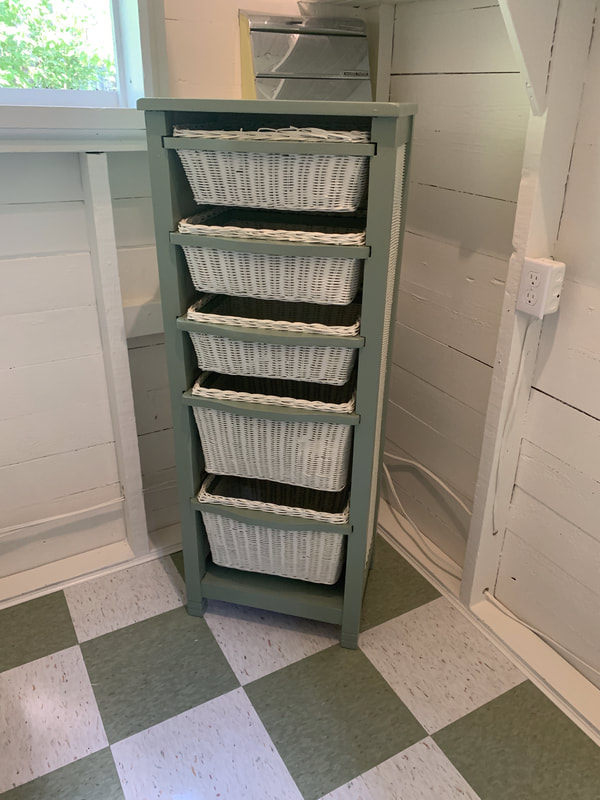 Next to the wicker storage unit is a gorgeous old enamel topped farm table I received as a gift from my friend Brenda. I ambitiously decided to restore the top of the table with new enamel. This led to an incident that my grandson will probably never forget. I had just finished applying the new enamel to the table when I picked him up from the local day camp and said "Liam, be very careful not to touch the white table, I just coated it with enamel." Well, you can guess what happened next... Kids of every generation do the same dumb stuff! The enamel table now has marks, where Liam stuck his hands in it, and Liam had the fun experience of having his hands cleaned off with solvent by a very testy Nana.... I was going to redo the enamel again, but in the end, we decided Liam's escapade was part of the table's story and adds a little vintage charm! 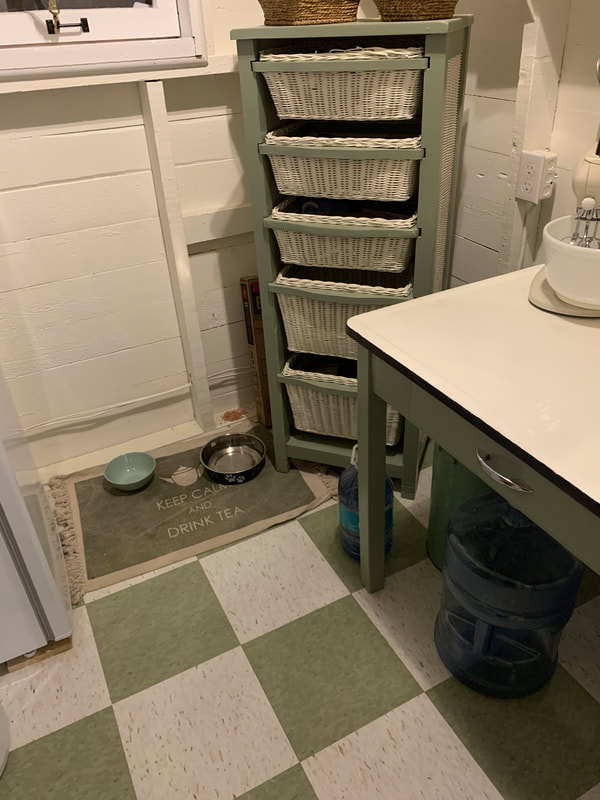 The final addition to this room was a vintage mixer which still works perfectly, some vintage cookbooks, and some old kitchen utensils hung on hooks and framed in a shadow box to recall the days gone by when everything was made by hand. 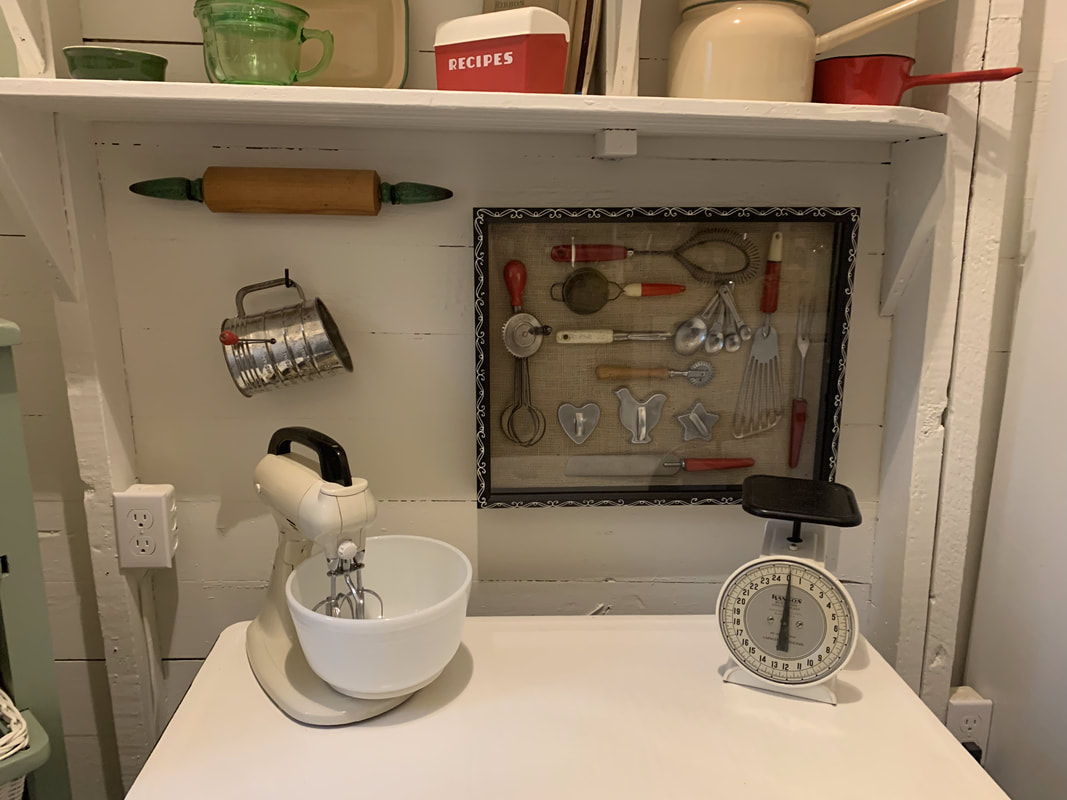 I'm very happy with the pantry and now having conquered this small space I felt ready to take on the major job of rehabbing the main kitchen...
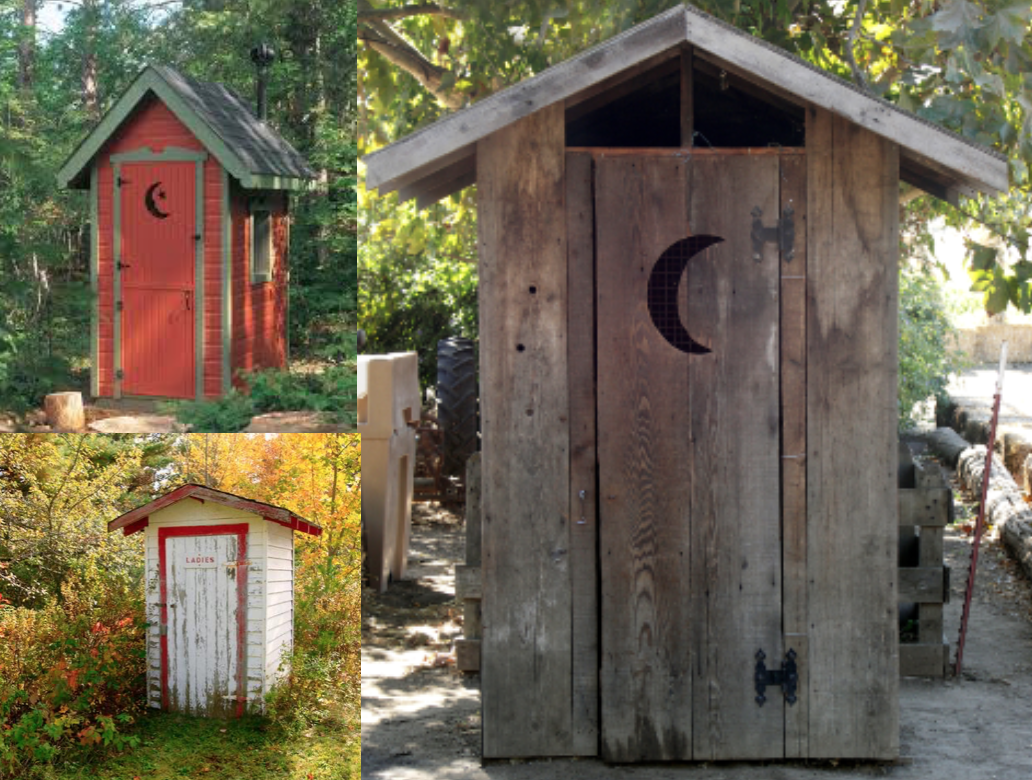
The Banchory Lodge Biffy was a deluxe version, two-seater. Painted ivory, with matching pink toilet seats, a tiled floor, a ceiling light, an outlet to plug in a heater, and of course a stack of magazines like readers digest to pass the time. Our yard was scattered with large and small boulders which my Nana whitewashed every spring to make sure you could see your way along the path at night without stubbing your toe. The walls had several funny, little plaques for decore, and I can remember reading them over and over as a child. I can only remember one of them now, it said: "Here is champaign to your real friends, and real pain to your sham friends." This type of saying was a bit like the Irish sayings I grew up with, a little sarcastic, and a bit of a play on words. The strangest thing to me as a child was the "Honeywagon" which was a big wagon with a tank on it, which came along the back lanes and had a man who we of course called "The Honeyman" who emptied the pails in the outhouses every week. I do hope he was paid well for this work. It was not a job for the faint of heart. My Nana as mentioned was a stickler for keeping the Biffy clean, and I remember being sent down the path with a broom, a bucket of water, and "Dettol" cleaner (a horrible smelling substance) to remove the cobwebs and wash down the floor, etc. And to this day, the smell of Detol screams outhouse to me! As to the two holes... at 2:00 in the morning, when you needed to pee, you were always happy to have a friend along for the journey.
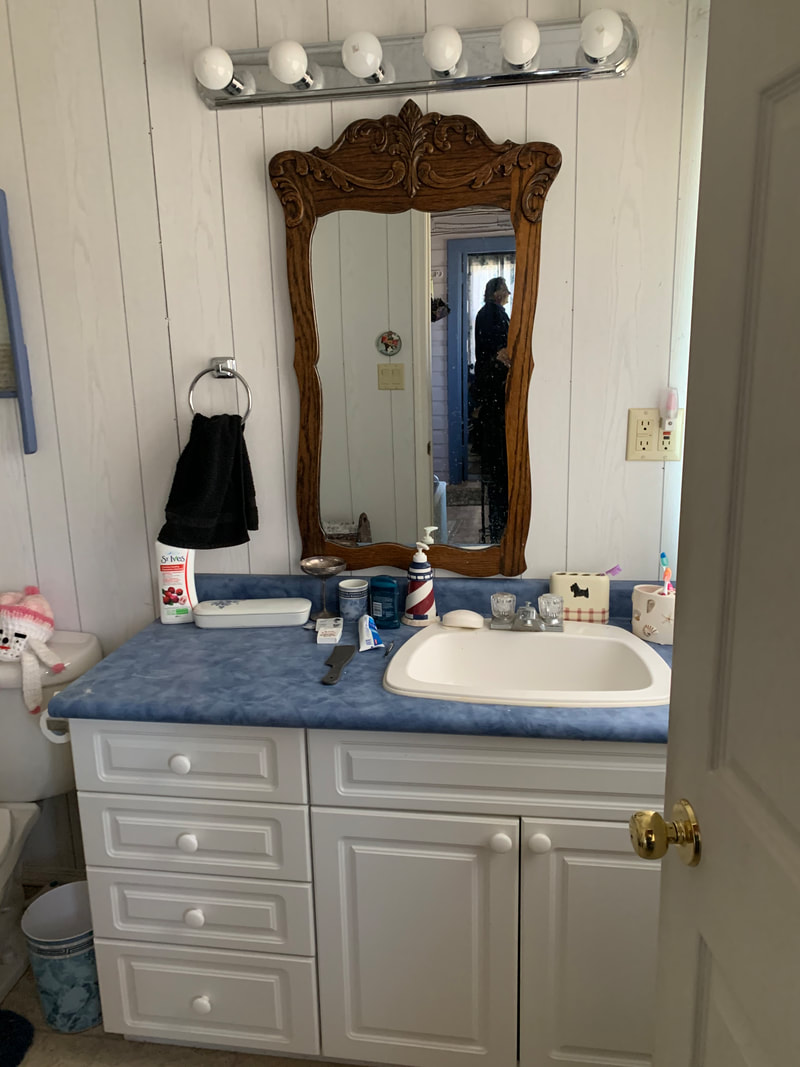
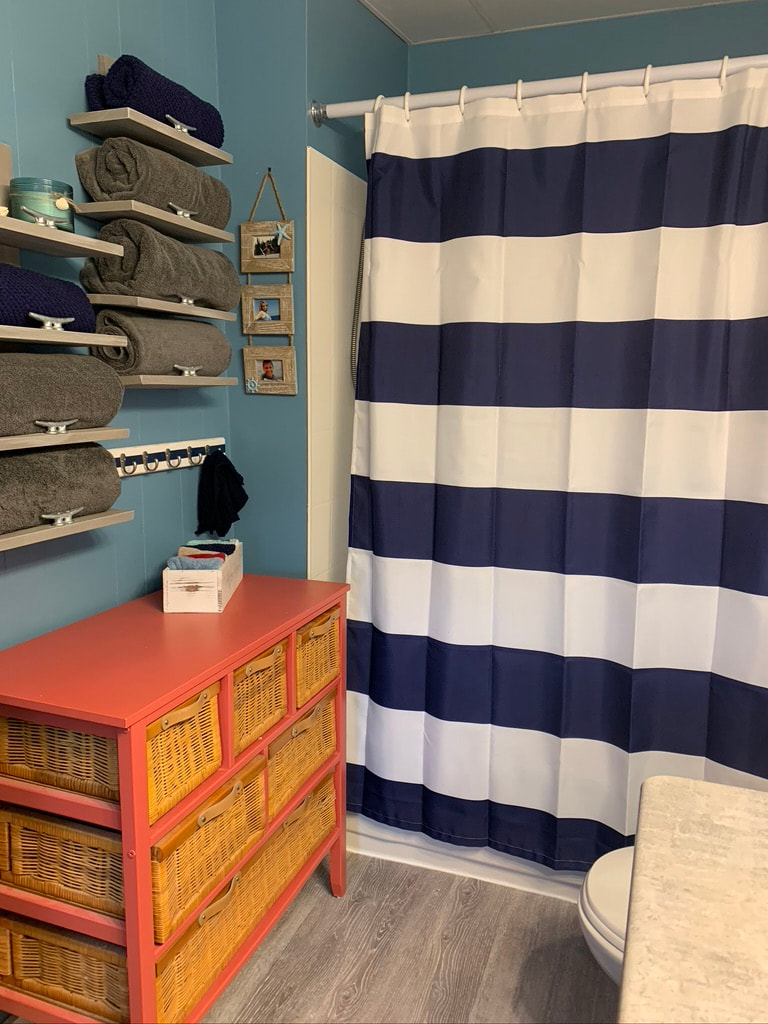 The sink and counter were replaced with the new sink now centered in the vanity, and a porthole-shaped mirror from Ikea placed under a nautical style light fixture I picked up for $10.00 at the Habitat for Humanity store. I also picked up the counter there for $30.00 and the backsplash tiles for a few dollars. In fact, the only items I bought new for the bathroom were the shower curtain and flooring bringing in the total cost of the makeover at just under $300.00! 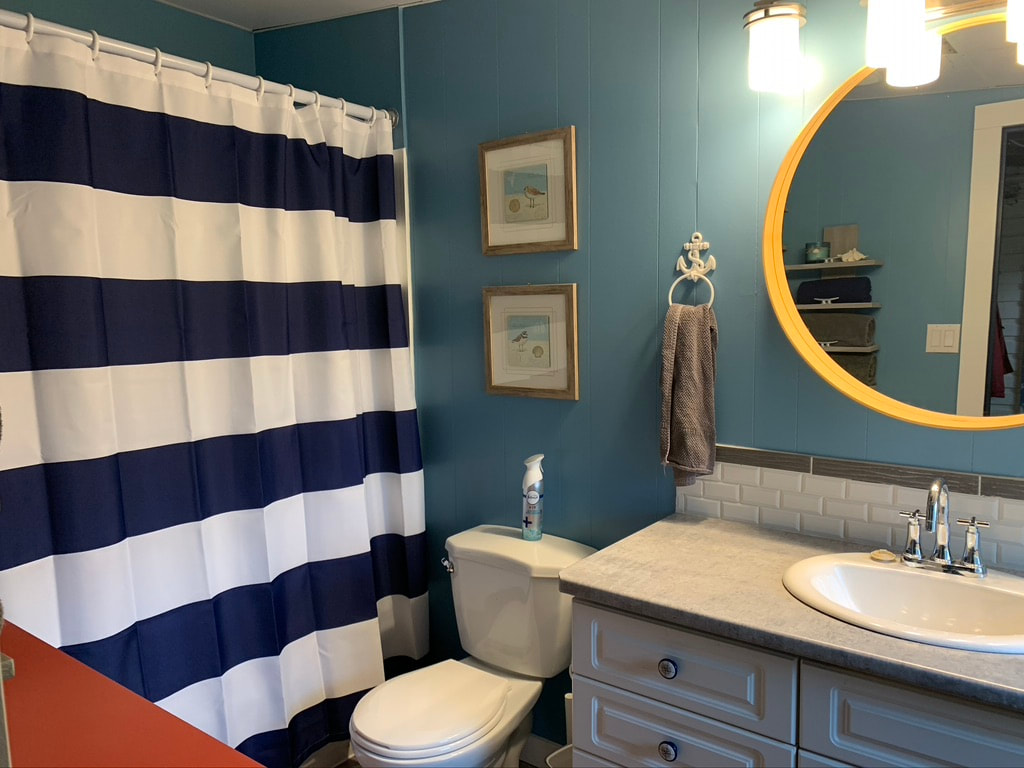 Finally... I pulled out my sewing skills and made up a charming Roman shade for the window, tied up on a nautical cleat. 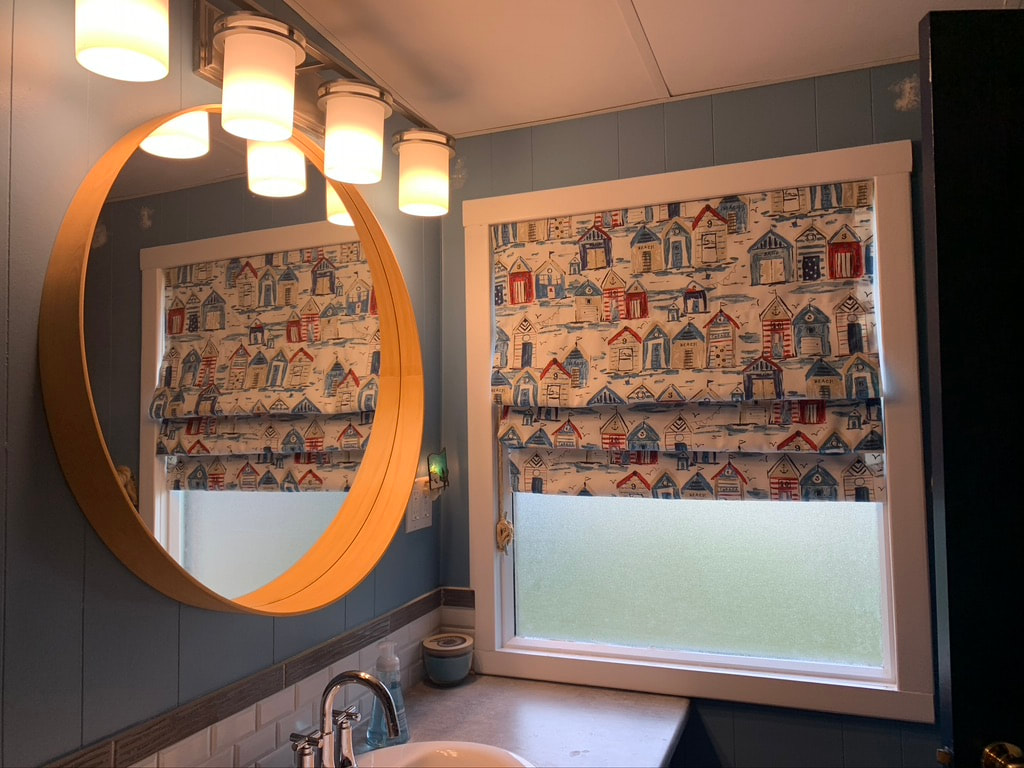 In the end, I am very happy with the results and I personally think our new Biffy.. is pretty Spiffy! Probably the same feeling my Nana had many years ago when she built hers!
This was true in our case and although we bought a cottage with a "fridge, stove, freezer, washer/dryer, and water heater, every one of these items was on its last legs when we moved in, and one by one they all needed to be replaced within the first year we were there. The bad news started with an ominous-looking puddle around the fridge the weekend we moved in. Not only was it leaking water, but the cottage was so slanted at that time, that there was a constant mini stream of water running across the floor.
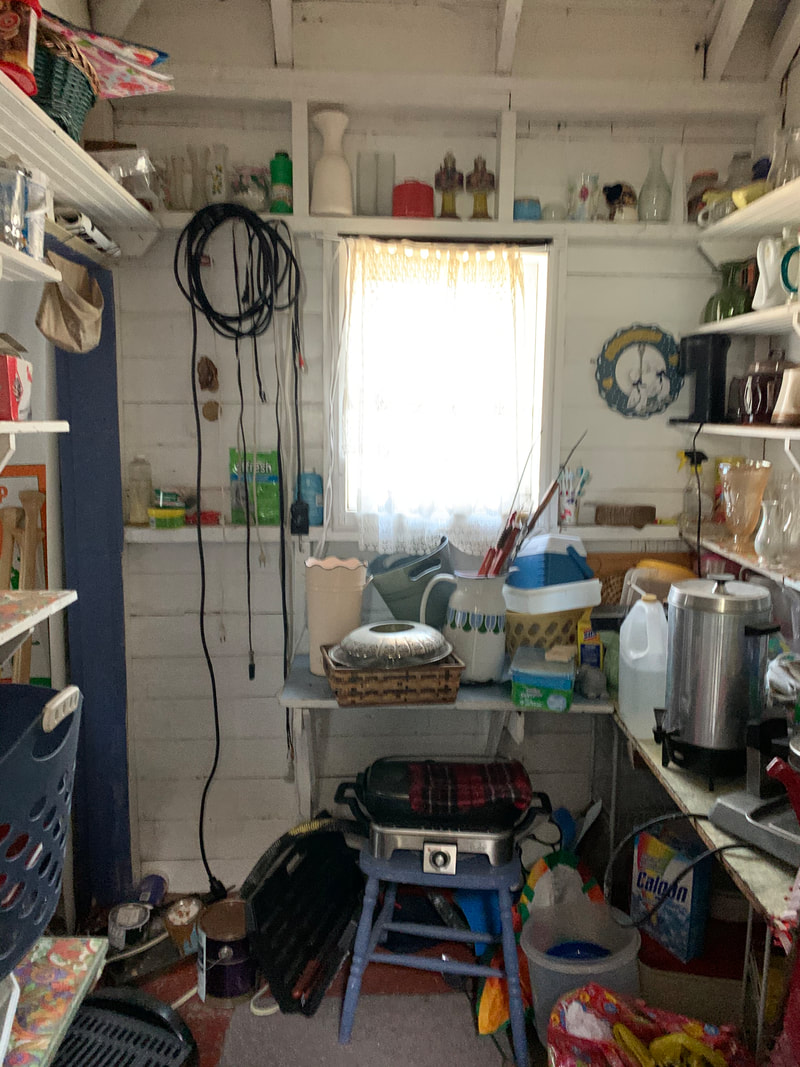
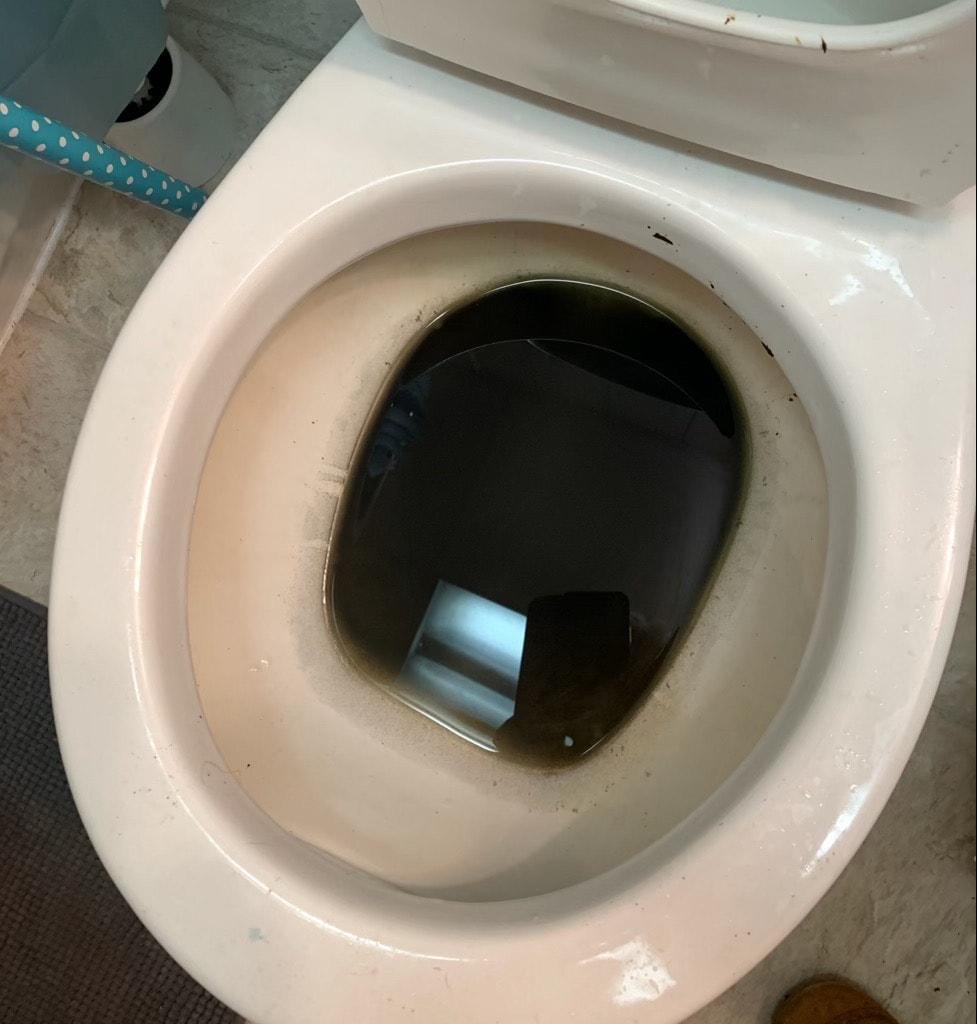
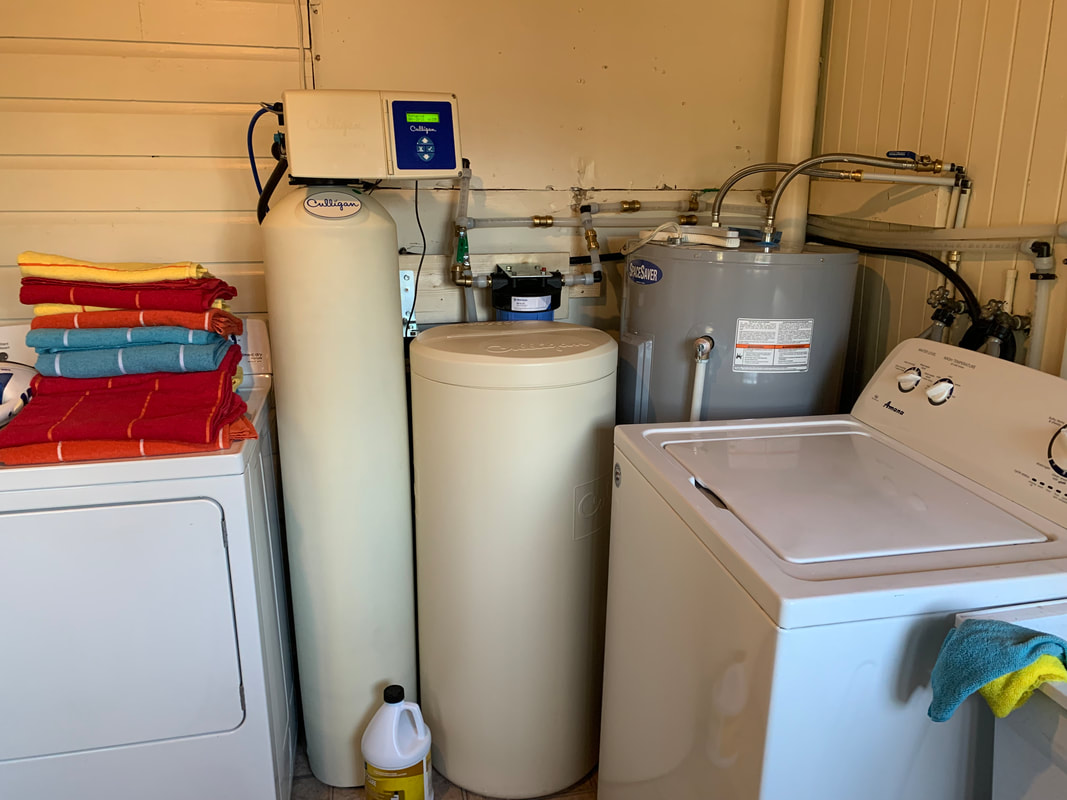
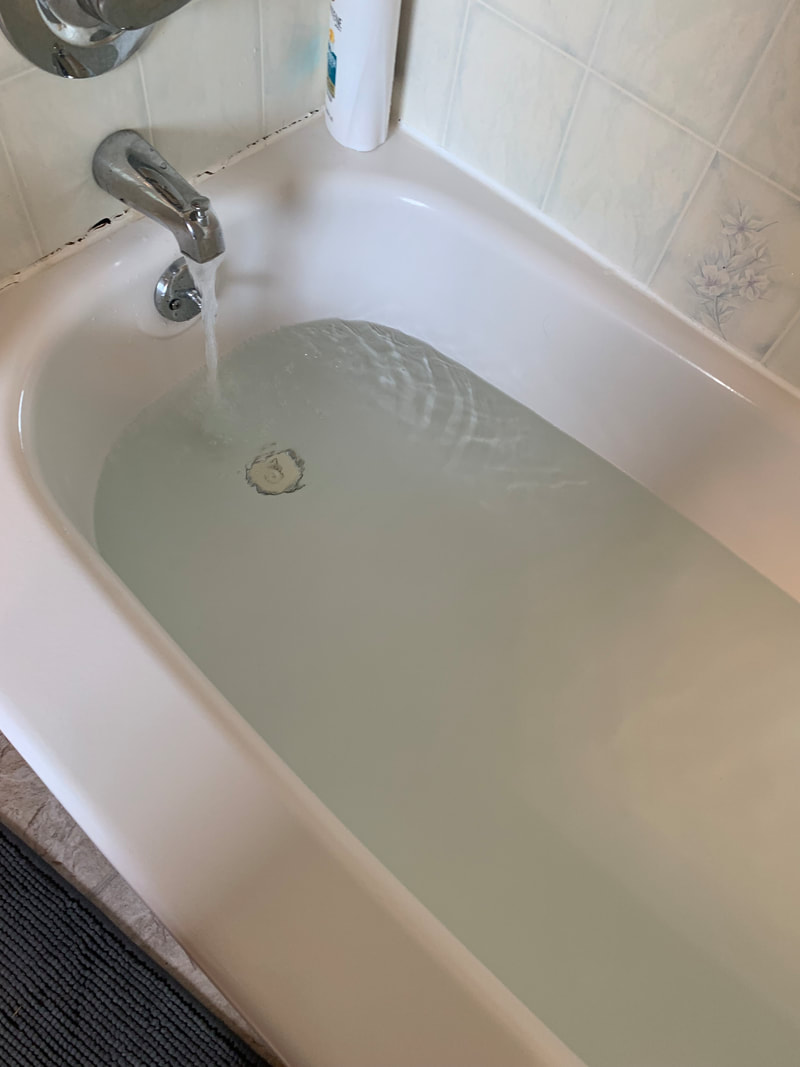
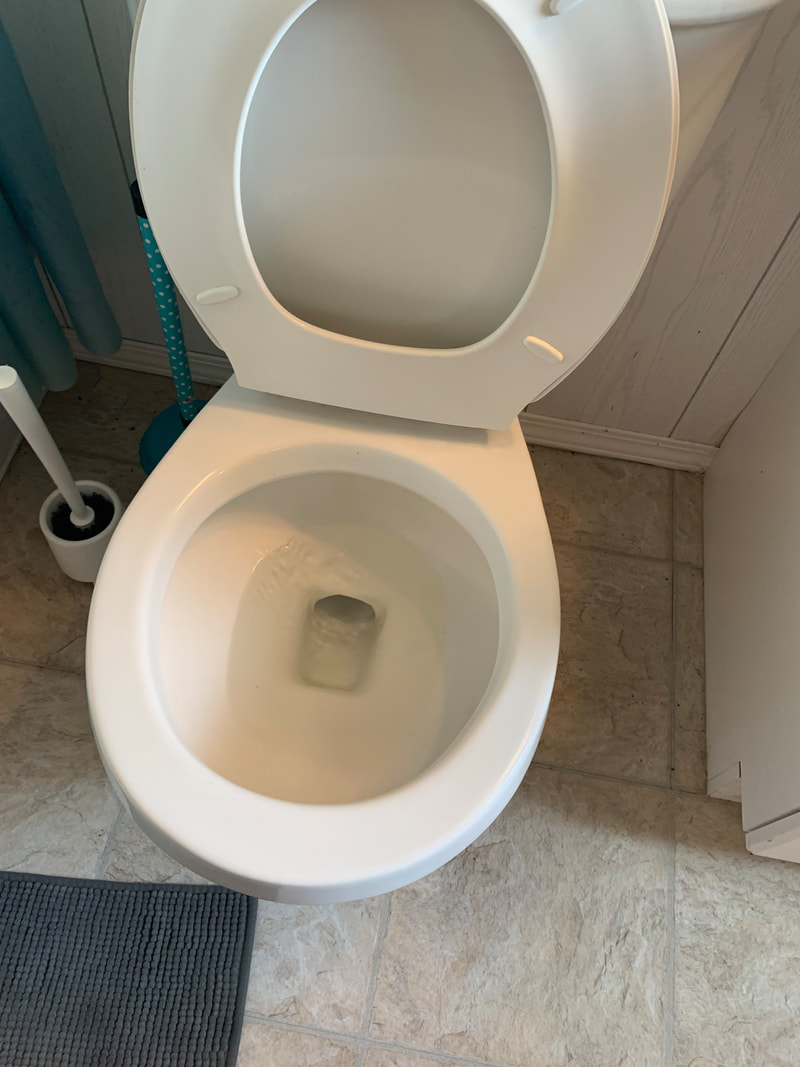
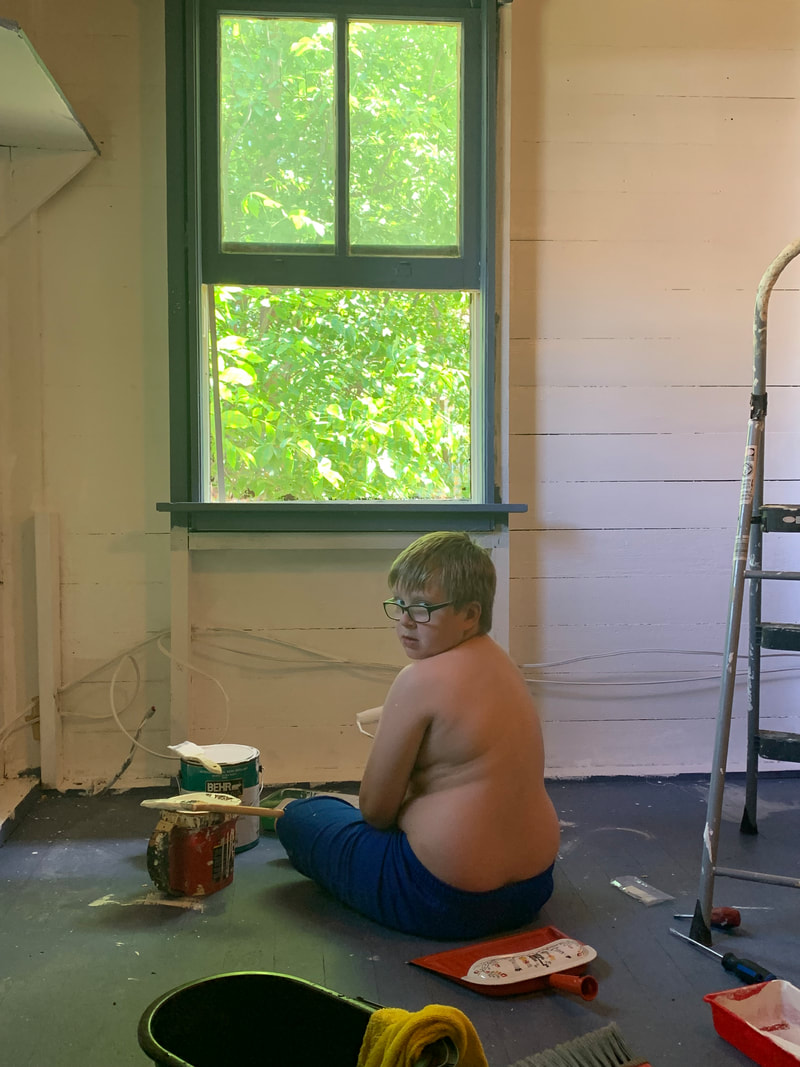
So we called Culligan Water Systems to come out and do an assessment, and they told us that our water was in the top percentage of how hard water can get and that the black stuff in our toilet was an algae bloom. $5000.00 later we had what appeared to me to be a science lab installed in our mudroom with pre-filters, rust filters, and a huge softener and conditioner that they promised us would make our water magically new... and they were right. This was our second major gift to the money pit ahem, I mean cottage, the first being the lifting and leveling. The results though speak for themselves. And I never imagined I would be excited about the color of our water, but I was! The next priority that spring was to get a room ready for my nine-year-old grandson who would be visiting me for the summer. There was a perfect room for kids, right off the kitchen and across from the bathroom, but like most of the rooms in the cottage, it had been woefully neglected. Although we plan to insulate each room as it is restored, there was no time to do that with the "Bunkhouse" as the kid's room will be called, and so with buckets of paint in hand, it was decided that the room would get a quick paint job. The other thing we had to do to make it functional was to close off the doorway to the pantry which went into this back room. Initially, I had no idea why a bedroom would be open to the pantry, but as we began to restore the rooms, it soon became clear why. You see I found a huge bolt latch on the pantry door, which I think was used by the cook (remember this was an Inn) to lock up the food at night so the guests could not help themselves. The cook likely slept in the attached room and got up early to light the stove, start breakfast, and with the room set away from the guests, this would have been a good fit. For some reason I don't have a photo of the bunk side of the room when it was finished, but here are a couple of photos of the process, and a photo of one corner of the completed room. I had Liam involved in all aspects of restoring his future room including helping me to chalk paint a cute $10 dresser from the thrift store. The finished photo shows the charm that we hope to bring to the whole cottage. These photos show #1 The old pantry the way we found it. The door opening at the far end of the shelves. #2 Liam learning to paint. #3 Me painting the now closed off doorway.
We gave a fresh coat of paint to the floor to finish the project and Liam had a room to stay in and to start collecting his own summer memories!
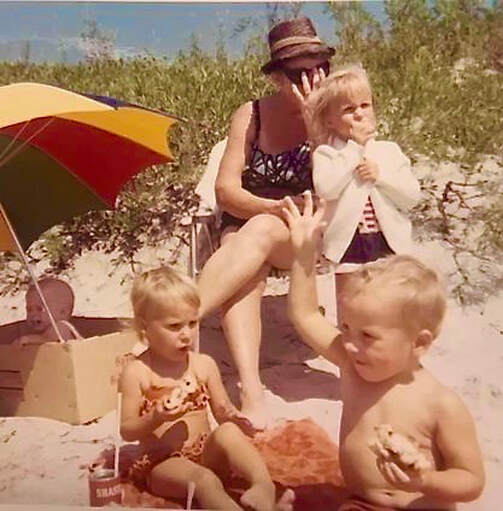
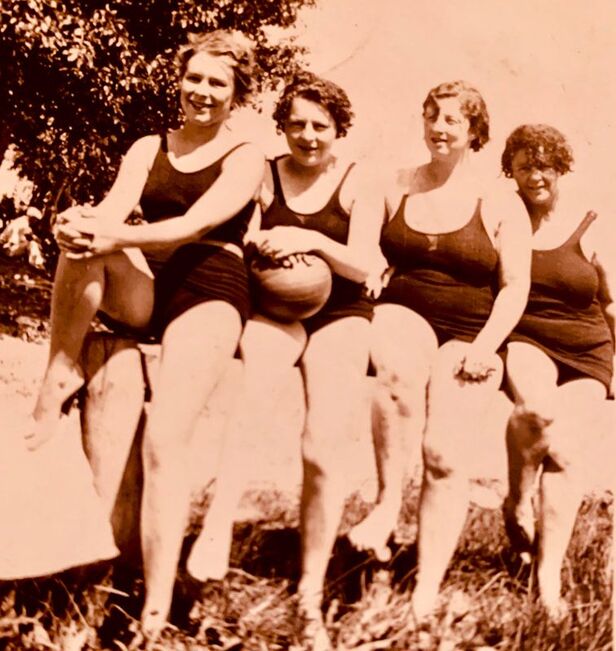
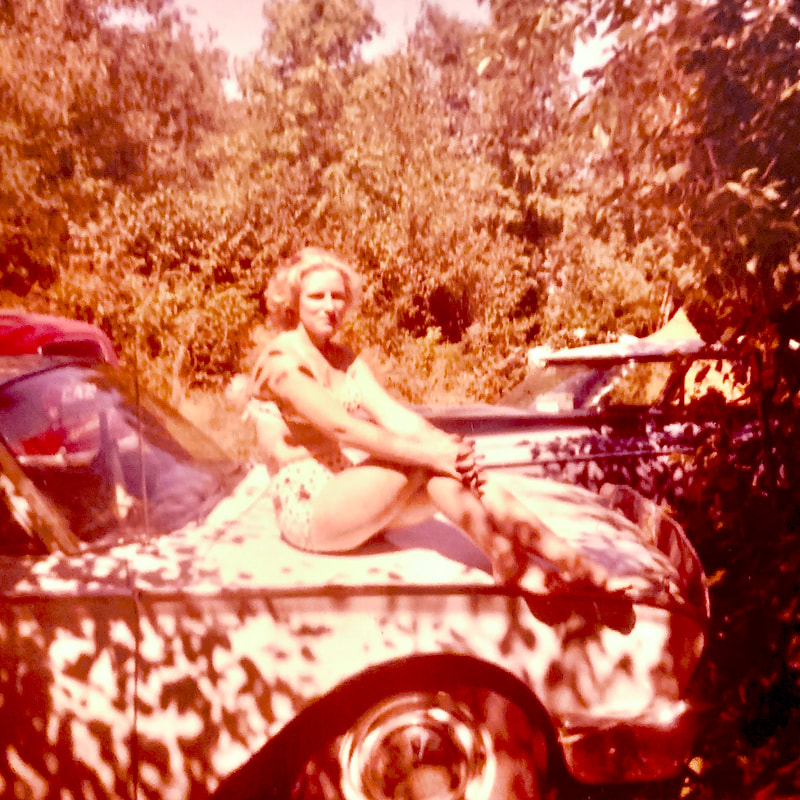
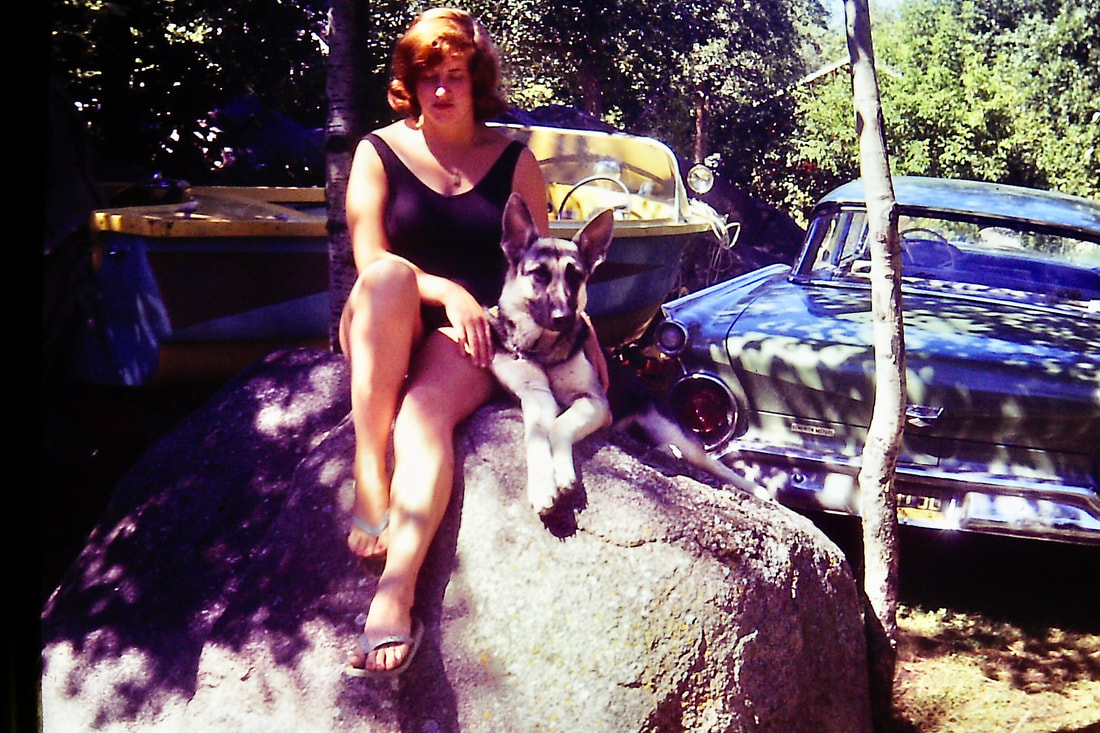
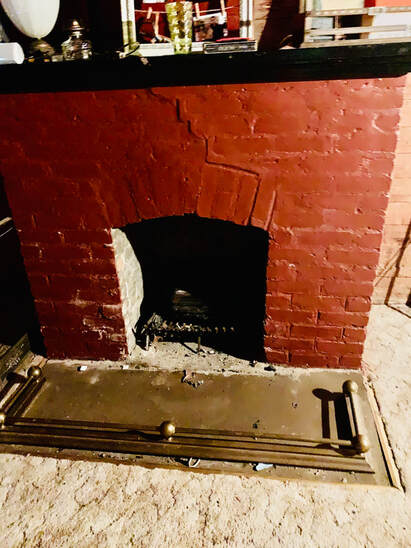
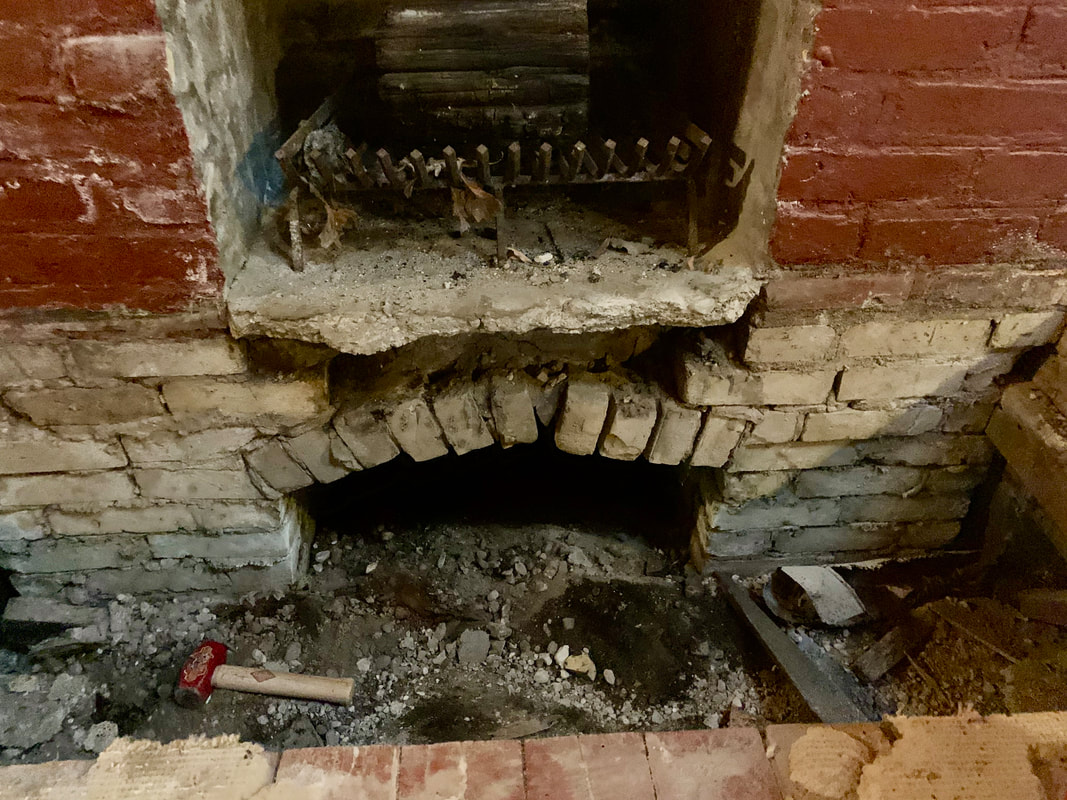
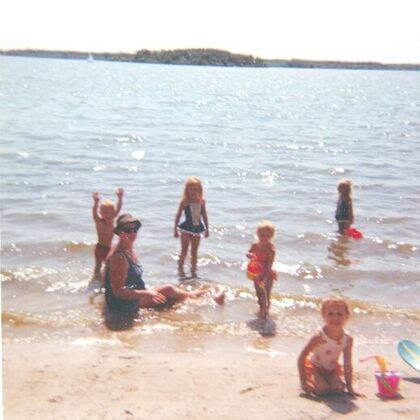
I love this photo of my Nana Eileen. (Second from the right) I'm not sure how to date this photo (1930's?) but I do know that my grandmother grew up in an era of many inhibitions and constraints placed on women and seeing her posing confidently in a one piece bathing suit, makes me smile. I also found series of Beach Bod photos of my mom and dad, and my Aunty Lois and Uncle Larry. Check out the amazing cars in the background. A Hole in the Floor... At the same time that we were getting settled into the cottage in the fall of 2020, I was also developing a plan for its restoration. It was tempting begin putting paint on the walls, but the old girl was 110 years old, and had a rather ominous slope in the floor. So having been schooled in "roof and foundation first" in our years on renovating, we resolved that we would need to attend to those issues as a priority. With this in mind I invited my amazingly talented friend and handyman Don out to take a look at what was going on. Don is definitely a jack of all trades, having grown up on a farm, and worked in almost every construction trade over the years. What was odd about the floor slope, was that the cottage had a level poured foundation running around the exterior and some level pads poured underneath. So the question was..... Why was the outside level, and the center sinking? Well, it did not take Don very long to make a pretty good guess. He said to me "Wendy, what you need to understand is that when they constructed these old places, they built the chimney first. Then they nailed the joists to the chimney and built the floor around it and then added the walls. So it is likely that your fireplace is still nailed to the joists, and has never stopped sinking. We need to open up the floor and see what's going on here." Five minutes later, Don had started breaking up the big cement hearth in front of the fireplace. It was 8" thick and as the first piece came out, I thought.. "Oh, oh.. we are going to be here for a month, getting this out." But Don is one determined guy and in less than an hour he had removed a the whole cement pad by hand and was dropping down into the hole.
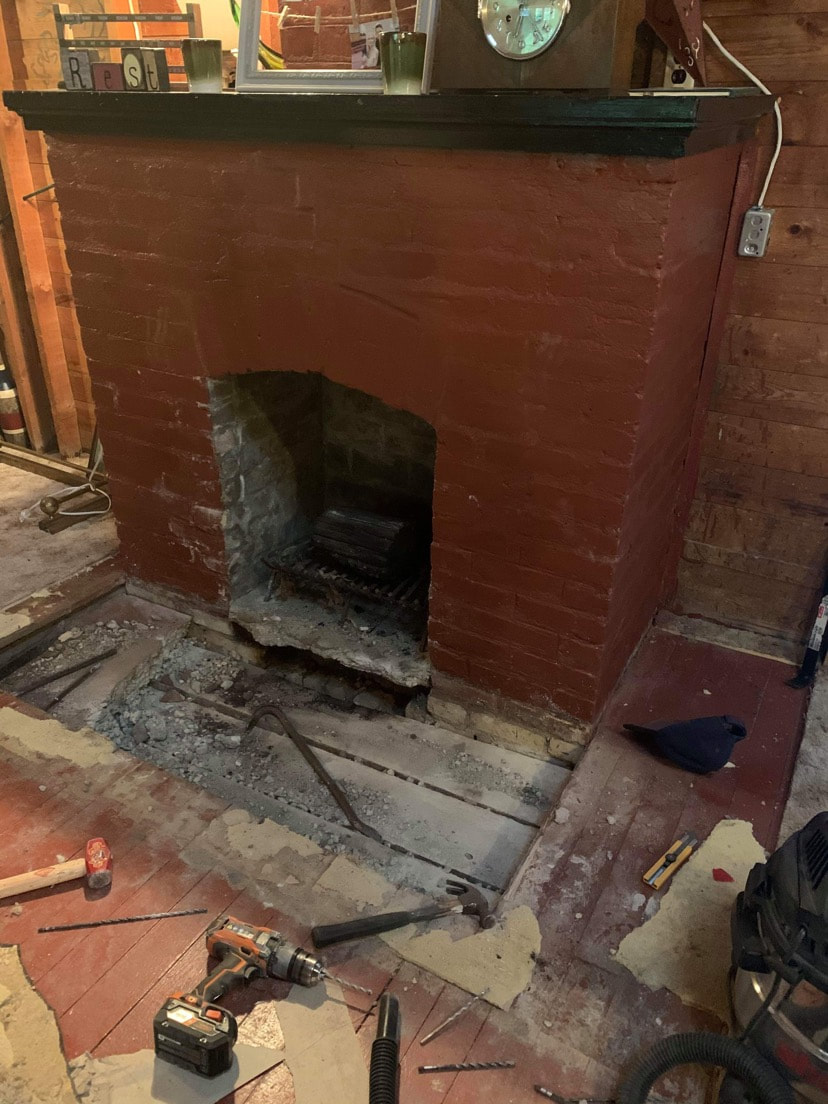
One of the first things Don pulled out of the hole was a turned porch column. When I asked him where he thought it came from, he said "It was one of the posts holding up the cabin, they probably had it left over from building the Empress Hotel." Remember, this old Inn was originally owned and built by CP Rail, who also built the big hotel and so I guess that is a real possibility. Once the hole was opened right up, the bottom of the fireplace was exposed. Don showed me the old "clean out"...the curved section below where the ashes would be scraped from the fireplace grate. I guess they sent someone under the cottage once in a while to empty it. We ended up with a matching hole in the kitchen, and Don confirmed his earlier suspicion. The floor was indeed nailed to the fireplace and even after it has been leveled years ago, it continued to sink, until it was sloping by almost a foot from the front door. It was now apparent that this was not going to be a weekend job. The cottage was going to have to be professionally leveled and repaired.
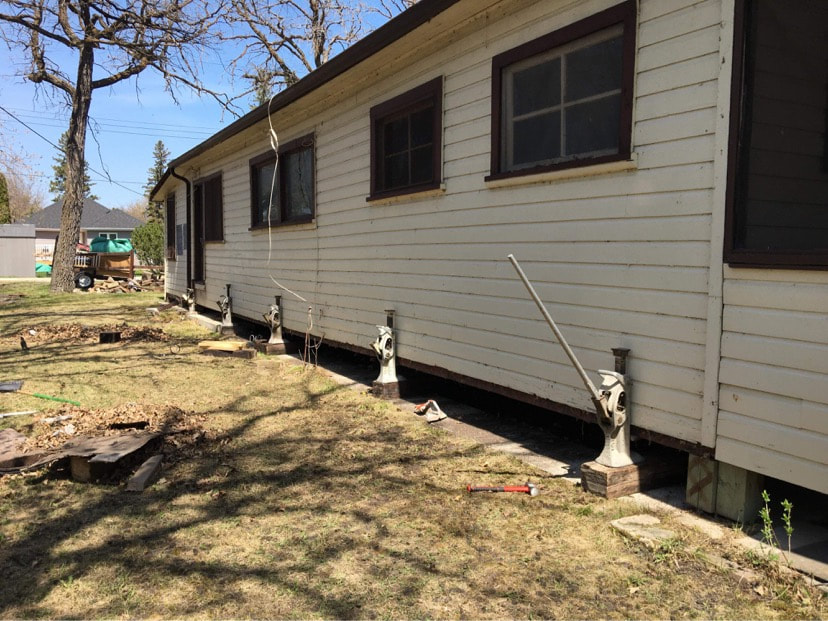
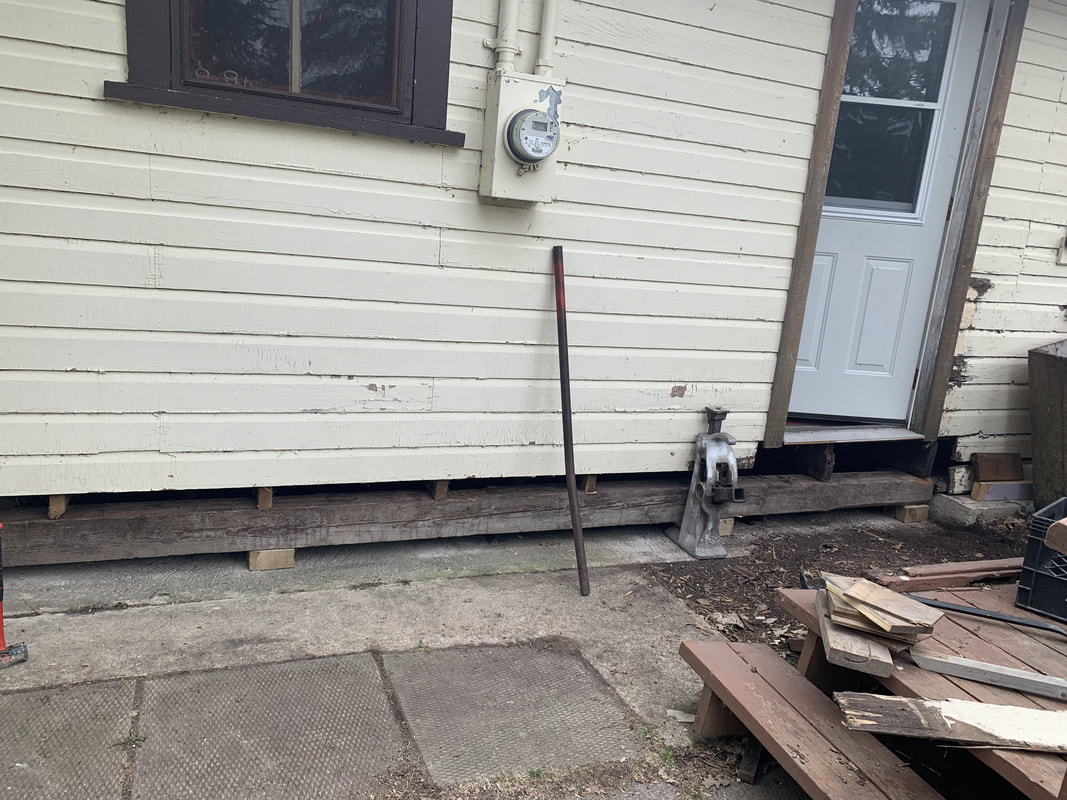
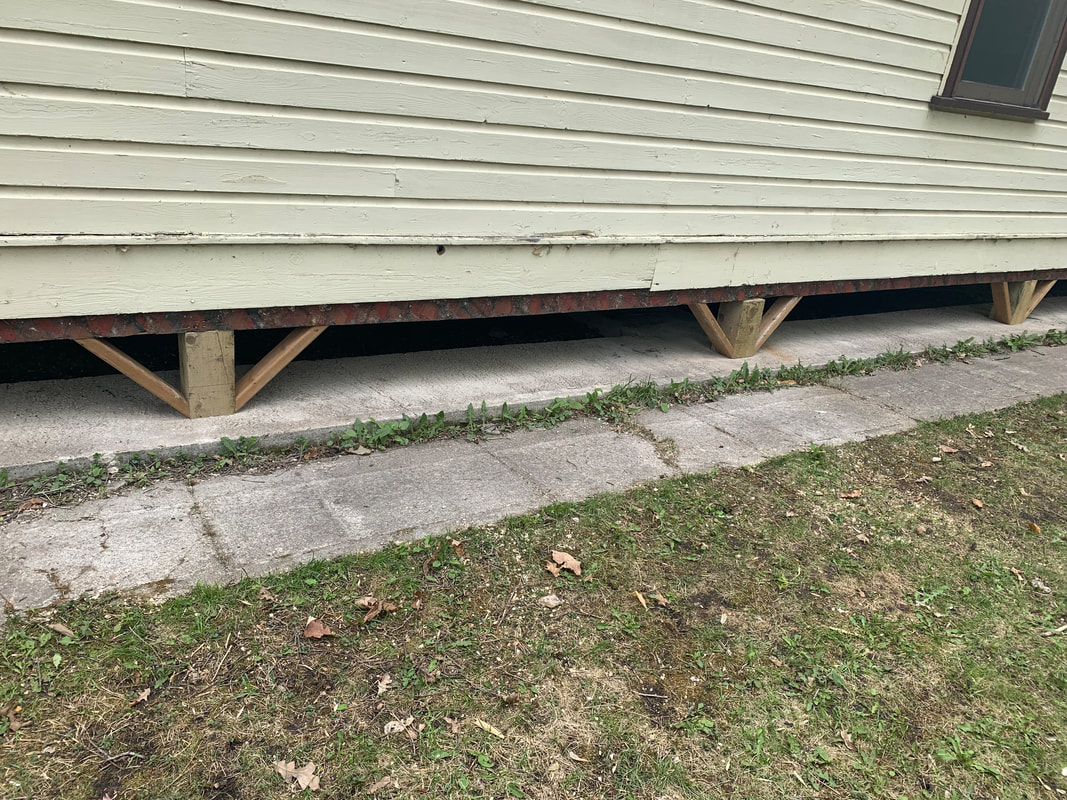
The Big Lift That was as far as we got before closing the cottage up in the fall of 2020, so the first thing on the agenda when we reopened it in the spring of 2021 was to call in a professional house lifting company. It was amazing to see how quickly they worked with their specialty equipment. It took about a week, and the owner of the company Mark was a real perfectionist, going above and beyond to make sure the cottage was as level as possible. We had decided to only "level" the cottage rather than lift and level, as we wanted to keep the fireplace. I have no idea how Mark and his team managed to squeeze into some of the places under there that were as low as 8" deep on the back corner! But somehow they did. Of course I wish there was a fairytale ending to this part of the story, but as most people who take on a historical renovation know, it's more of a combination fairytale/nightmare. And in spite of Mark and the teams best efforts to save the fireplace, we came home to a "good news/bad news scenario one day." The cottage was now level, but in the process as it came up (almost 12 inches) in the center, the chimney did not make it. It cracked and fell over on the roof and after some close examination it was decided that the old fireplace could not be saved. The whole thing was tipping forward and even if we rebuilt the chimney it would continue to sink and cause the same problem again.
Hindsight is always 20/20 and if I could have a redo I would have lifted the cottage about 2 feet higher than it now sits as most people in the area do. But in my determination to save the fireplace, that did not happen. In the end, we were pretty happy. The floors were level, and onto our todo list was added "remove the old fireplace".... Oh yes, and I forgot to mention adding "and patch the roof".... which started to leak in five places after the chimney collapsed! Aaaahhh...... but that's a story for another day! In a cottage hideaway, a carefree spirit rules. The furnishings ---- a wonderful mix of old and new, cast offs and thrift store finds should reflect this easy going attitude. But old or used does not have to mean ugly. In fact, the best cottages are the ones where with a little creativity, the owners have turned furniture that was only mundane into something magical. It usually does not involve much money, just an ability to think outside of the box, and pour some love and time into the finished product. 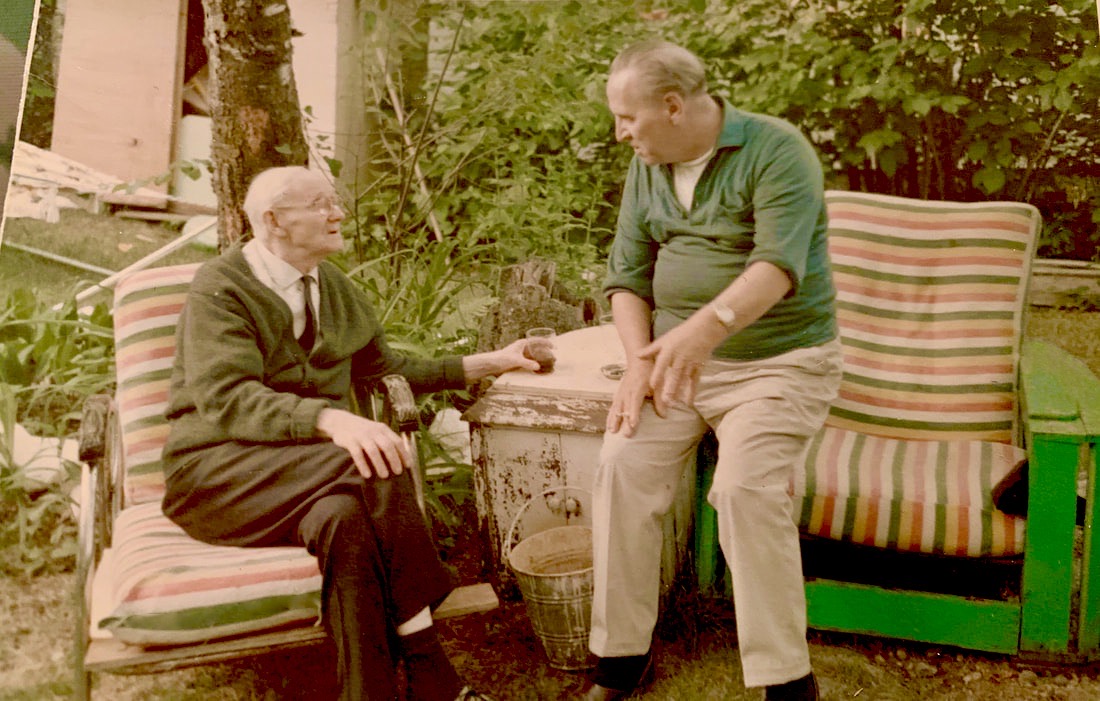 My grandfather Hugh talking to old uncle Joe, sitting on the vintage cottage chairs. . . I wonder what that conversation was about? My "Nana" Eileen, was very creative and an excellent seamstress. She let me practice on her sewing machine as a young girl, and it opened up a world of possibilities to me for decorating. Always practical and able to to transform her world, she created this furniture for the cottage yard from a 1930's art deco style sofa and chair set. She removed all the stuffing from the frame and painted the wooden arms in a vintage turquoise green. The existing cushions were recovered in red, green and yellow striped canvas to complete the "cottage-style" look. Other cast off chairs were then recovered to match the theme. 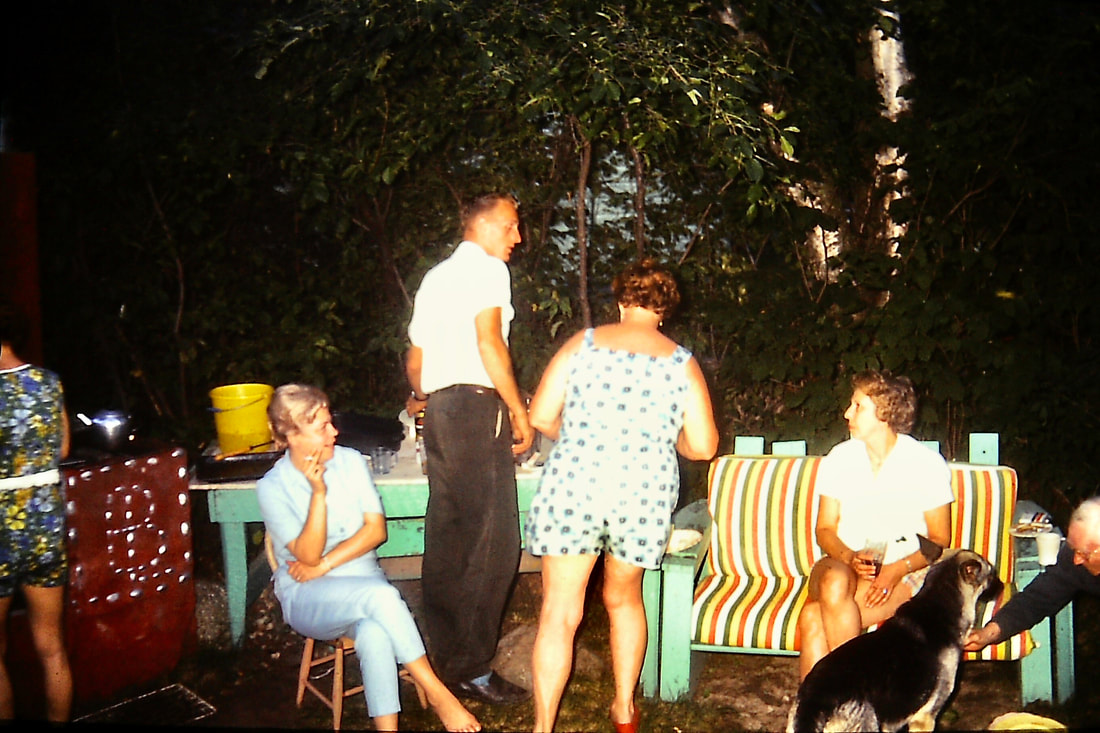 The rest of the backyard was a collection of miss-matched furniture that had all received the same turquoise paint treatment, and somehow came together in a very charming way. The old tables were topped with marble slabs from a building that was being demolished, and a hand-made red barbecue with the initials for Banchory Lodge embedded in silver painted stones completed the look. I don't know if we will ever be able to replicate that barbecue. It is definitely a one of a kind! 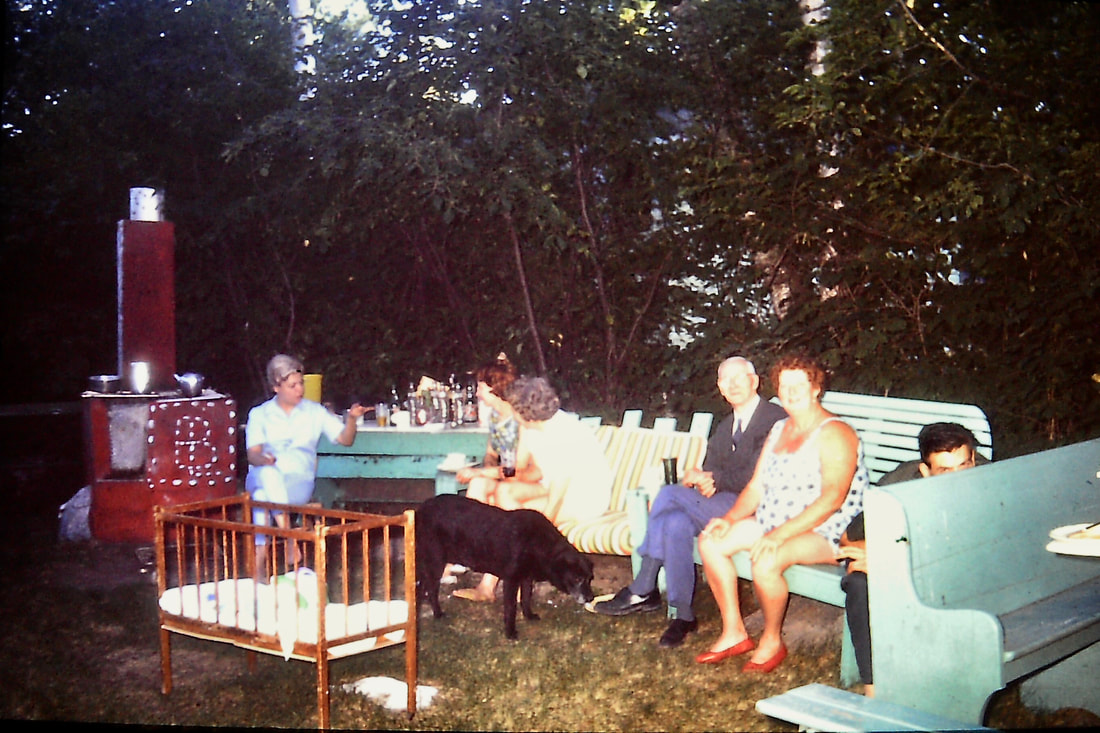 When Murray and I purchased our own version of Banchory Lodge in Winnipeg Beach, it would have been easy to become overwhelmed with the amount of work involved, but I had all summer to get ready for our fall possession date, and decided to purchase and create the decor for the one space that didn't need much work, and that was the screen porch. I knew I wanted to go with vintage wicker furniture, because it's so perfect for a cottage, but I did not want frilly or fussy fabrics. The screen porch is a central gathering place in the summer and I want it to have four elements. #1. Vintage, #2. Comfortable, #3. Durable, #4. Relaxed-Style.
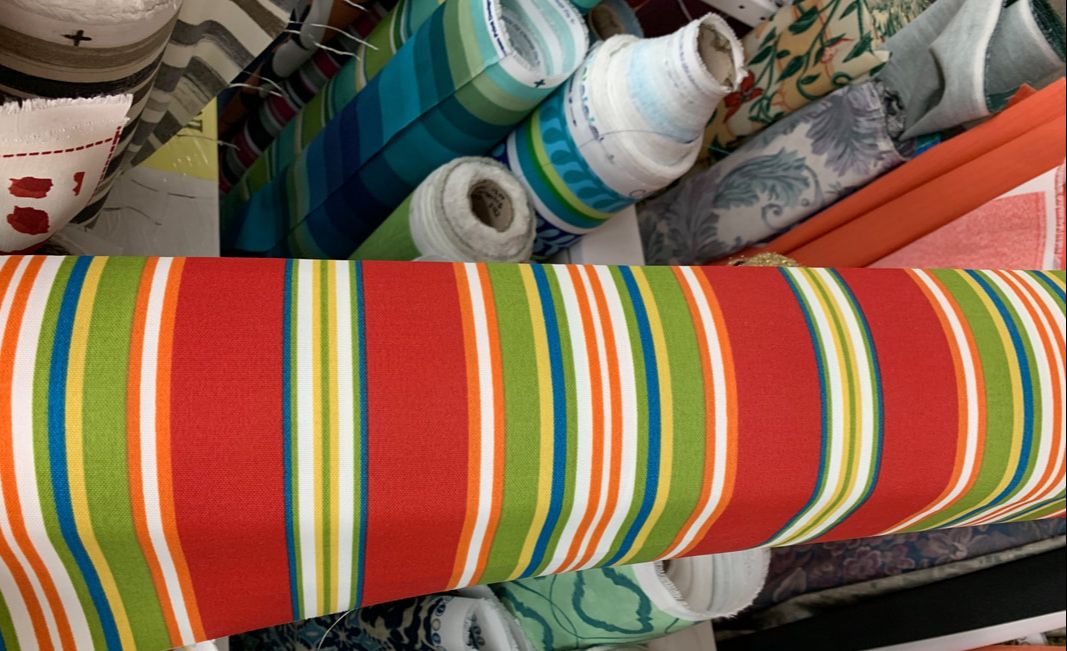
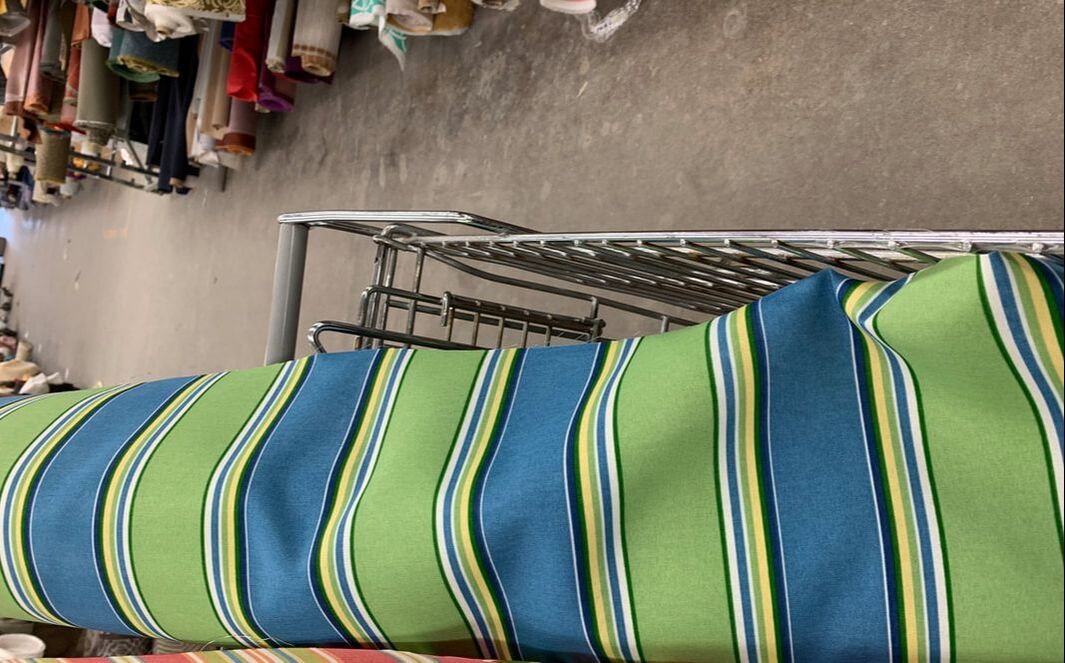
So with this in mind, I set our for the fabric store to find some cottage worthy striped canvas, just like my Nana had used. I ended up with two possibilities in my cart, and spent about 30 minutes going back and forth between them. I could not decide! I finally messaged my friend Brenda to help me with the verdict. She is my partner in all things vintage, thrift shop, crafty and cottage related. Oh, and I should mention... she and her husband ended up buying a cottage just a few blocks over from us, shortly after we bought ours. The final verdict was the red. It looked a bit more vintage to both of us, which we thought would work best with the age of my 1910 cottage.
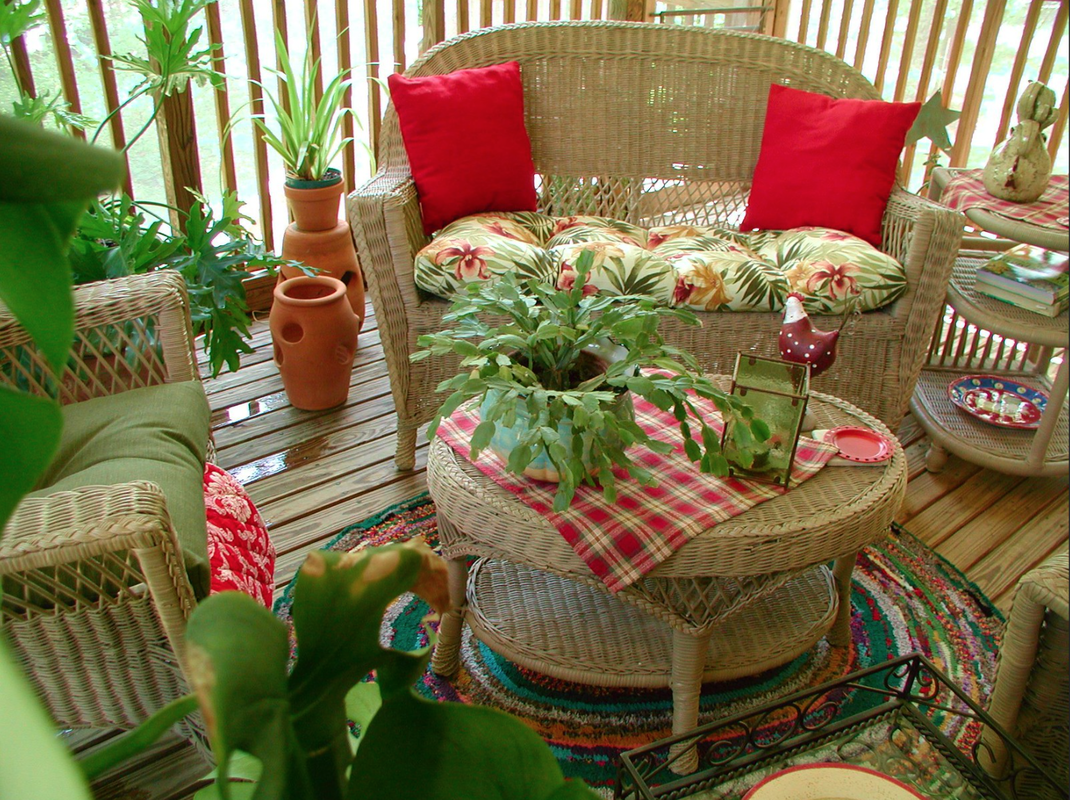
In total I painted painted 9 chairs, two tables, and a rattan loveseat. BY HAND... WITH A BRUSH! Let's just say it was a labour of love! Here below is a photo of one of the chairs having just received its green paint. You can see in this photo what a difference a bit of paint can make to an old wicker chair.  Once the painting was done, it was onto the sewing. Tufted seat cushions, back pillows, and a cover and skirt for the featherbed. I spent the summer tethered to my sewing machine and using all of my upholstery skills to bring the old pieces back to life. So was it worth it? Definitely. Here is a reminder of how the porch looked when we purchased the cottage in May. We did not really know what to expect on the weekend we took possession in September, but I was very grateful I had prepared everything for the screen porch once we arrived. 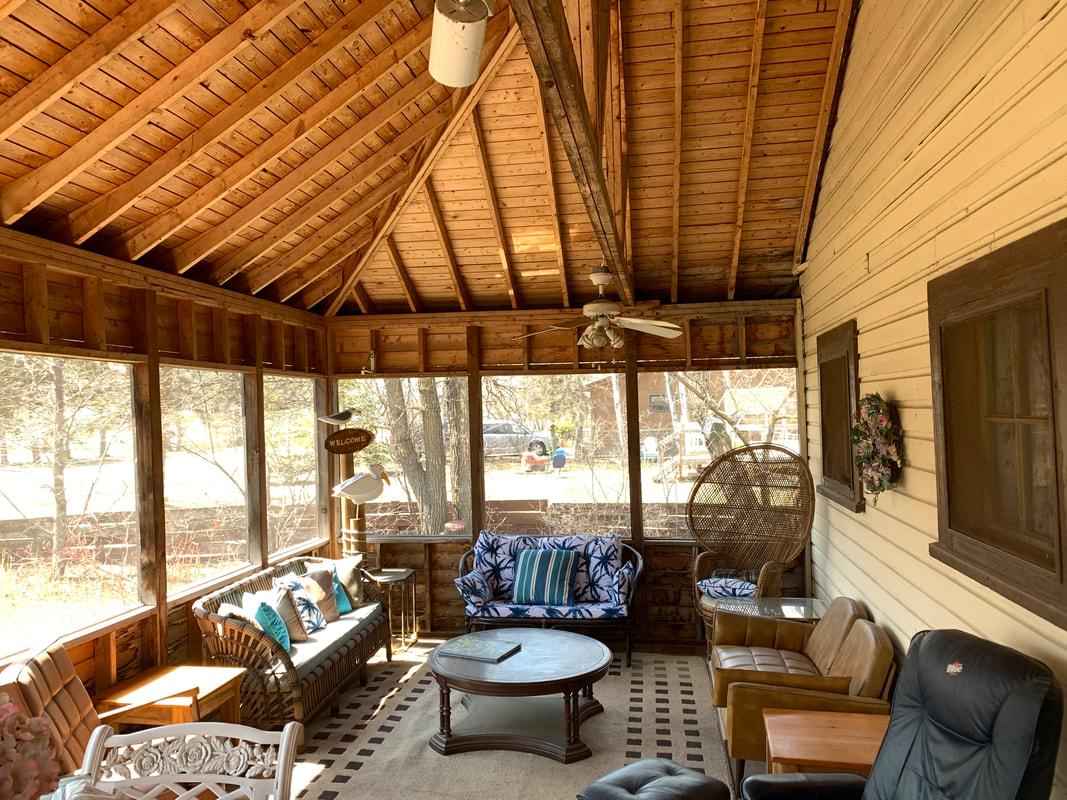
The vintage feather bed from the original Banchory Lodge, now reimagined in stripes and blue accents. This is the perfect spot for an afternoon nap!  The cottage is beautifully shaded by the tree canopy all day, so we can sit in these chairs and see the lake, just to the left... 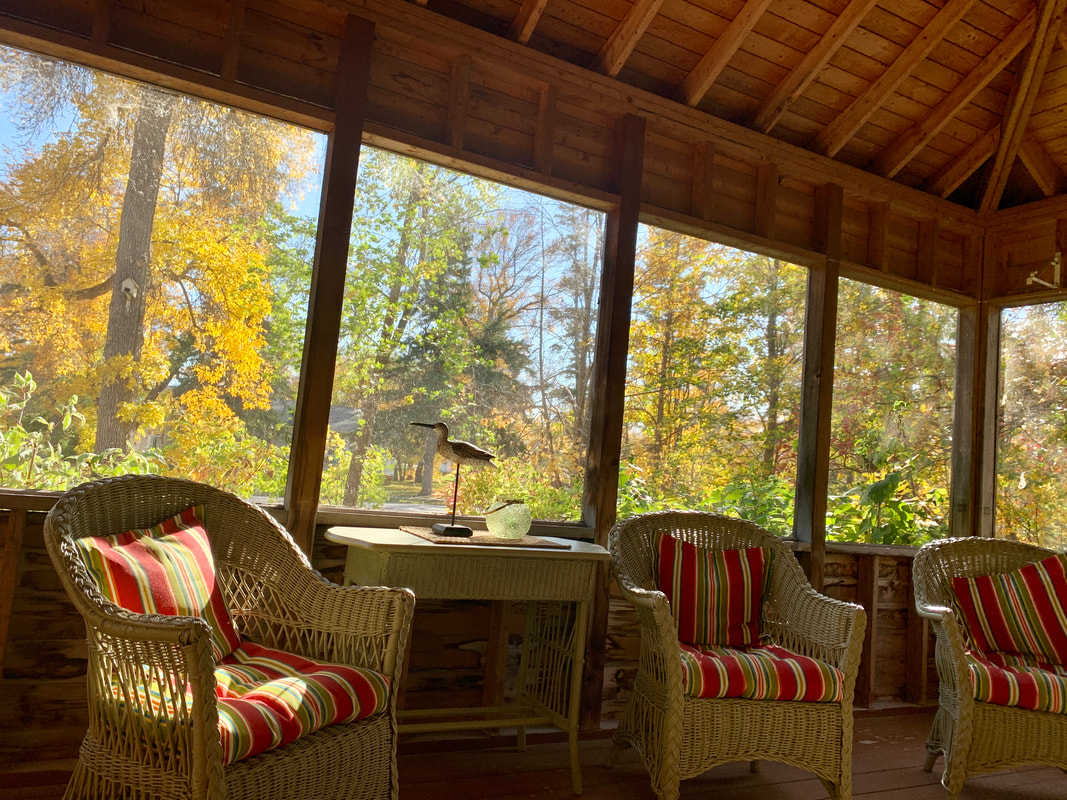 I had purchased this old oak table and chairs with the intention of painting them cream, but as soon as they were in the space, they looked like they belonged just as they were. The cream paint would have been "too fussy". 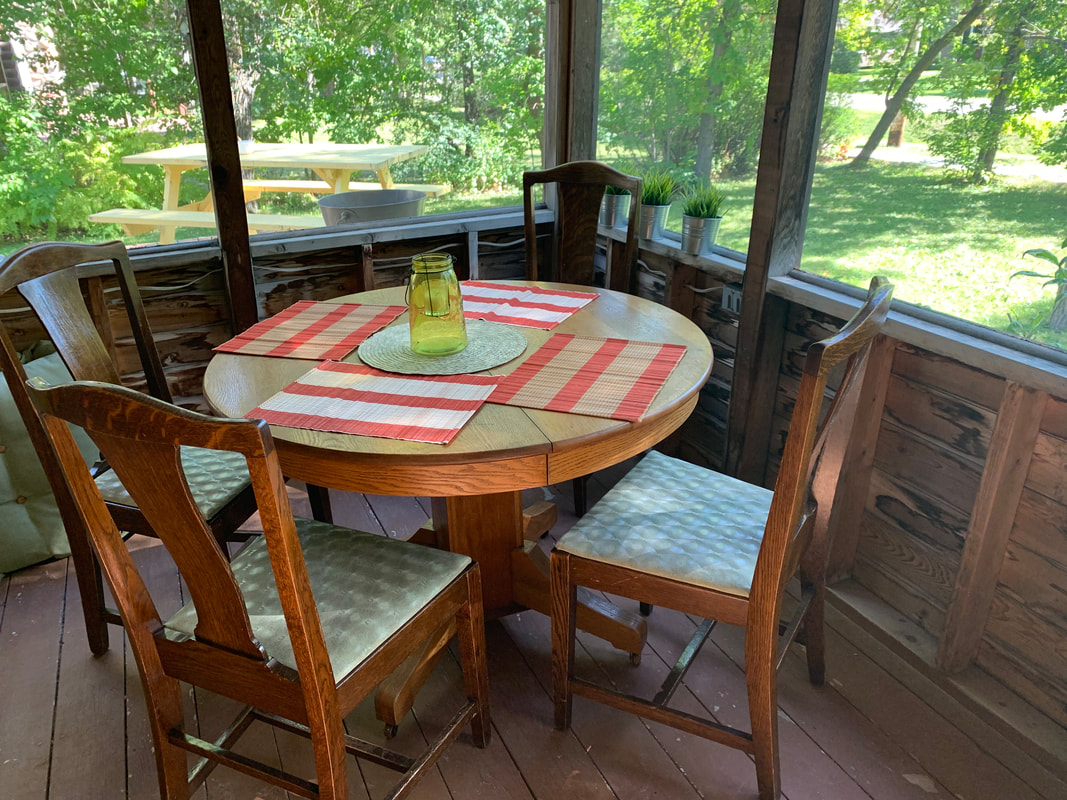
The finished screen-porch shows a small sample of the way I style things, and the standard that I like to bring to restoration projects. This combination of #1. Vintage, #2. Comfortable, #3. Durable and #4. Relaxed-style, will be repeated throughout the cottage, with a few doses of whimsy and nautical fun mixed in. 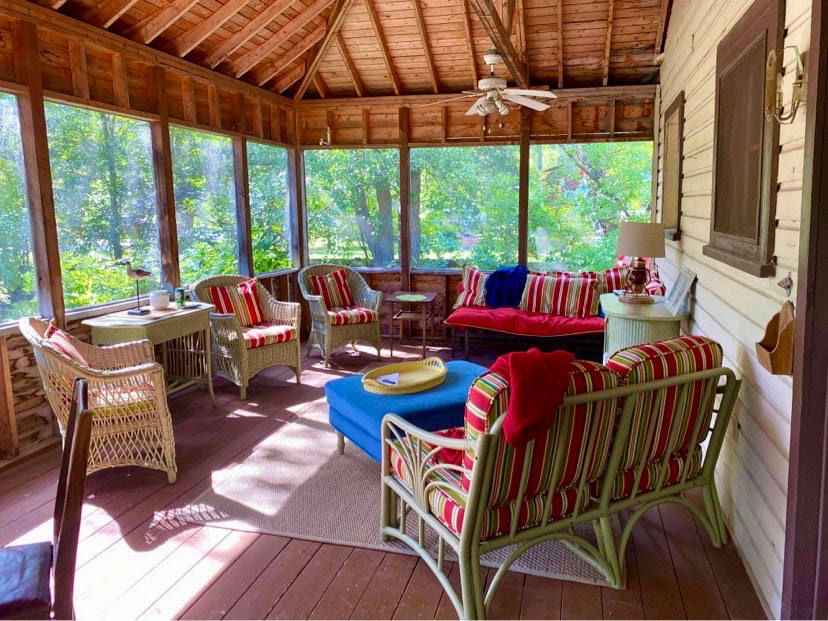 We have started the journey to bring this old girl from mundane to magical... but the best is yet to come! 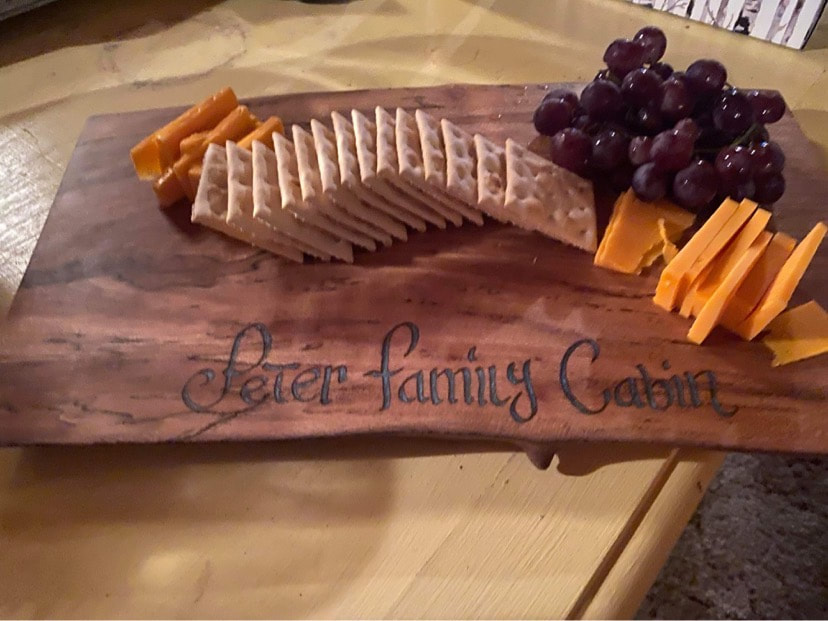  The summer cottage. The mere words evoke images of sun-dappled woods and sparkling waters, breezy screened verandas, and the promise of lazy afternoons. Often our most treasured retreat, the cottage has become a metaphor for relaxation, escapism, and family kinship. Above all, it's the place where we can cast off our city shoes and worries, sink into an old porch rocker, and simply be ourselves... Judy Ross Not only are summer cottages the depository of people's most cherished memories, they often are the depository of anything the family has collected along the way that they can't quite let go of for one reason or another. Whether it's a comfortable family chair or a long-ago mother's day gift, these items always seem to migrate to the family cottage. In the Banchory Lodge cottage of my childhood, it was no different and there was quite an eclectic collection of furniture, all of which had a story. "Those little blue chairs came out of the Sunday school rooms of ________ church." and many other such tales attached to everything from the china cabinet to the outdoor furnishings.
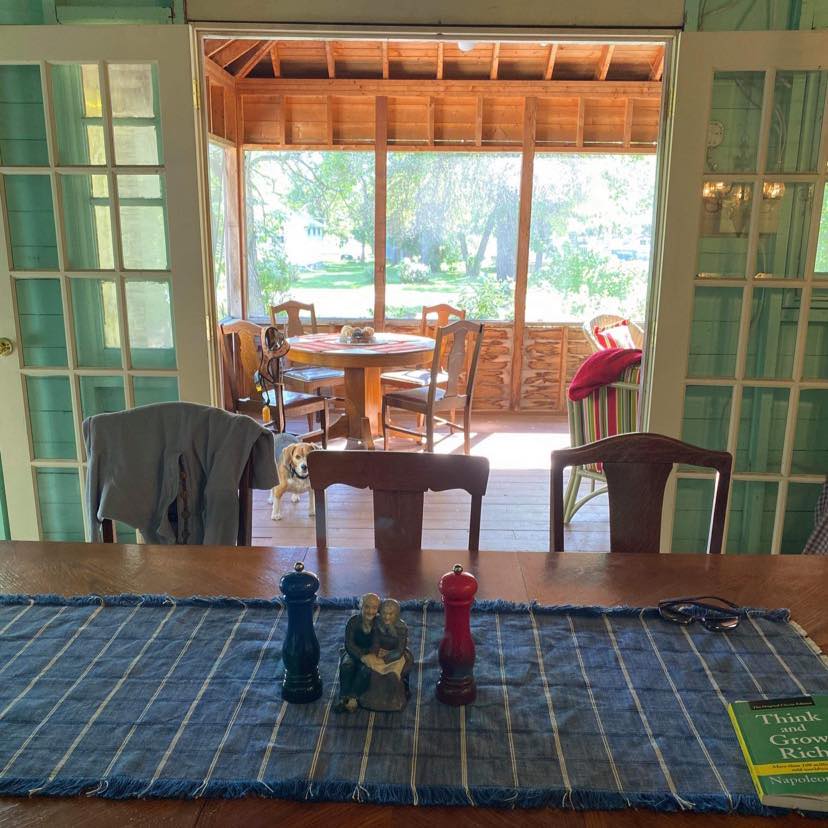
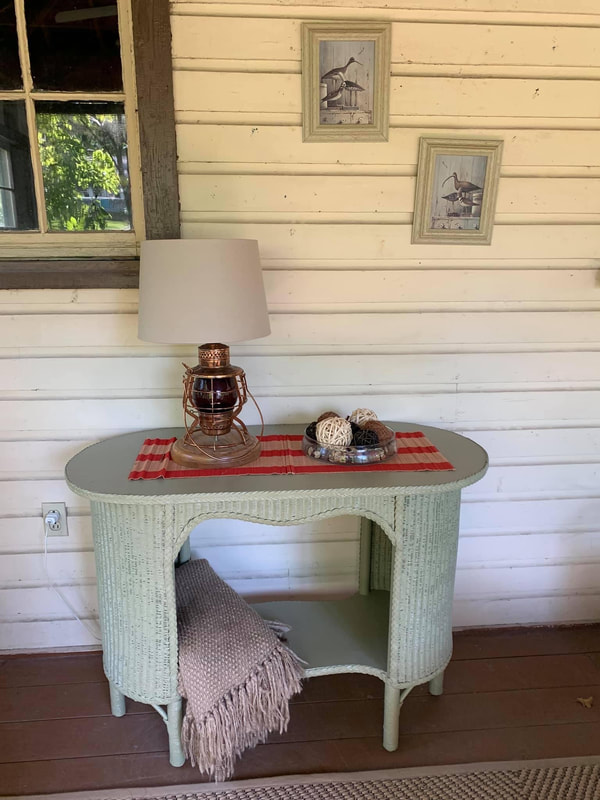
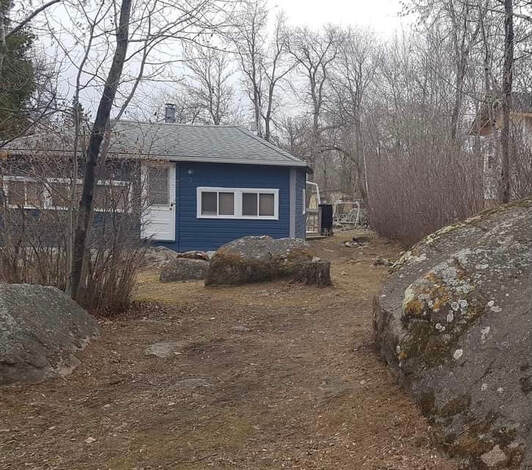
So it should have come as no surprise to us when the agent showing us the Winnipeg Beach cottage seemed to be a bit nervous before taking us inside. On the surface, the cottage seemed to tick all of the boxes of what I could ever want in a summer place. It was big enough, having started it's life as a 12 bedroom Inn, (I'll share more about that later). It was right next to the lake, in fact you could see the water from the front yard, and it was built in 1910 so it should have had the vintage charm that the first Banchory Lodge cottage had held for me. But it seemed that the agent was trying to prepare us for things to be "less than charming" to say the least. She told us that "it's a bit like a museum inside" and "other buyers have been overwhelmed by this cottage and walked away". And so as she went around the back to open up and let us in through the screen porch, we braced ourselves, imagining the TLC show about hoarders and thinking that we would likely have to rent a large dumpster if we decided to purchase the cottage. Well, the interior was not quite as bad as I was anticipating, but we definitely had to look past all the "stuff" inside and picture the bones of the cottage and its long term potential. Massive gothic antiques and silver tea sets were mixed together with saggy sofas, a mid century mod bar, and an endless china collection. There was really no rhyme or reason to it, but like I said, "the family cottage becomes the depository of souvenirs from every kind of life experience" and clearly these owners had experienced an eclectic journey. For those of you who have known me for years, I think it could be said that I thrive on taking things from broken to beautiful. So as we toured the cottage, I was becoming increasingly excited, while Murray my partner in adventure for the last 35 years was likely thinking... "Oh no! Here she goes again"! This is the cottage as we found it, plus my vision for what we will do with it... The Screen Porch The agent knew exactly what she was doing by letting us enter by the screen porch. Nothing says lake living like a screen porch and this one was huge. 12ft x 22 ft, it had room for both a dining and sitting area and I was already picturing lazy afternoons laying on the feather daybed that I had rescued from the original Banchory Lodge back-yard. The decor seemed to be wicker meets office furniture, but it was easy to see past that, at least in this space. 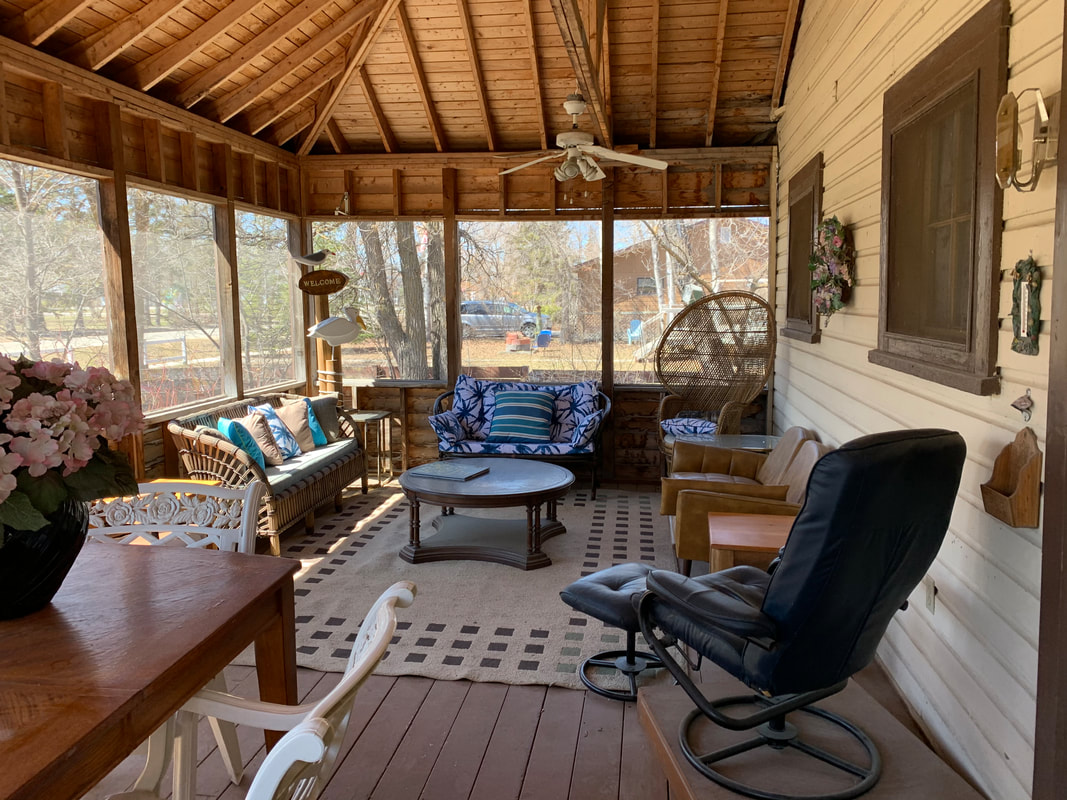
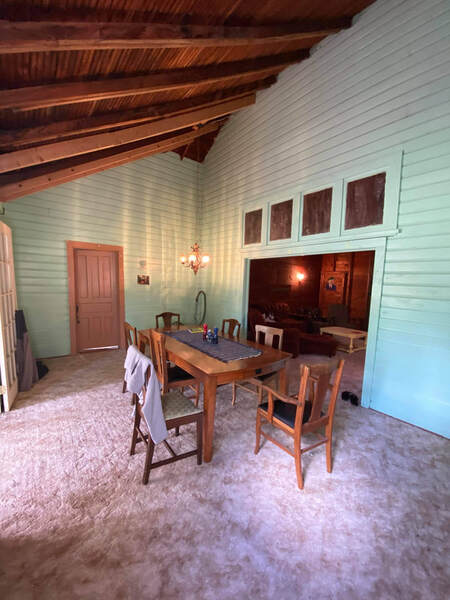
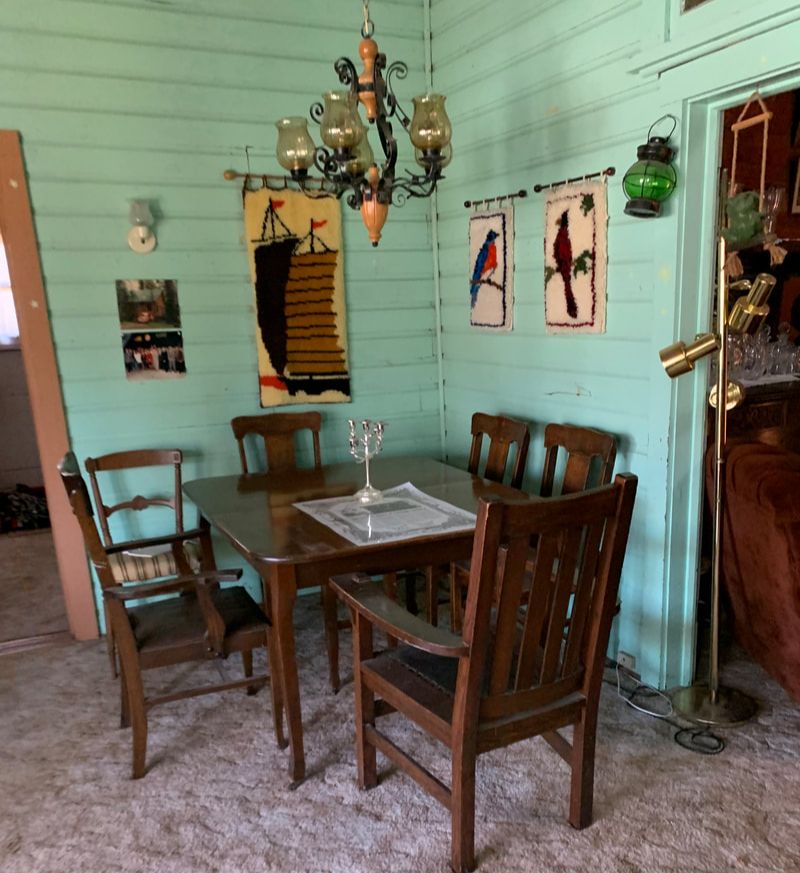
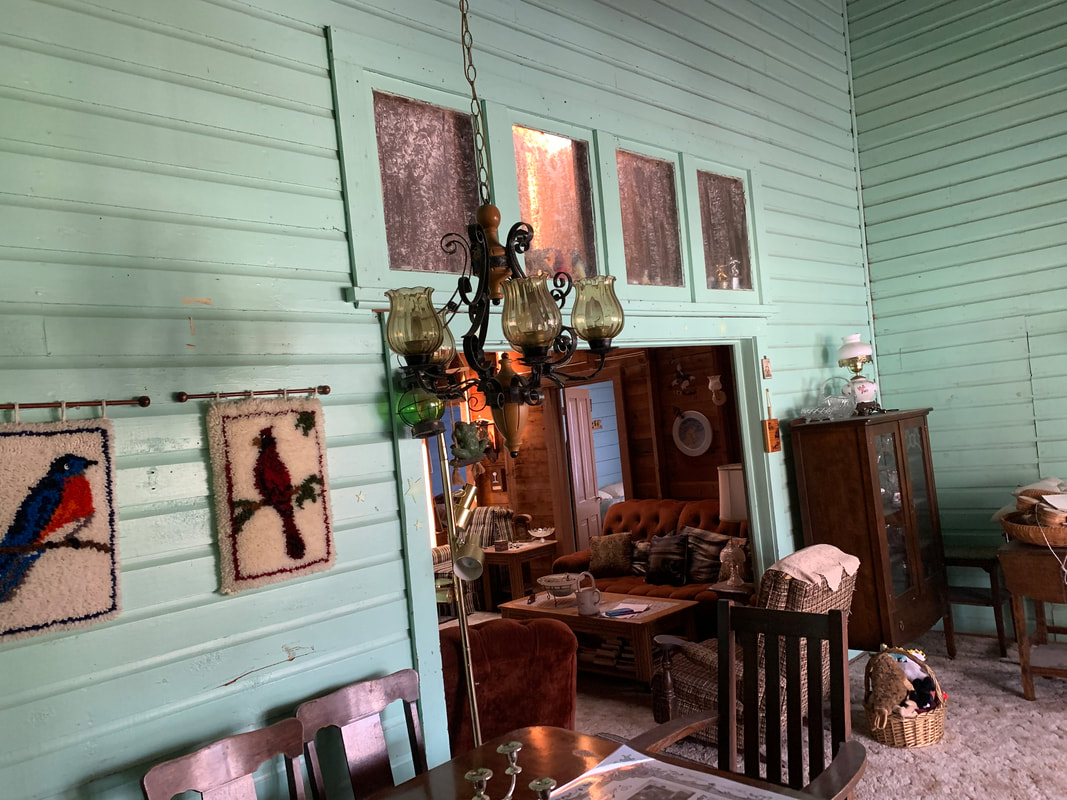
The Dining Room This was also a huge room (remember this cottage started as an inn). 12'x18' with 14-foot vaulted ceilings, but it only had a very small table in the corner and numerous antique furniture items pushed against the walls. It did have beautiful transom windows, but someone had fogged them over with some kind of film.
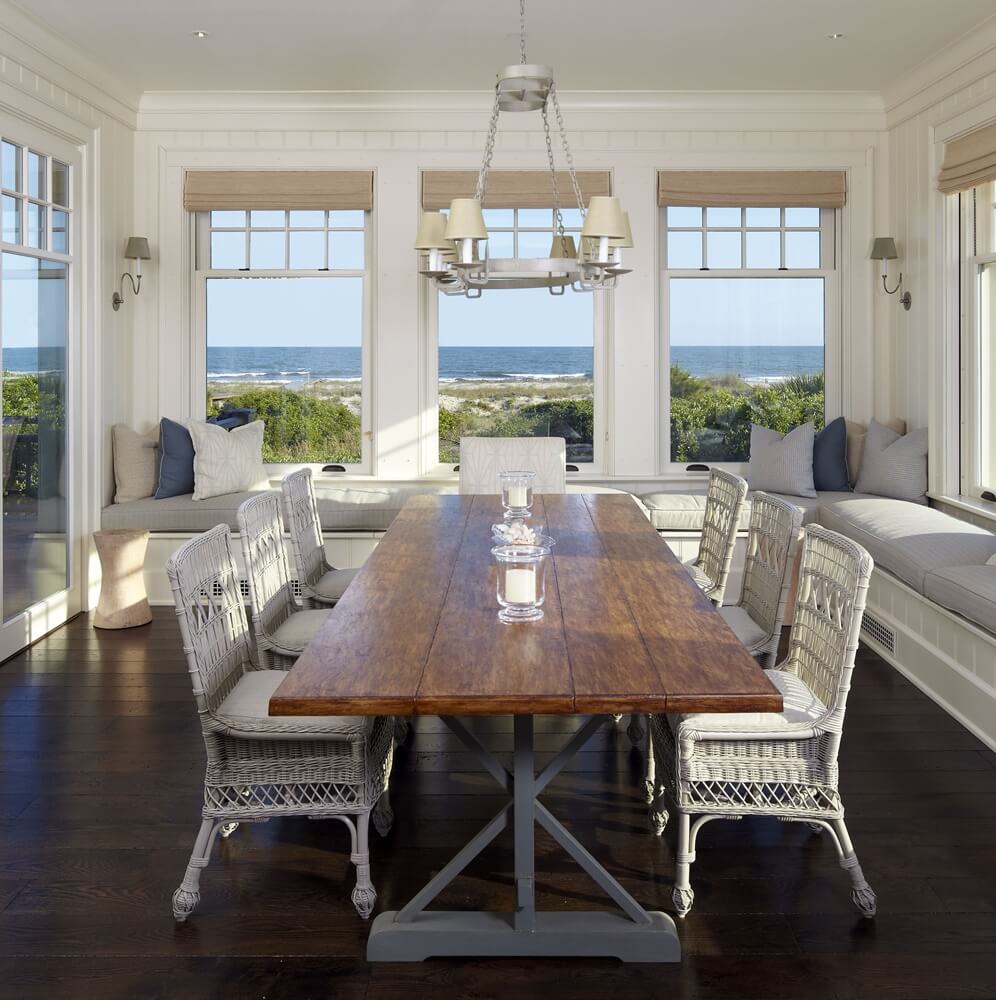
The vision for the Dining Room- A huge table that will seat up to 16 people, off white walls, navy trim and a side server and hutch in coral red. Casual vintage chairs, and fun nautical accents. Yes, of course we are doing a nautical theme.. it's a beach house!
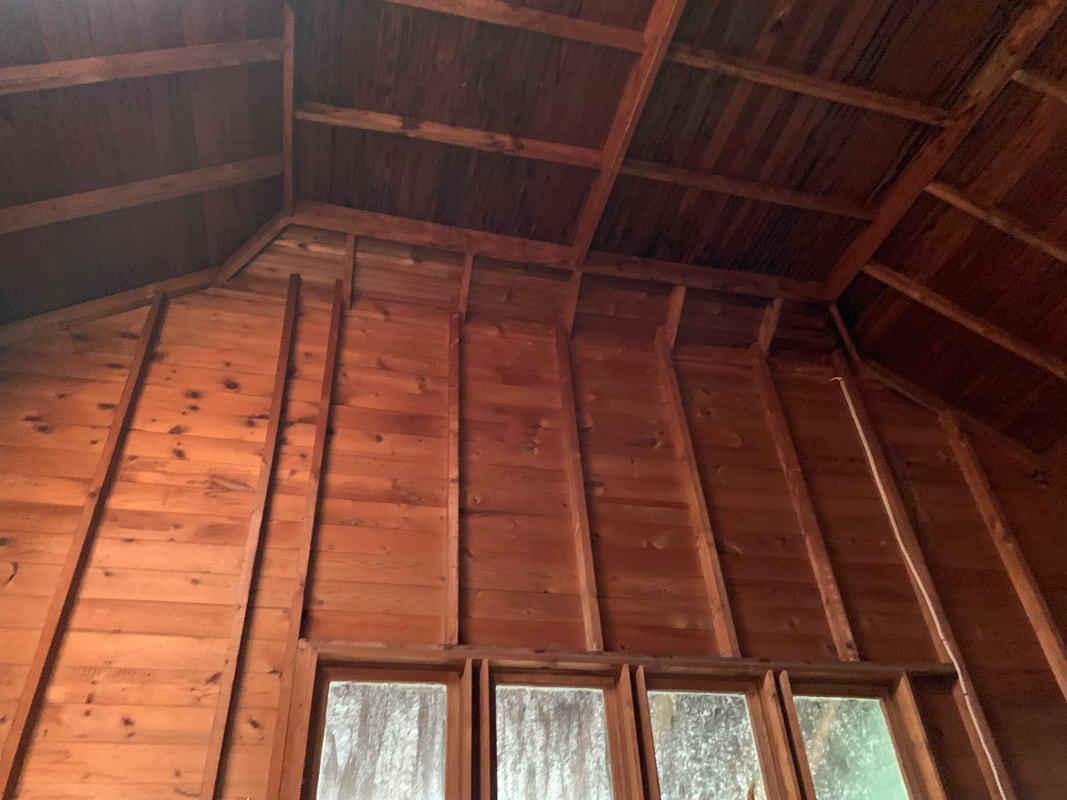
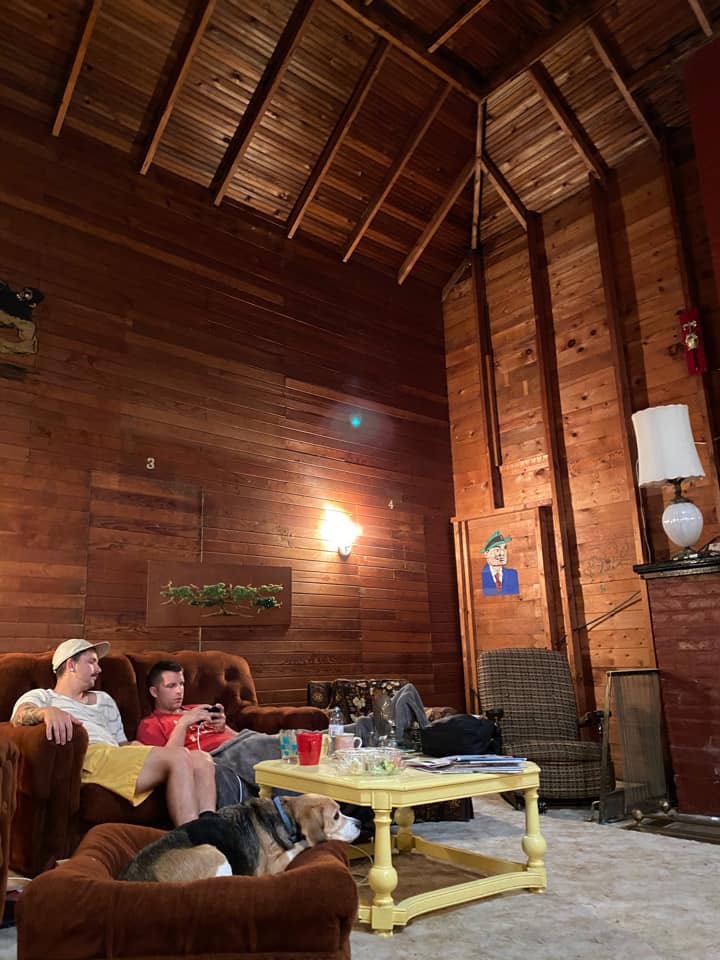
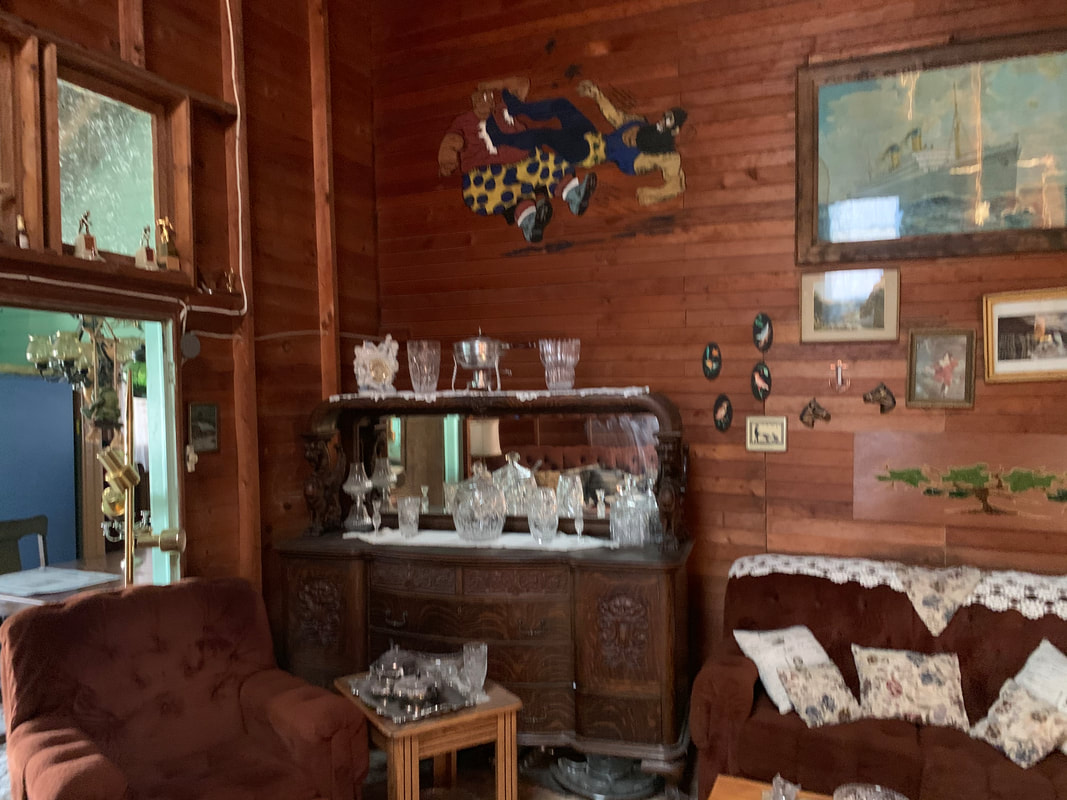
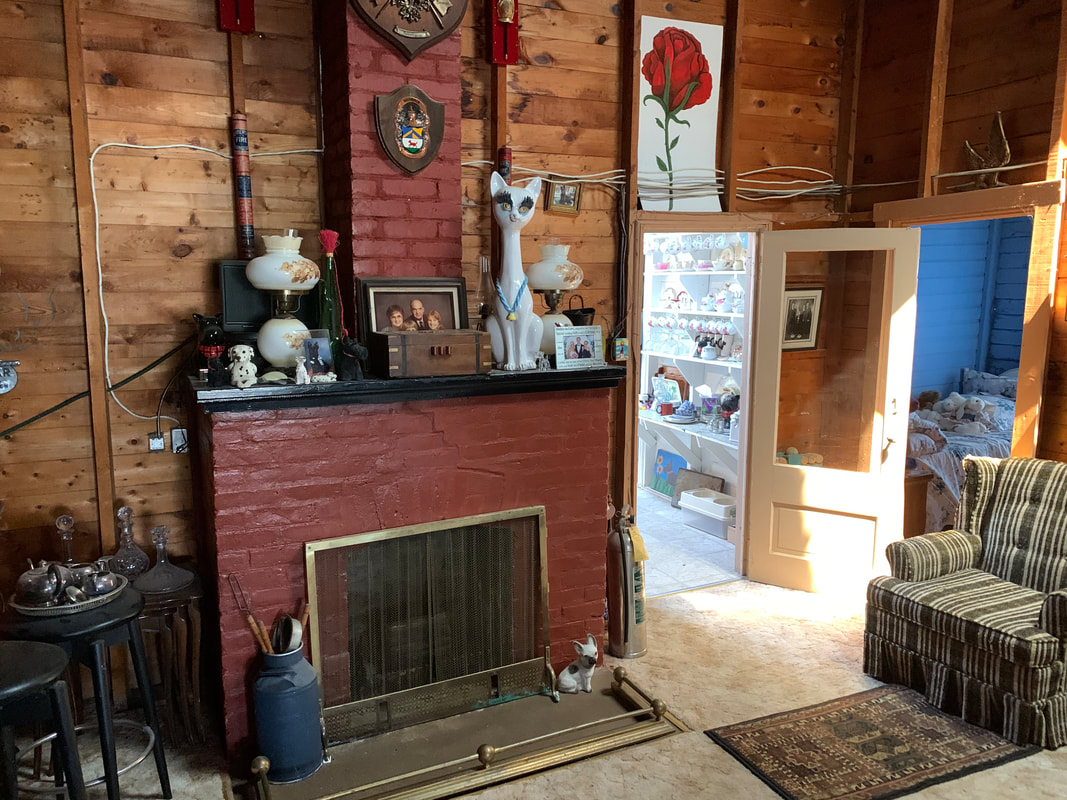
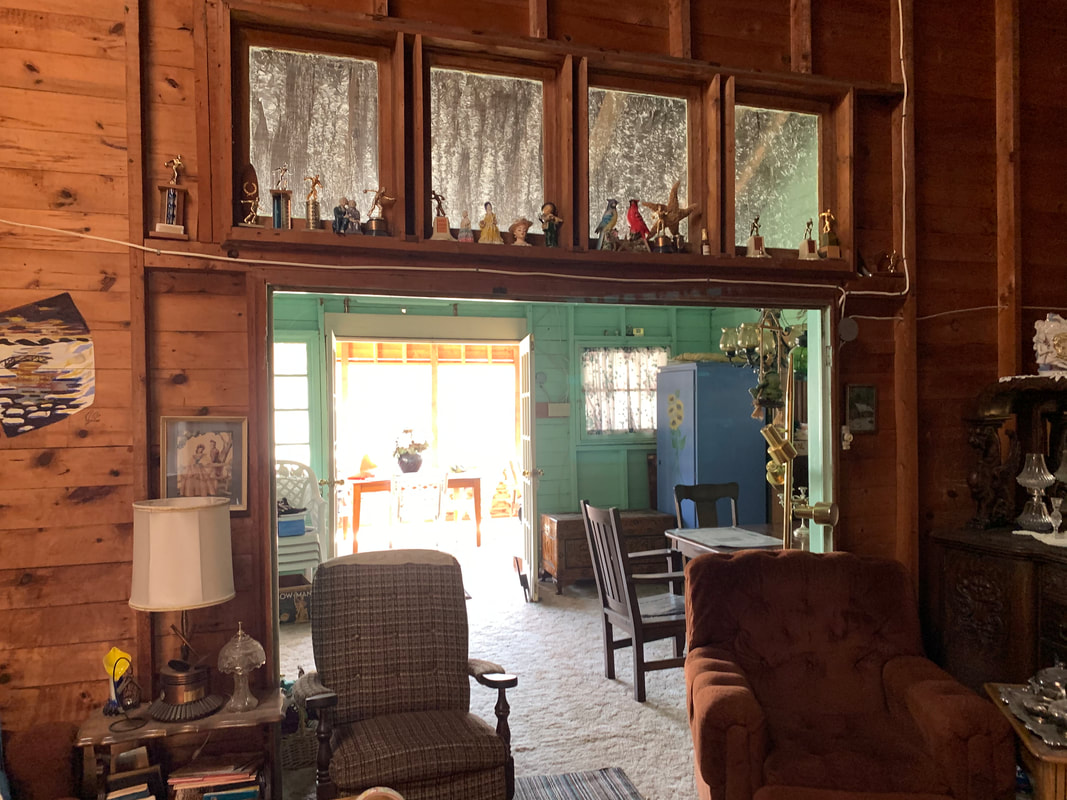
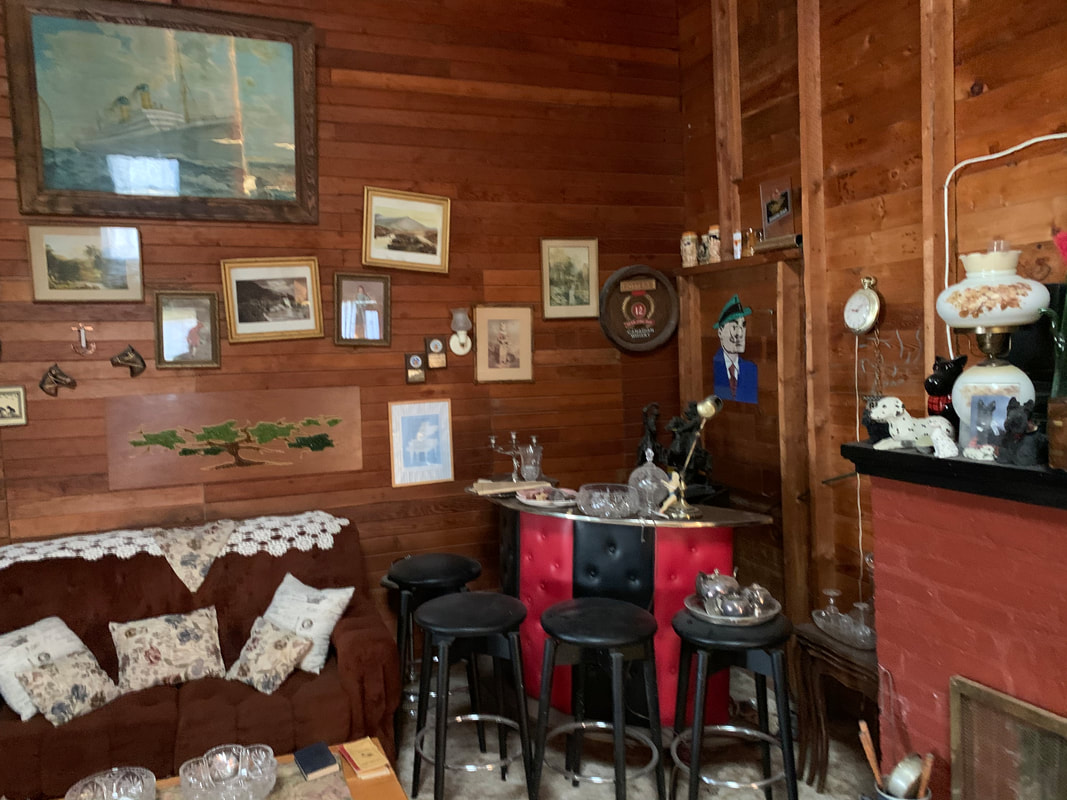
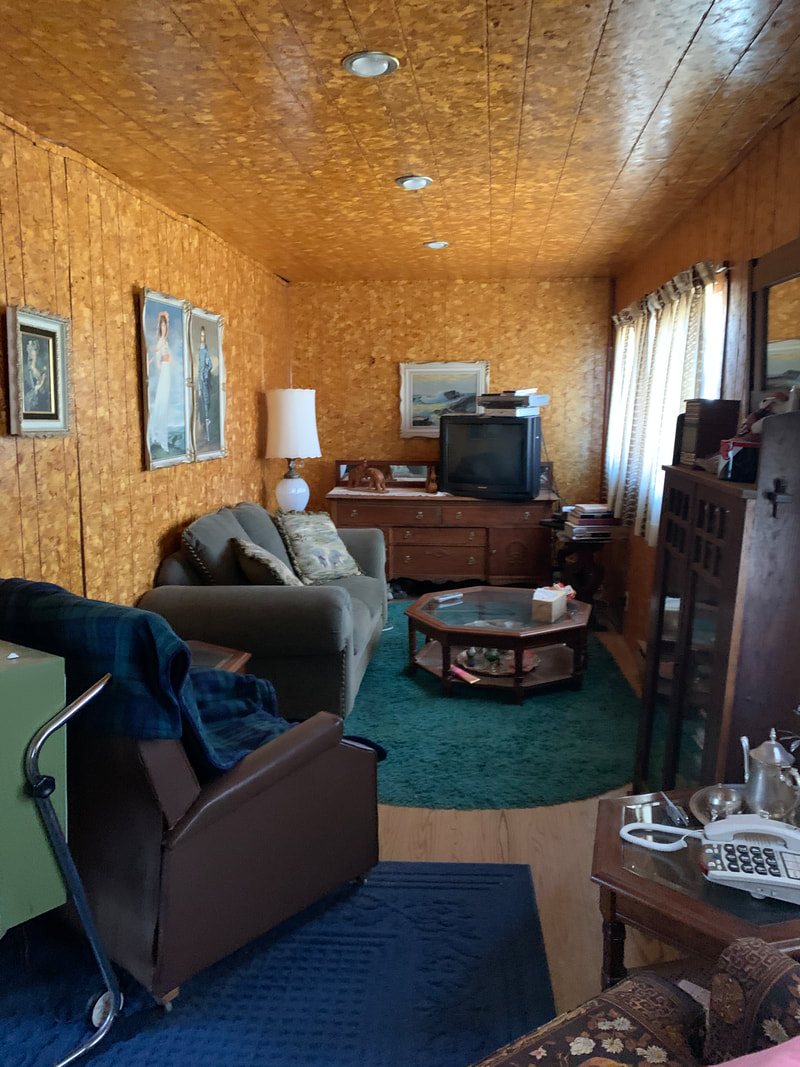
The Great Room When I was a child there was a show about a friendly giant that opened with the words "look way up" ... those were the exact words that went through my head when we stepped into the largely untouched great room. It had vaulted 20 ft tall ceilings and was full of strange antique furniture. There were also several weird cartoons painted on some of the walls. This room was also really large 18x18, and it appeared that some of the original doors leading off of it had been closed off sometime in the past.
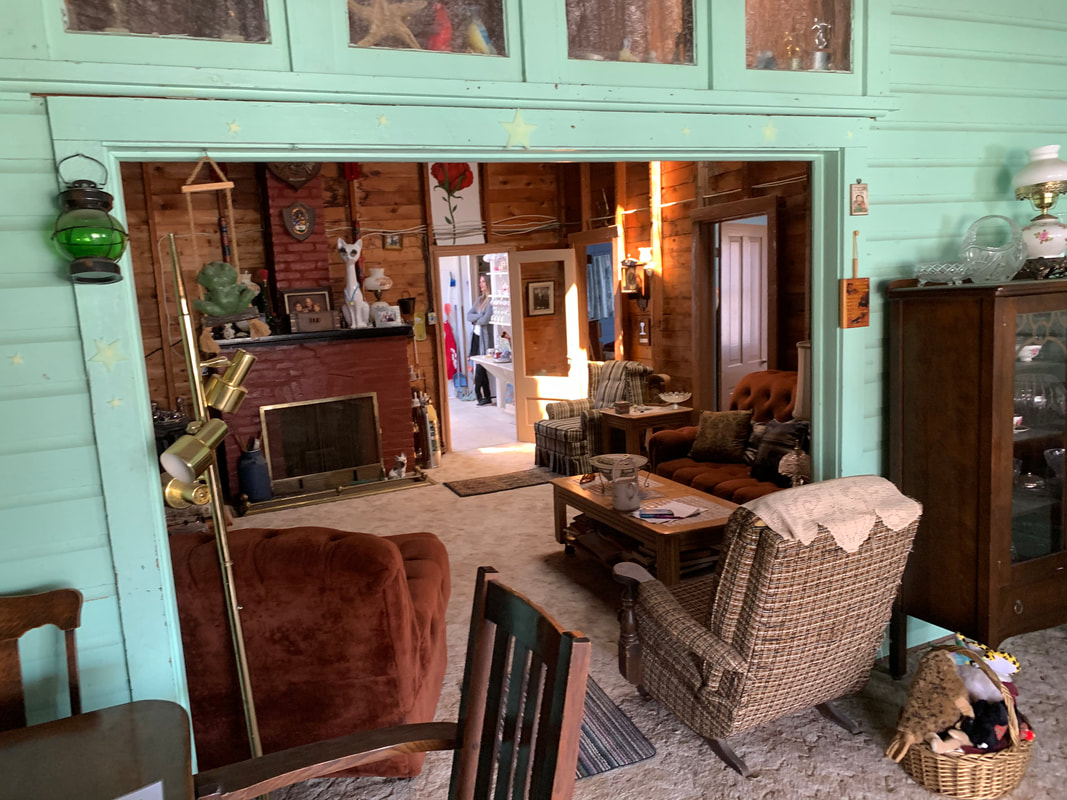
The vision for the great room is quite simple. "Add white"... but not on the walls. It turns out that this cottage is one of the few remaining in Winnipeg Beach that still has its original unpainted (if you don't count the cartoons) walls. So with the overall goal being to restore this cottage back to its vintage style, we have decided to keep the walls in the original cedar. The floors are also original wood and will be refinished, and all of the cartoons will be removed from the walls. Here are the vision photos... Think, casual slipcovered canvas sofas, comfortable side chairs and fun nautical accents. The fireplace will be repainted in a cream tone and refitted with an insert.
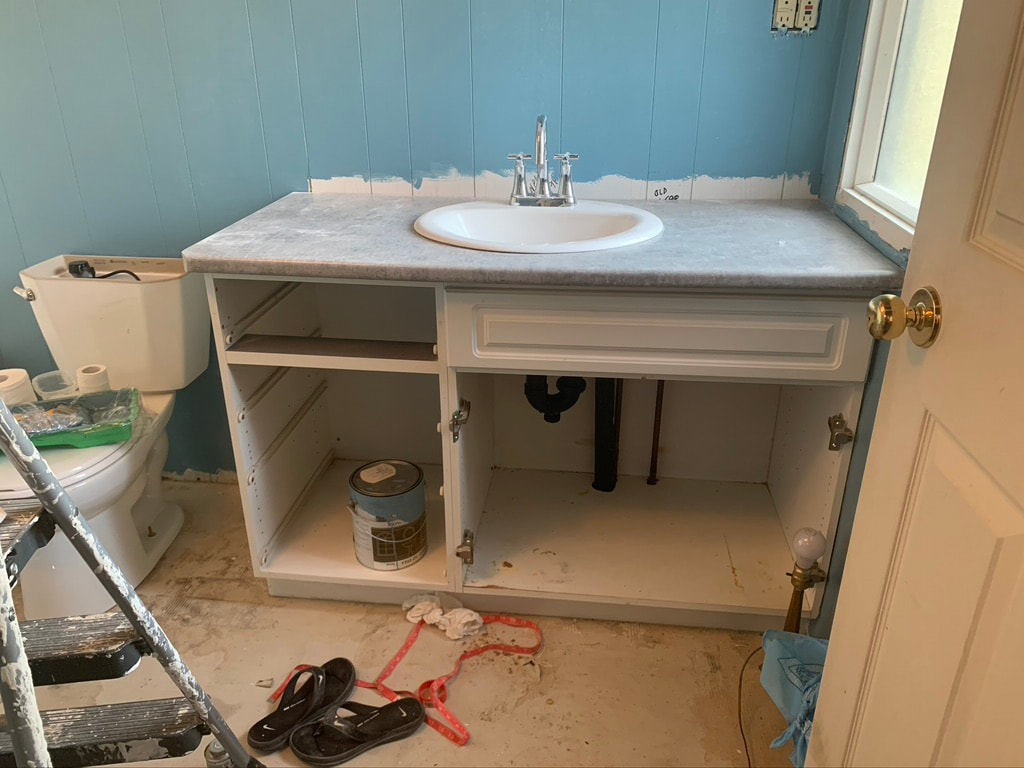
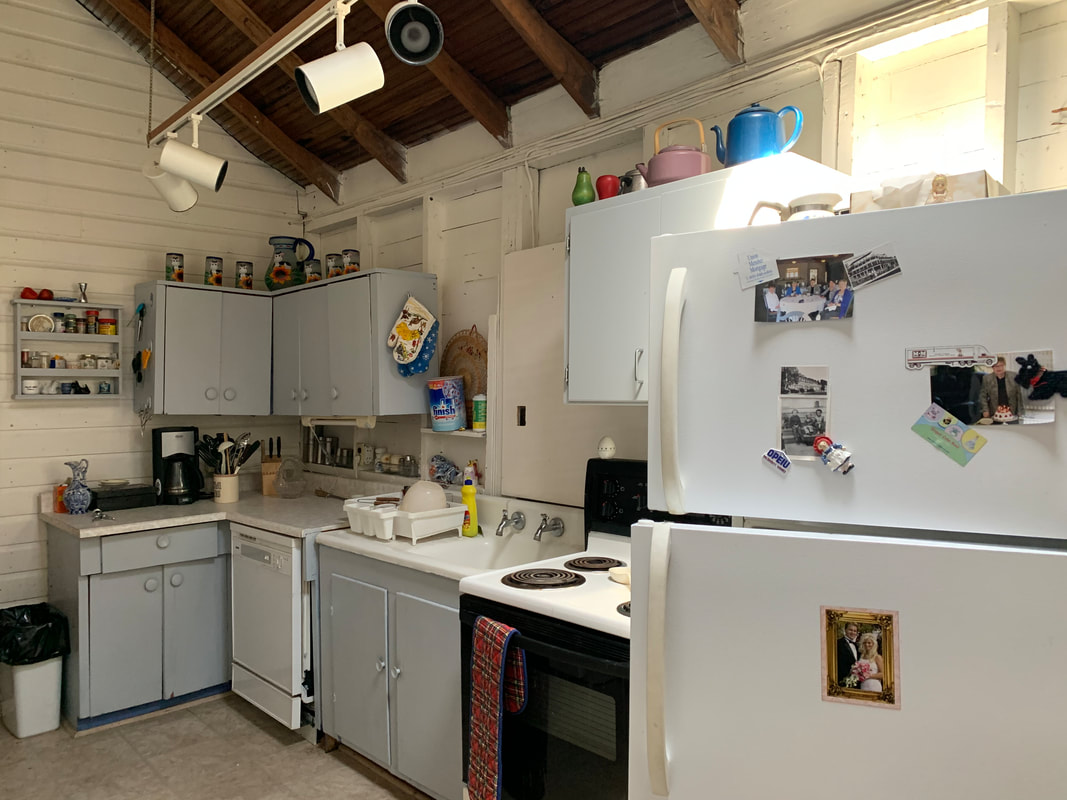
The kitchen All I can say about the kitchen is that it looks like someone refitted it from a 1980's staff room. On the positive side, there is an attached walk-in pantry, original farmhouse sink, and charming plate wall reminiscent of an Irish dresser...
The vision for the kitchen is to gut it completely. We will only keep the farmhouse sink. I have purchased a vintage wood kitchen out of an older home and we will be painting the cabinets the color seen below in the inspiration photos. We will be adding wood countertops and closing off the doorway on the end wall of the kitchen, which will allow us to have an L-shaped kitchen with a centre island. We will reopen the great room doors which have been boarded shut in order to gain entry to that part of the cottage.
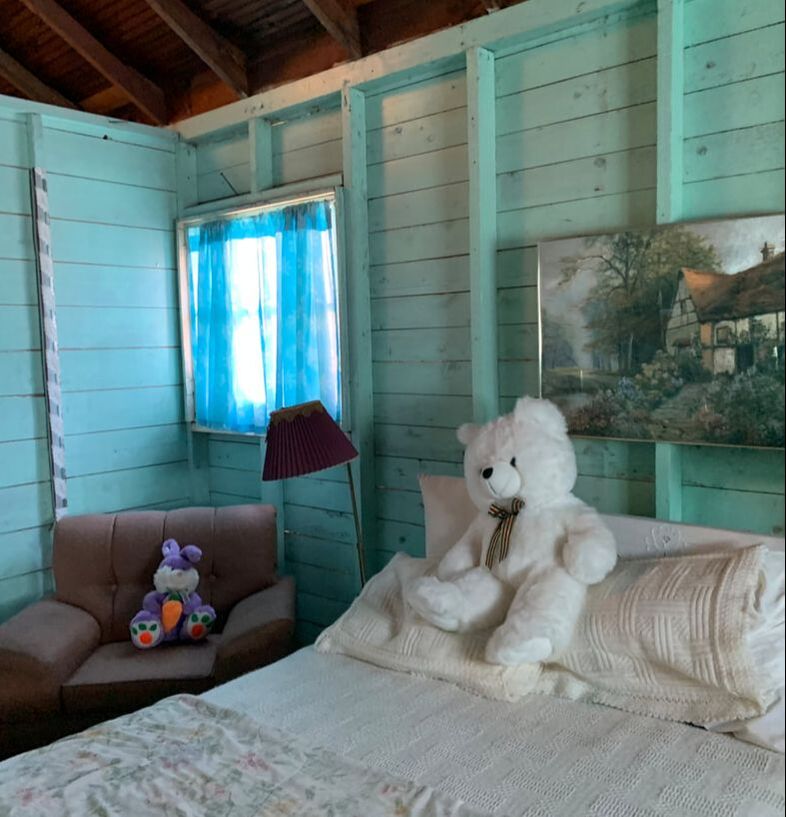
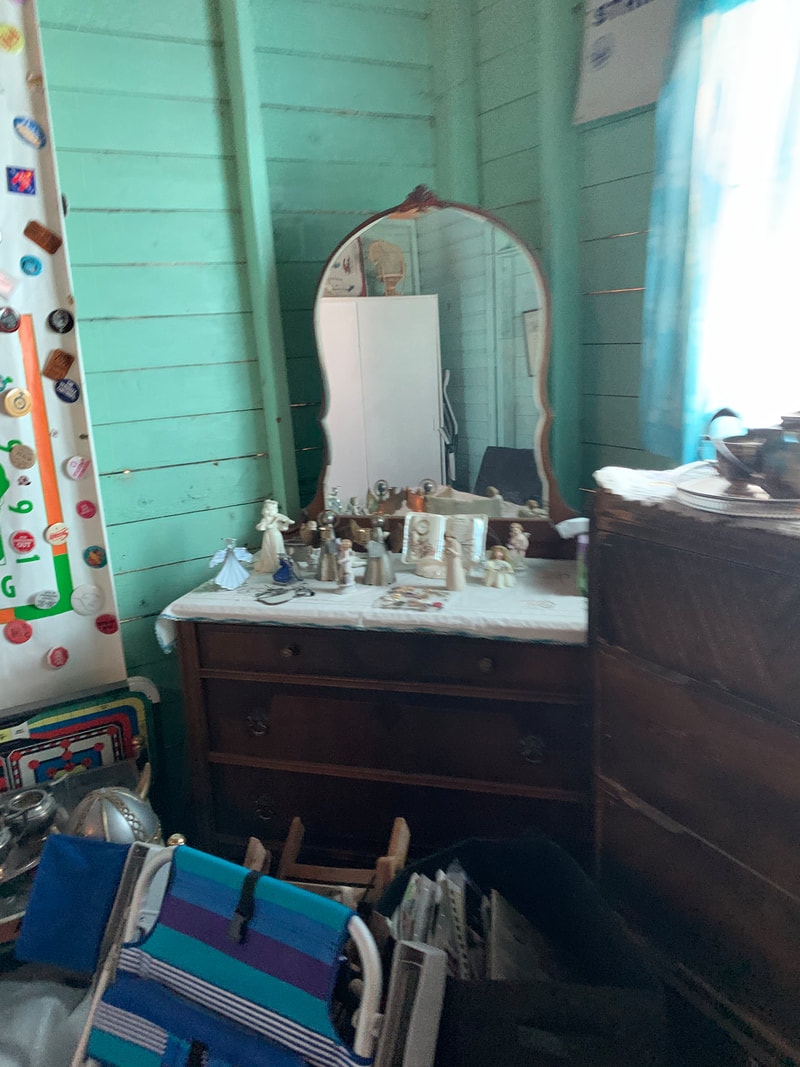
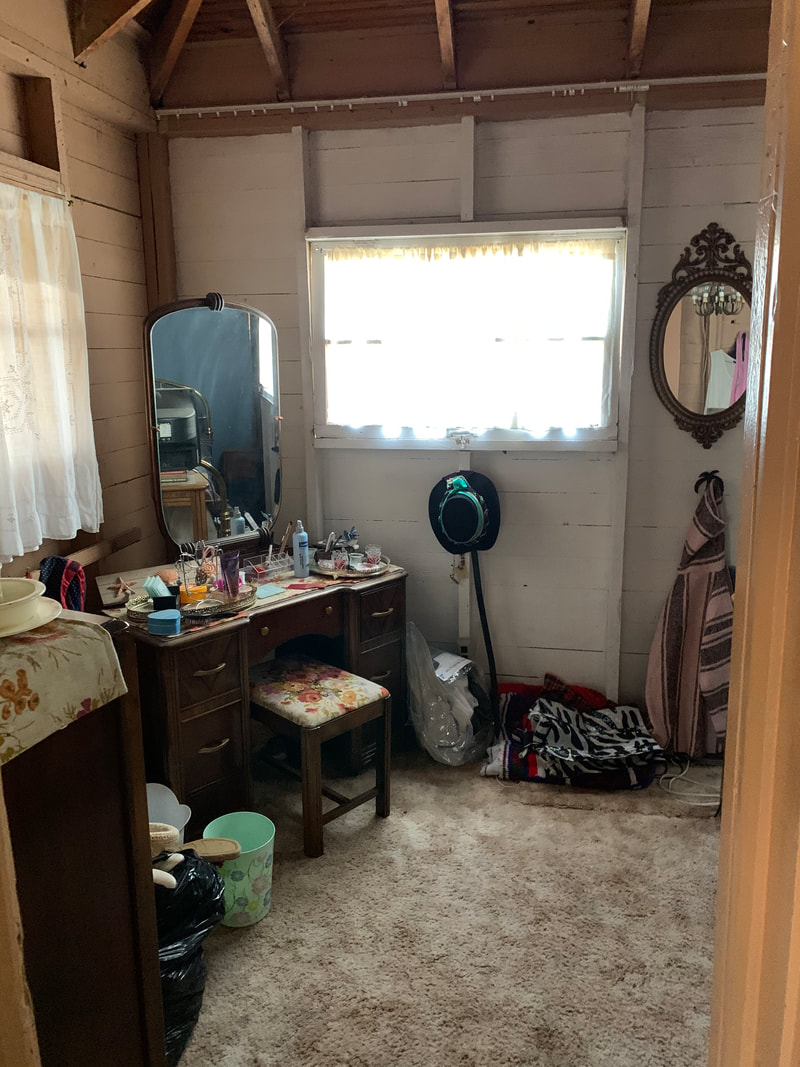
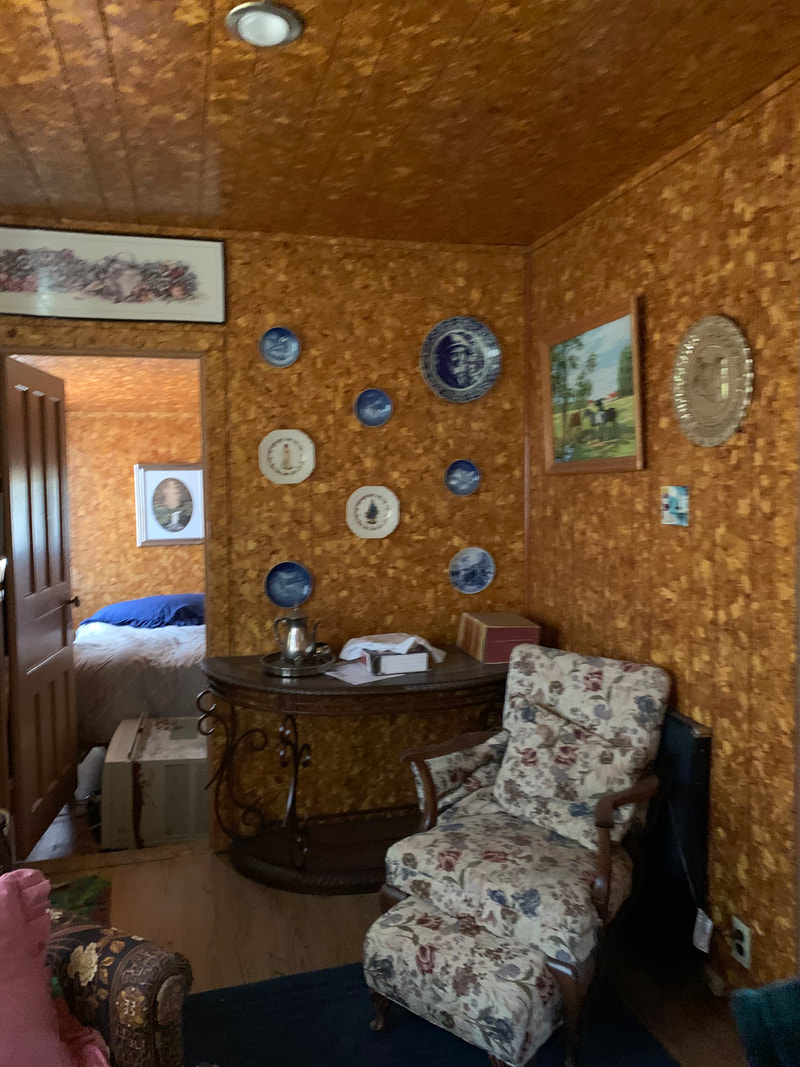
The Bedrooms I am only going to show a couple of photos of the bedrooms here because there are so many. There are currently 8 bedrooms of all different sizes and shapes. This is due to the original walls from the twelve small bedrooms being moved several times. We plan to resize the bedrooms down to 6 medium-sized bedrooms, and then turn the extra bedrooms into a den and second bathroom. The bedrooms all look similar. They are old, basic, uninsulated and you can even see the light shining through the walls in some spots. All of the bedrooms were overflowing with stuff. Some were so bad we couldn't even open the doors due to the amount of clutter in the rooms. These are two of the tidiest rooms.
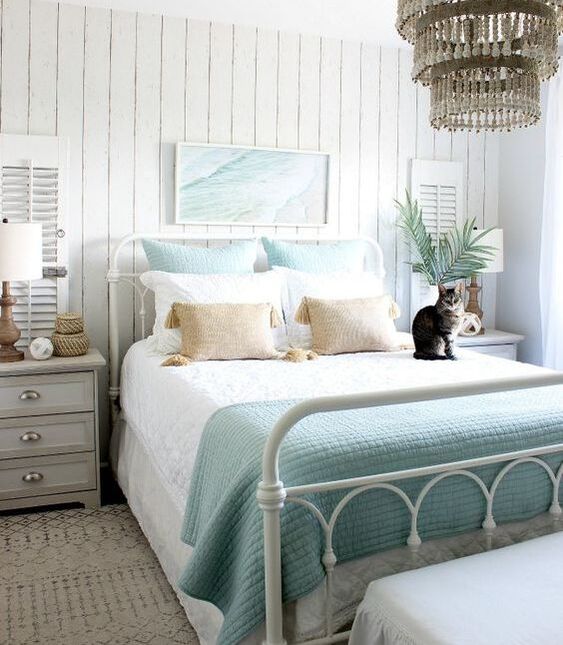
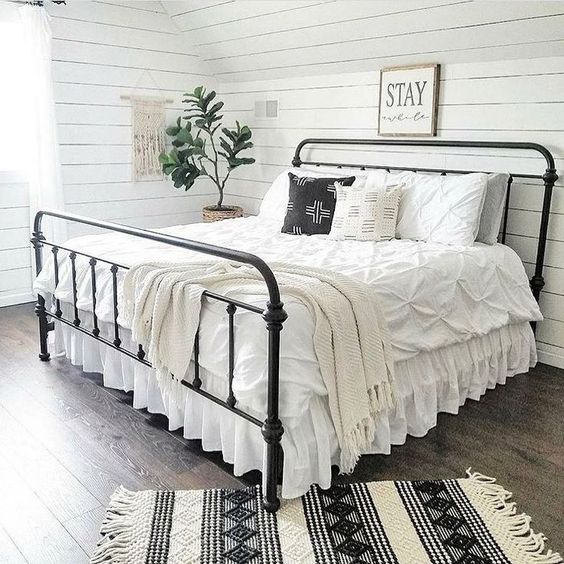
The vision for the bedrooms. We will be sealing, and insulating all of the bedroom walls, and bringing them up to full ceiling height. Sorry, Nana, there will be no spot for nick-nacks! We will also be finishing the walls with tongue and groove pine that has been whitewashed. The vision for the bedrooms is an Air B&B look with beautiful light-colored bedding, and vintage quilts.
Did I mention that this cottage is HUGE..? As we toured it that day, it just seemed to go on and on. One of the strangest rooms was a long 8 ft x 27-foot space that had been covered in OSB board and varnished. This space as far as we can tell was originally bedrooms. We will be converting it back into one bedroom and a den. The den will retain the OSB board and be done up with a vintage fishing theme. The other room will need to be re-boarded with beadboard walls and ceiling. It's impossible to show the whole 27 feet, but these photos show two views of the room.
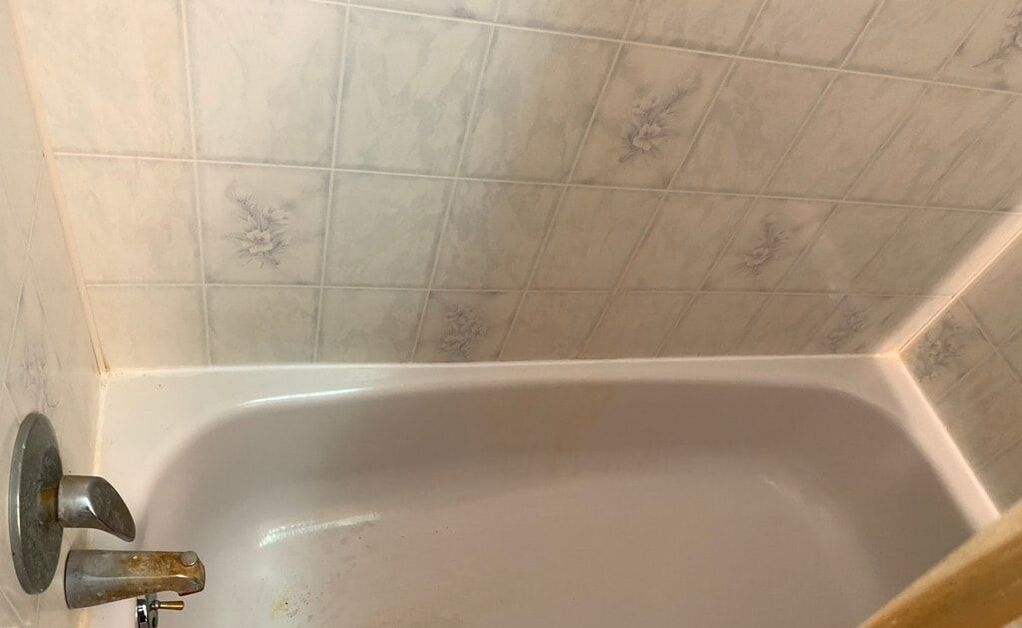
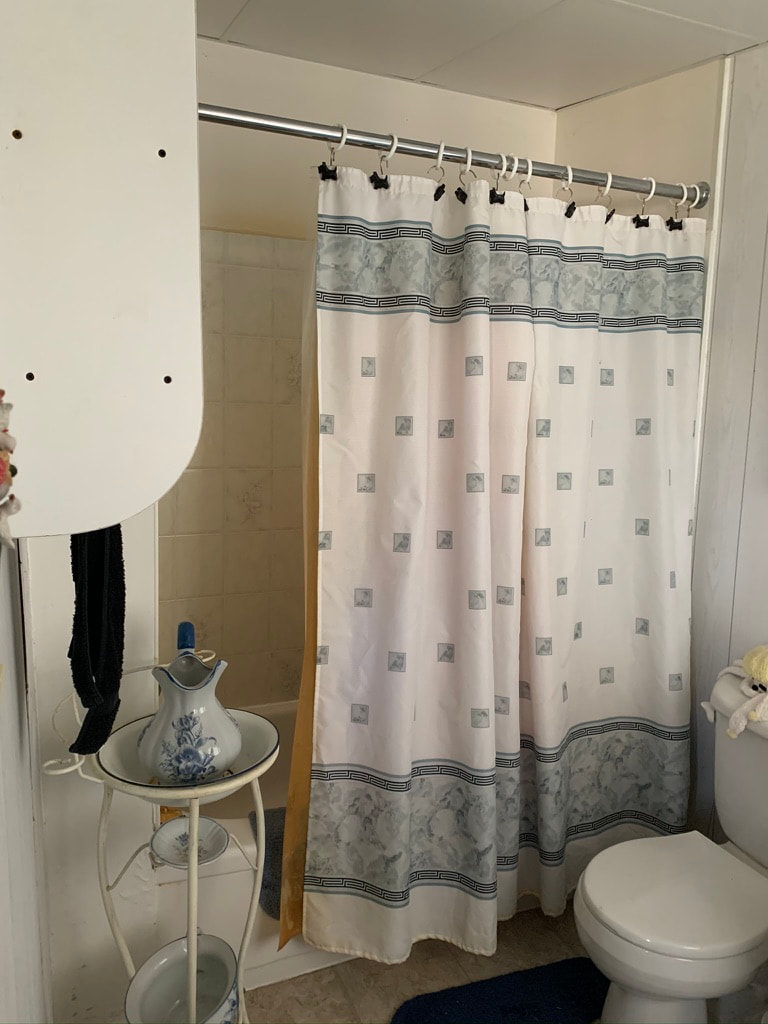
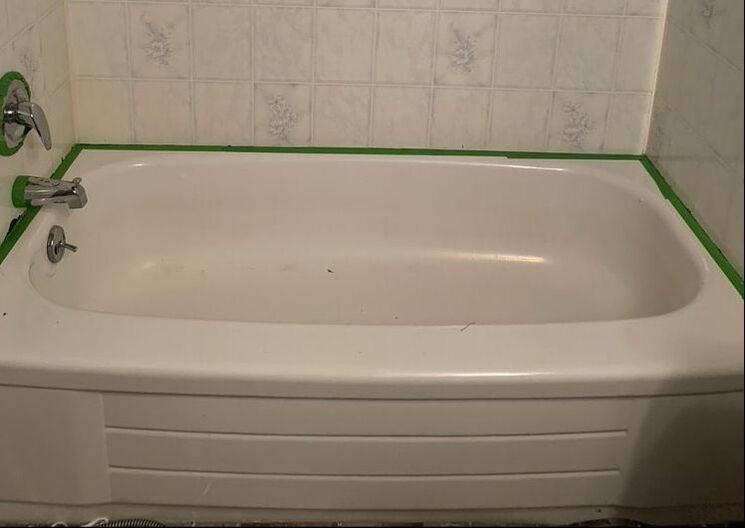
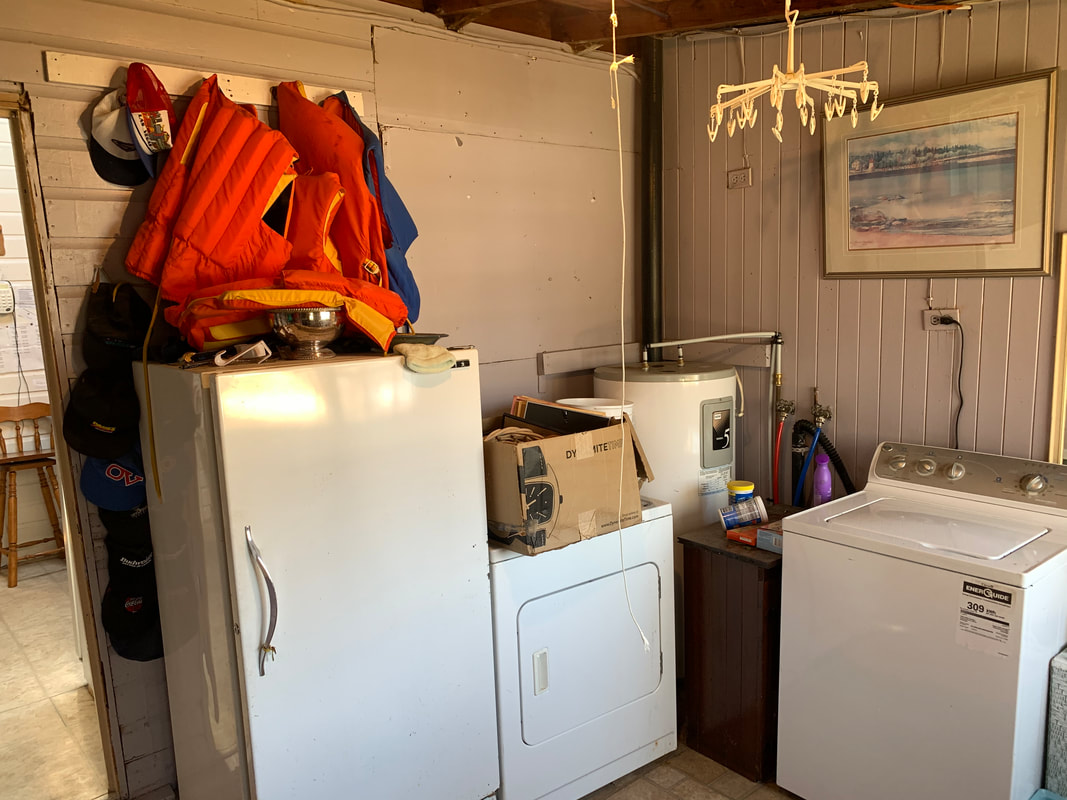
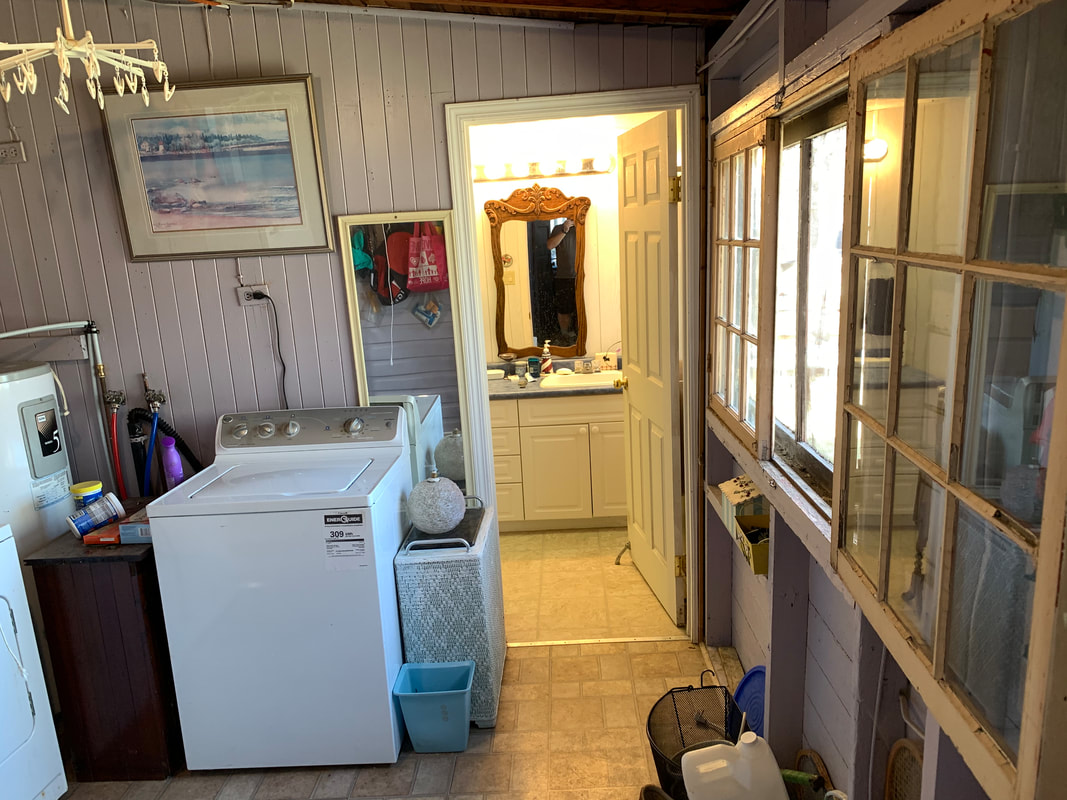
The final room I will show you is the bathroom, which runs off of a large mudroom with laundry facilities. The bathroom was actually "ok". It will only get a cosmetic overhaul, as we will be adding in a second bathroom with a vintage clawfoot tub in one of the old bedrooms.
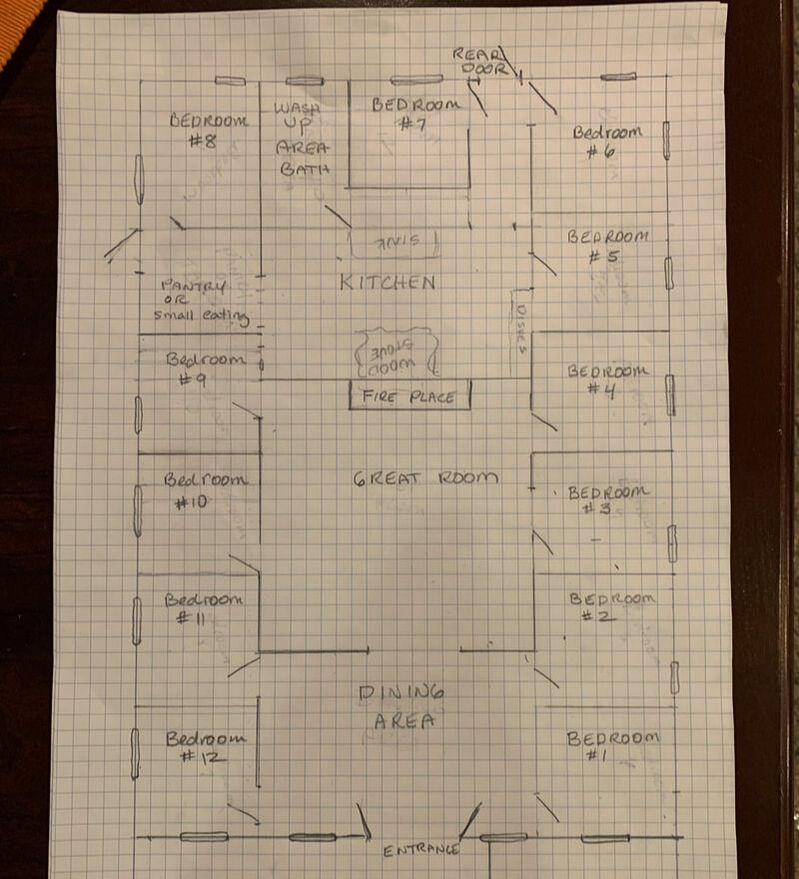
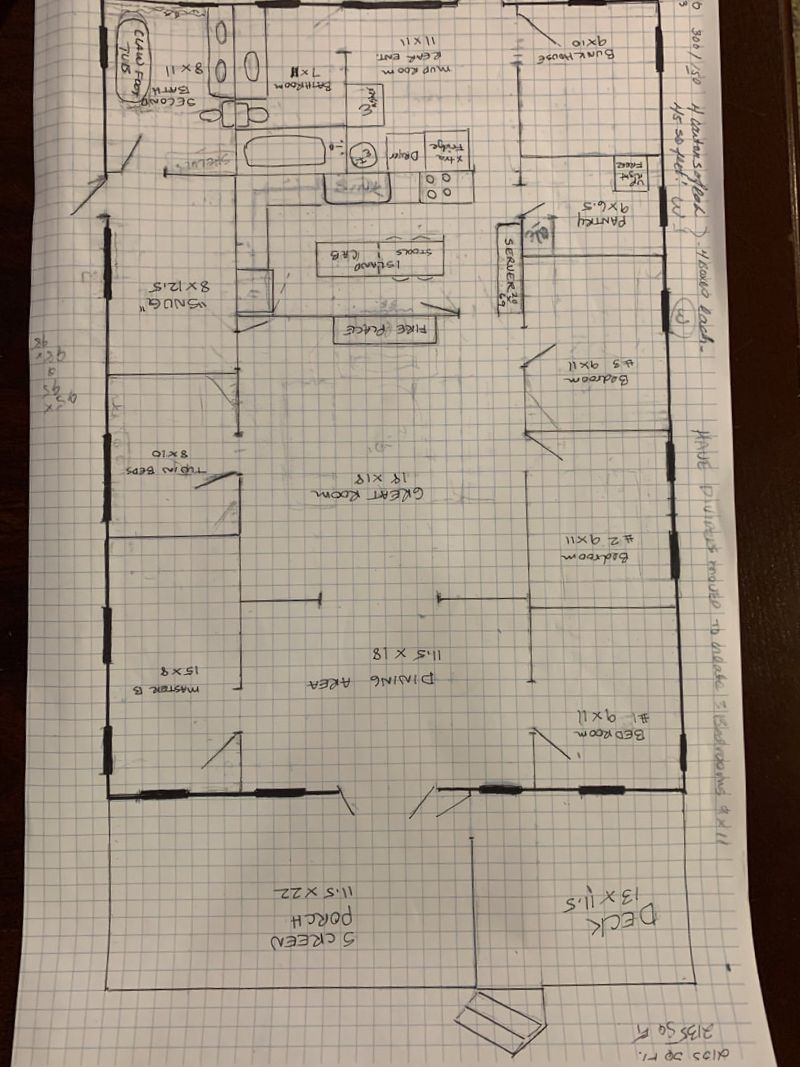
So that's the tour of our beach house project. Banchory Lodge 2.0. We are planning on a 2-3 year renovation including the exterior of the cottage and I will be updating my progress here. The last two photos I have posted here is a pencil sketch floor plan of how the cottage was laid out in 1910 when it was built, and how we plan to lay it out during our renovation. I do have some interior design software that will print out a floor plan, but there is something about a piece of graph paper and a pencil that is much more satisfying when designing a home.
In my next post, I will show you the one room that we have already completed!
Now in my 50's as I write this, it is obvious to me, that I wasn't so much trying to break into the cottage, as I was trying to find my way back to something very special which my family had for generations held onto, which was in essence, a way of life. A way of life which reached out and said: "come on in, your welcome at the party and there is always room for one more around the table."
Just a normal part of Irish hospitality. After all you need to whet your whistle if your going to sit a while and tell some stories.
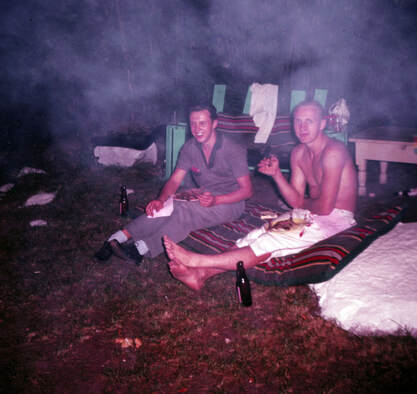
It was a carefree place, full of food, fun, drinks, and stories, and probably a bit too much of all of those were consumed every weekend from the first time my grandparents were in residence.
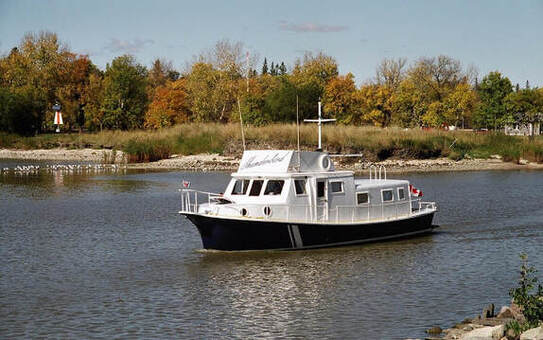
Of course, under this tough exterior was a man with a very caring heart, and so, by the time my own children knew him as grandpa, he had mellowed to the point where he was utterly idolized and adored by them, and seen by all as Captain Dan, fixer of any problem, driver of large fire trucks and huge boats and softy towards all pets and children. My parents by then owned a large 46' trawler called the Thunderbird that had in some ways acted as a substitute for Banchory Lodge for them. (As I said, my dad loved anything BIG). It was large enough to take out a party of people on the lake for the afternoon, and my mother's "room for one more" attitude, had many people spend a night onboard.
So I put the thought behind me, and if fate had not intervened that would have been the end of it. After all, it wasn't like I could move Banchory Lodge across the lake. However as is the case with most wonderful things that happen in life, there is nothing you can do to purposely make them happen, but if you simply let go, and trust in the ways of God and the universe, the most amazing things do come about, and right at the perfect time that they are needed.
Brenda went on to share that her Grandparents had had a lakefront cottage similar in some ways to the one I grew up at in Grand Beach, and she began to tell me of all the fond memories from her childhood there. She went on to say that her grandparent's cottage had been torn down, but they were on the search for a 4 season cottage that could eventually be a retirement home for them and a place to visit with their American grandchildren. Brenda concluded her story with... "Oh, and there was this one cottage, that was totally vintage" and she went on to describe a cottage that sounded so similar to Banchory Lodge, that I was pulled down memory lane with everything she said. "It's over a hundred years old, and it's right near the lake, and it's never been remodeled, and Wendy I couldn't help but think of you and Murray and how good you are at renovating." and we all laughed..... And two days later, we bought that cottage! Thanks for reading. This blog will be a place where I will chronicle the physical restoration of our 110-year-old Cottage which after consultation with my mom, and permission from my aunty Lorna will be re-named "Banchory Lodge" in honor of our family legacy, and in search of the special magic that the Mailey's knew how to create. We want of course to hand that legacy down to our children and grandchildren, but we also want to let them the hear story of where that legacy came from. So each of my posts will talk about the past and the present. I want to share some of the family and friends stories and memories from the Banchory Lodge and also invite you to watch the complete restoration of a 110-year-old original lake house, as we work our special kind of renovation love and style into its future as Banchory Lodge 2.0 So if you are reading this, and you have a memory, a photo, or any other record you can share with me about the original Banchory Lodge in Grand Beach, I would love for you to share your thoughts in the comments, or send me your photos and memories to: [email protected] Watch for my next blog post where I will share photos and details of the "new" Banchory Lodge as we found it on the day we purchased it. |